
Are you trying to figure out how to create a WordPress member site?
会员网站允许您向用户收费以访问受限内容,从而可以使您的网站收入飙升。换句话说,您可以轻松地将社区货币化,并向您的社区销售产品、课程和商品。您甚至可以通过创建网站会员资格来销售对特定内容或您时间的独家访问权。
But how you do it?
In this article, we’ll show you exactly how to easily create a WordPress member site with no code.
听起来不错?让我们开始吧。
Why Should You Create a WordPress Member Site?
A WordPress member site is a website that requires visitors to log in or sign up in order to access certain pages, posts, or features. This makes it a great option for businesses, organizations, or individuals who want to keep certain information or content private and only available to members.
那么,您为什么要创建 WordPress 会员网站?嗯,这里有几个好理由:
- Protect sensitive information: If you have information that you don’t want just anyone to see, a WordPress member site can keep that information secure. Only the people who have signed up and logged in will be able to access it.
- 建立社区:通过拥有会员网站,您可以为会员之间建立社区感。他们将能够相互联系并分享信息或想法。
- Offer exclusive content: By having a member site, you can offer exclusive content or resources that are only available to members. This could be anything from premium blog posts, special discounts, or early access to new products.
- Charge for access: If you have valuable information or resources, you can charge people a membership fee to access them. This can be a great way to generate income for your business or organization.
- Easy management options: WordPress makes it easy to manage your member site. You can add and remove members, control who can see what content, and even send out emails to all of your members with just a few clicks.
So, those are just a few reasons why you might want to create a WordPress member site.
Whether you’re looking to protect sensitive information, build a community, offer exclusive content, generate income, or just make your website easier to manage, a WordPress member site can help you get it done!
How to Build a WordPress Member Site
The good news is that building a WordPress member site is pretty easy even without any coding. All you need is a WordPress membership plugin to import powerful features to your site directly. We’ll talk about this in more detail soon. But for now, let’s take it step by step.
Step #1: Get Powerful Hosting for Your WordPress Member Site
Before you start building a WordPress member site, you need a reliable WordPress hosting service. We recommend using Bluehost to create your WordPress site.
Bluehost 是最受欢迎的 WordPress 网站托管服务之一。它被 WordPress 和 WooCommerce 正式推荐为 WordPress 托管服务。最棒的是,您可以使用共享主机来运行 WordPress 网站,而且价格非常实惠。
随着您的网站规模的增长,您也可以随着时间的推移升级到更高的套餐以适应您的发展。是的,您的 Bluehost 托管套餐包含一年的 SSL 证书和域名。
您不必担心由于流量激增而导致网站运行缓慢。Bluehost 的任何 WordPress 托管套餐都附带一个惊人的 WordPress 一键安装功能。
如果您以前从未构建过 WordPress 网站,请查看本教程 如何从头开始构建 WordPress 网站。
同样,请记住这只是设置您网站的成本。您需要花费更多资金来使用主题和插件扩展您商店的功能。
最重要的是,价格仅从每月 2.75 美元起。
- 速度:689 毫秒
- 正常运行时间:99.99%
- 客户支持:4/5
Step #2: Install a WordPress Membership Plugin
WordPress membership plugins convert a regular WordPress site into a member site just by clicking a few buttons. You don’t have to code anything into your site. So, they will reduce the time it takes to launch your members-only site.
更不用说,您还可以获得插件开发者提供的所有支持。简单来说,您不需要开发团队来为您维护网站。
We recommend using MemberPress to create your WordPress member site.
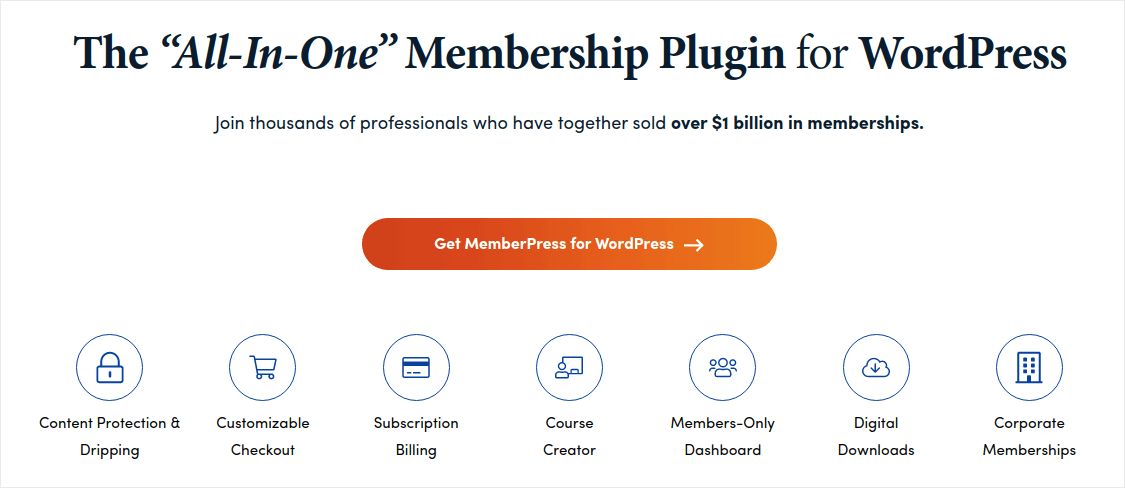
MemberPress 是最易于使用的 WordPress 会员网站插件之一。它还附带了一整套强大的功能,可帮助您发展和变现您的会员社区。
入门所需做的就是:
- 安装插件
- 配置您的支付网关
- 创建不同的会员级别
- 为每个会员级别添加特权
- 添加一些产品
然后您就可以开始使用了!之后,只需邀请人们加入您的会员计划即可。
您还可以根据您的会员级别限制对不同页面、帖子类型、标签和类别的访问。最棒的是,您还可以获得一个课程构建器。因此,如果您想为会员创建课程,您无需安装任何其他插件即可完成。
Step #3: Configure MemberPress on Your Site
设置 MemberPress 非常简单。如果您以前从未使用过 WordPress 插件,请查看此有关如何安装 WordPress 插件的教程。安装完插件后,请转到您的 WordPress 管理仪表板,然后依次转到 MemberPress » Settings。

这将带您进入 License 设置页面,您可以在其中输入您的 MemberPress 许可证密钥。
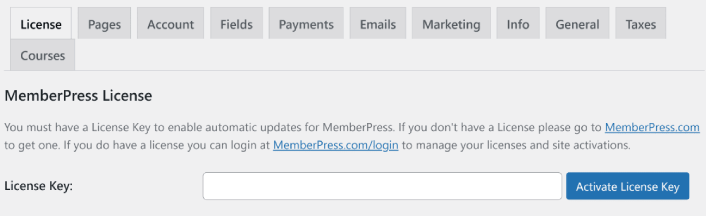
Paste in your license key and hit the Activate License Key button. You will now get full access to all MemberPress features.
Step #4: Set Up Payment Methods for Your WordPress Member Site
要使任何会员网站正常运行,您都需要接受和处理付款,以便允许访问您的优质内容。因此,接下来我们将为您的订阅者设置付款选项。
要添加付款方式,请访问 MemberPress 的 Settings 页面。点击 Payments 选项卡,然后点击 Add Payment Method。
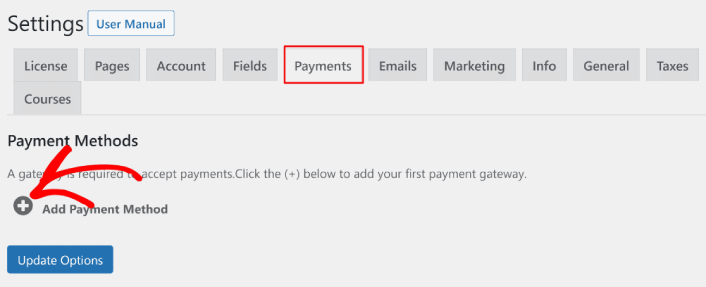
MemberPress 允许您使用 Stripe、PayPal 和 Authorize.net 接受付款。我们建议使用 WP Simple Pay 在您的网站上接受 Stripe 付款。
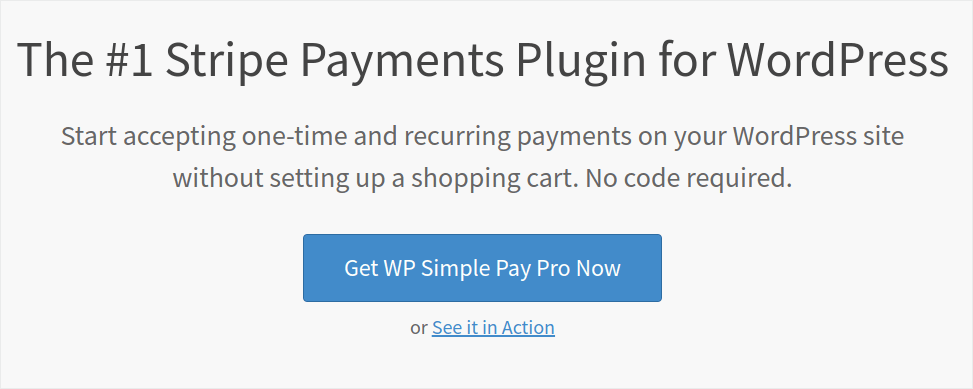
WP Simple Pay is exactly what it sounds like. It makes online payments simple on your WordPress site. It’s easy to use, highly reliable, and requires zero coding to set up.
最棒的是什么?WP Simple Pay 帮助您专注于创建和销售产品,而无需担心接受来自世界各地的付款。
所有客户和付款信息都存储在您的 Stripe 帐户中,而不是存储在您的 WordPress 网站上。因此,该插件不会像其他替代方案那样使您的网站臃肿。WP Simple Pay 提供了一种最简单的方法,可以在您的 WordPress 网站上添加 Stripe 付款。
If you’re not sure if it’s the right Stripe plugin for you, check out our review of WP Simple Pay.
Step #5: Create Membership Levels
在您的网站上设置好支付网关后,请继续为您的会员创建会员级别。如果您是主播,或者您以前在 Twitch 或 YouTube 上看过直播主播,您可能知道 Patreon 和 YouTube 会员资格是如何运作的。
You need to create varying levels or tiers of membership at different price points. Each level should have different perks for your members. If you’re a Twitch or YouTube streamer, then creating a WordPress member site is way better than Patreon or YouTube memberships because you get more control over your content and earnings.
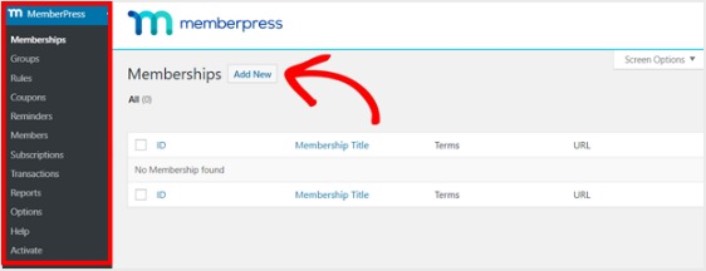
转到 MemberPress » Memberships,然后点击 Add New 来创建您的会员级别。
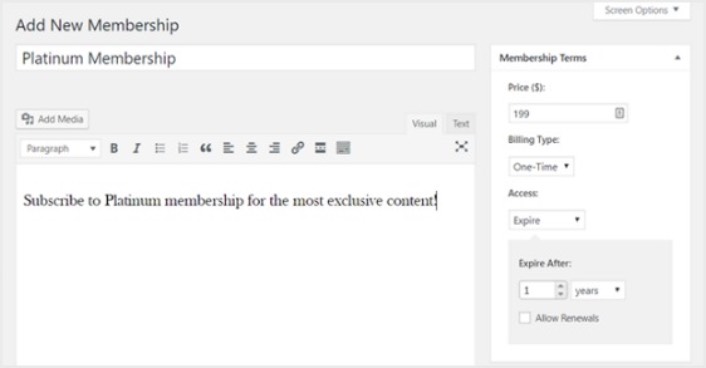
接下来,在编辑器中为您的会员级别输入标题和描述。然后,在右侧的“会员条款”部分设置价格、账单类型和访问时间。
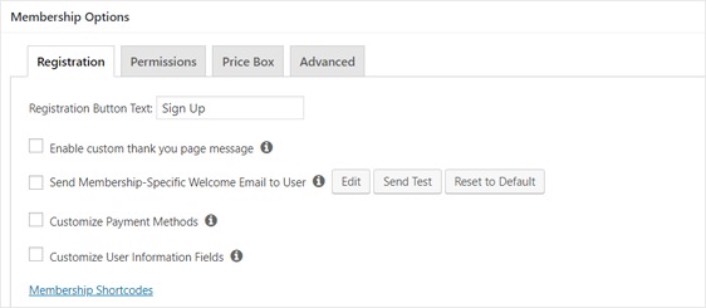
之后,您需要向下滚动到“会员选项”部分,以按您想要的方式自定义它。别忘了点击其他选项卡来配置“权限”和“价格框”。
然后,只需发布您的会员级别。
Step #6: Set Membership Access Levels
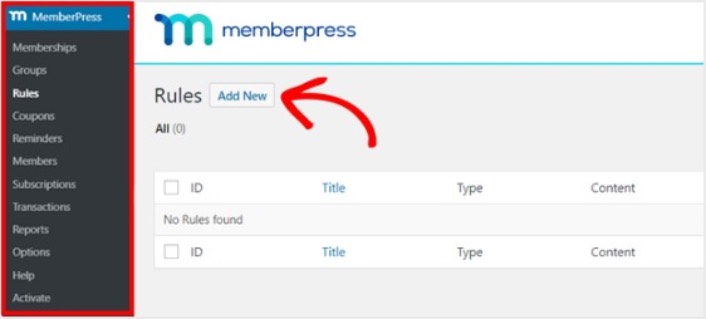
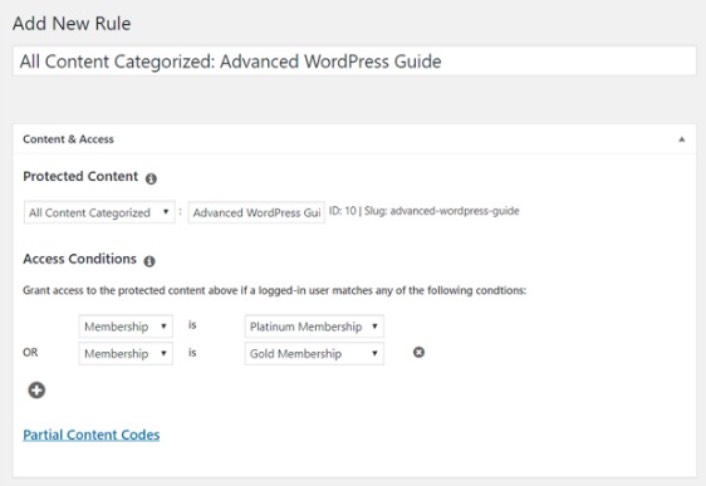
如果您有多个会员级别,并非所有会员都应获得访问所有内容的权限。因此,您需要限制对您会员网站的访问。转到 MemberPress » Rules 并点击 Add New。
You can select all the content under a specific category be accessible only by users with the 2 most expensive membership plans. In this example, we selected the Advanced WordPress Guide category.
接下来转到“Drip/Expiration”设置。

如果您选择启用“Drip”选项,这将允许您逐步发布内容。“Expiration”选项允许您选择内容不再可用的时间。
Step #7: Create Members Only Content
接下来,您需要上传付费会员的内容。您还需要根据会员级别限制对其的访问。您可以通过帖子或页面添加内容。因此,在此示例中,我们将创建内容以链接到我们在上一步中创建的访问规则。
创建一个新帖子,并添加您想要的内容。接下来,选择“Advanced WordPress Guide”类别。

接下来,向下滚动到“MemberPress Unauthorized Access”部分。
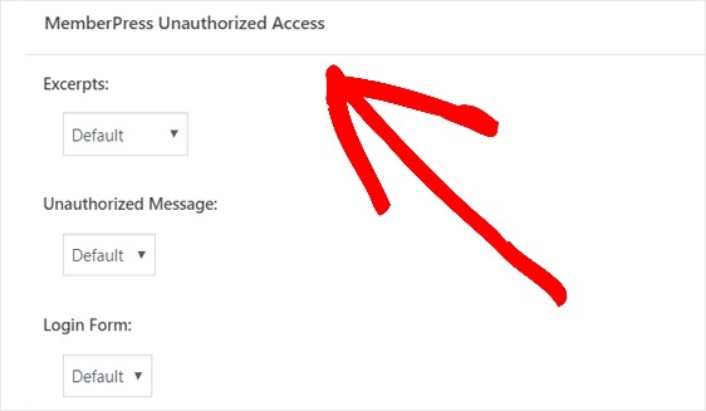
在这里,您可以设置非会员可以看到多少仅限会员的内容。当一切都按照您想要的方式配置好后,发布您的页面。然后,您可以转到 Posts » All Posts 查看哪些内容仅限于某些会员级别访问。

You can even create full-blown online courses using MemberPress.
Step #8: Create a Pricing Page
我们几乎完成了。现在,您已经为每个级别设置了会员级别和高级内容。接下来,您需要为您的会员创建定价页面。
转到“MemberPress » Groups”,然后点击“Add New”按钮。
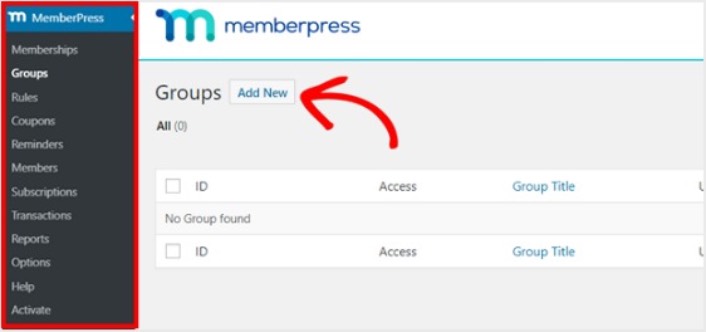
Name your group something like ‘Pricing Plans’ so people know what the page is about. After that, scroll down to the Group Options section. Here, you can add the memberships you want to show on your pricing page.
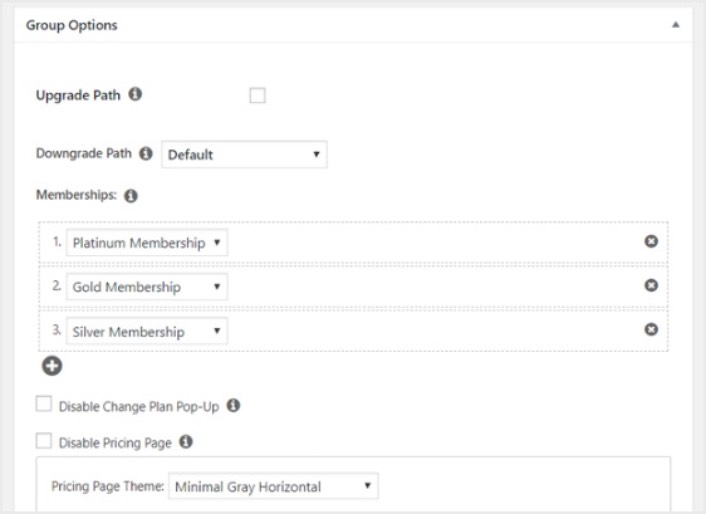
Pro Tip: You can also change the pricing page theme on this page.
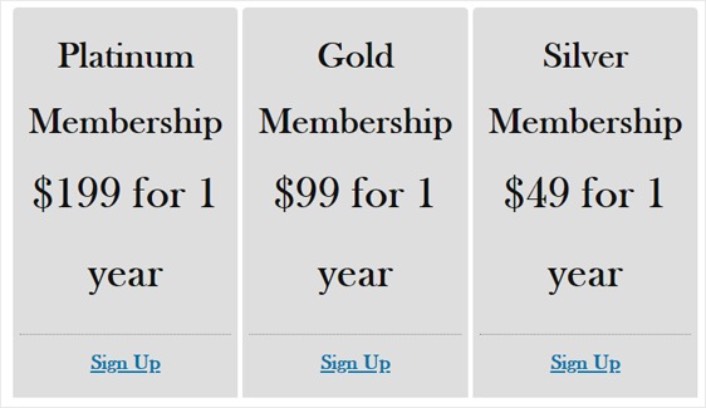
准备好后发布此页面,并预览以进行检查。如果您按照所有步骤操作,它应该看起来像这样:
现在,您需要确保您的 WordPress 会员网站将未经授权的用户重定向到定价页面。复制您的定价页面的 URL,然后转到 MemberPress » Options 并向下滚动到 Unauthorized Access 部分。
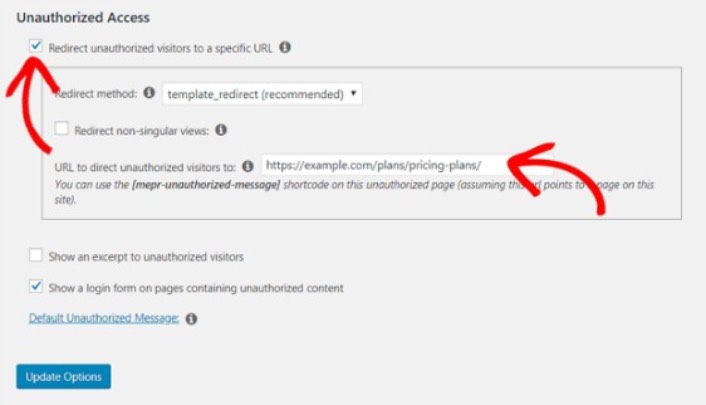
勾选 Redirect unauthorized visitors to a specific URL 旁边的框,然后粘贴您的定价页面的 URL。最后,点击 Update Options 保存您的更改。
Step #9: Create a Login and Signup Form
您需要为注册用户提供一种登录和访问其内容的方式。您还需要创建一个表单来接受新会员。
最简单的方法是使用 MemberPress 登录小部件。MemberPress 已经有一个登录和注册表单模块,您可以直接导入,无需任何自定义编码。
在您的 WordPress 管理仪表板中转到 Appearance » Widgets ,然后将 MemberPress 登录小部件拖到您网站上的一个小部件就绪区域。
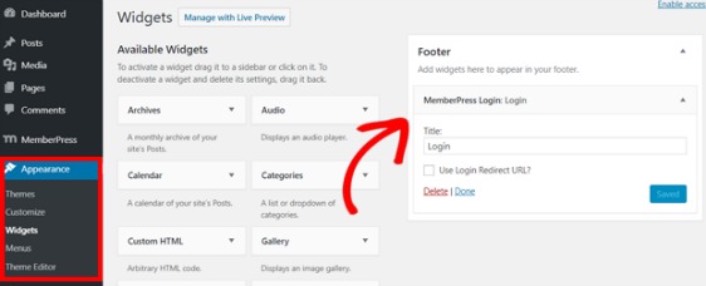
示例显示将其添加到页脚。但如果喜欢,也可以将其添加到侧边栏。
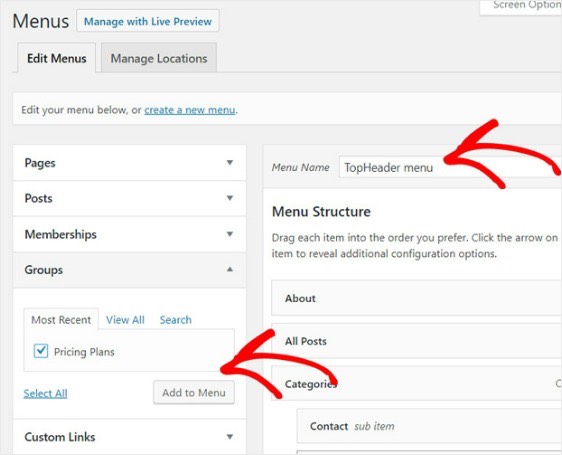
最后,您需要通过将其添加到网站导航菜单来宣传您的定价计划页面。转到外观 » 菜单 并创建一个新菜单或选择一个现有菜单。然后,在左侧的“组”下选择 定价计划 ,然后单击“添加到菜单”按钮。
And that’s it! You’ve successfully created your WordPress member site.
What to do After You Create a WordPress Member Site
您应该考虑在会员插件中使用推送通知。大多数会员插件都附带自动电子邮件营销活动,以吸引和保留会员。但我们建议您使用推送通知来增加会员的流量、参与度和销量,并与您的电子邮件营销活动并行。
您是否知道推送通知也附带许多自动营销活动?看看其中一些可以帮助您快速发展会员业务的活动:
如果您刚开始使用推送通知,我们建议使用 PushEngage。PushEngage 是全球排名第一的推送通知软件。因此,您的营销活动将得到妥善处理。


