Observera: Det finns ingen äldre dokumentation tillgänglig för det här objektet, så du ser den aktuella dokumentationen.
PushEngage låter dig gruppera dina app-prenumeranter i segment så att du kan rikta in dig på specifika målgrupper med relevanta meddelanden istället för att sända till alla samtidigt. Den här guiden täcker både statiska segment, där en prenumerant stannar i gruppen tills du tar bort dem, och dynamiska segment, där prenumeranten automatiskt tas bort efter ett visst antal dagar. Den inkluderar instrumentpanelsinställningar, metoder för iOS- och Android SDK samt länkar till REST API för serverhantering.
Innan du börjar
- Din app måste vara integrerad med PushEngage iOS- eller Android SDK. Om du inte har gjort det än, slutför installationen först:
- Segment måste skapas i PushEngage-instrumentpanelen innan din SDK-kod kan referera till dem. Segmentnamnet du skickar till SDK måste matcha namnet i instrumentpanelen exakt (skiftlägeskänsligt).
- Fullständiga referenser till SDK-metoder finns tillgängliga på iOS SDK-referens och Android SDK-referens.
Hur segmentering av app-pushmeddelanden fungerar
När en användare öppnar din app och din SDK-kod anropar en metod för att lägga till ett segment, registrerar PushEngage den enheten under motsvarande segment i ditt konto. Från och med då kommer alla kampanjer du riktar mot det segmentet att inkludera den prenumeranten.
Det finns två segmenttyper:
Statiska segment kvarstår tills du uttryckligen tar bort prenumeranten. Använd dessa för permanenta grupperingar som återspeglar ett fast tillstånd, till exempel en prenumerants plan, föredragen innehållskategori eller slutförd onboarding-steg.
Dynamiska segment har en tidsgräns som du definierar i dagar. PushEngage tar automatiskt bort prenumeranten från segmentet efter att den perioden har löpt ut utan någon åtgärd från din app. Använd dynamiska segment för tillfälliga tillstånd som ett nyligen genomfört köpfönster, en aktiv provperiod eller en väntetid efter bokning.
Båda typerna skapas på samma sätt i instrumentpanelen. Skillnaden ligger i SDK-metoden du anropar för att lägga till prenumeranter i dem.
Steg 1: Skapa ett segment i instrumentpanelen
Innan din SDK kan tilldela en prenumerant till ett segment måste segmentet finnas i PushEngage.
- Logga in på ditt PushEngage-konto på app.pushengage.com.
- Gå till Målgrupp » Segment.
- Klicka på Skapa ett nytt segment.
- Ange ett segmentnamn. Använd ett namn som är beskrivande och lätt att referera till i kod, till exempel "Nyligen köpta" eller "Premium-användare".
- Klicka på Spara segment.
Du behöver inte lägga till URL-mönster eller regler när du skapar segment för app-push. SDK hanterar tilldelningen programmatiskt.
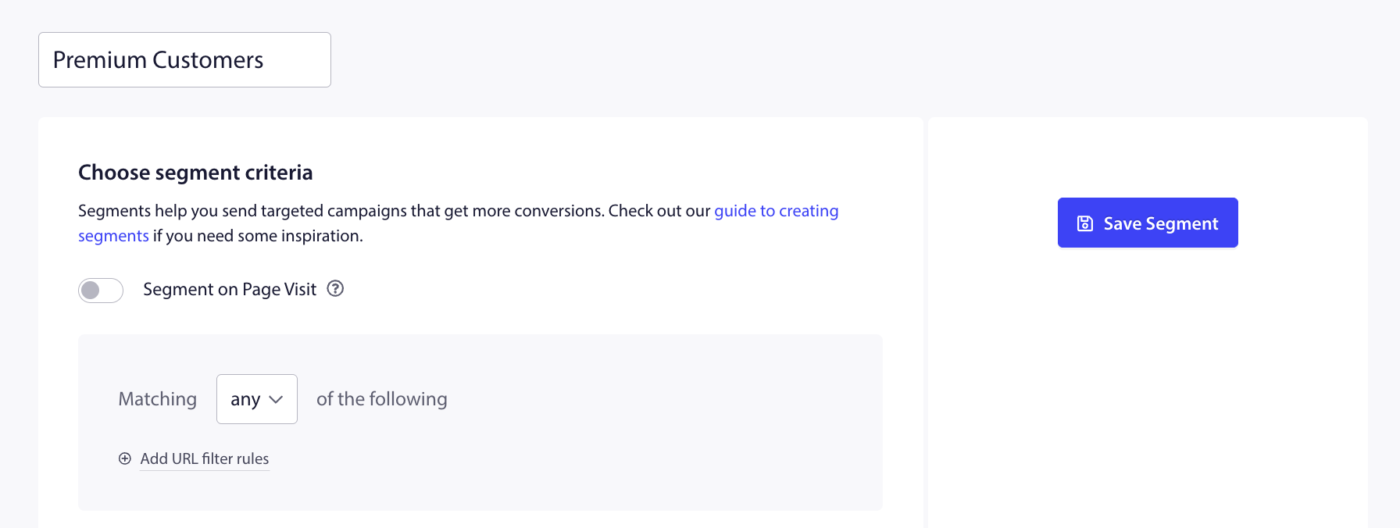
Upprepa detta steg för varje segment du vill använda.
Steg 2: Lägg till en app-prenumerant i ett segment (iOS)
Anropa segmentmetoderna varhelst det är logiskt i din apps logik, till exempel efter att ett köp har bekräftats, efter att en användare har valt ett innehållsval, eller när en specifik skärm visas.
Statiskt segment (iOS)
Använd addSegments för att permanent lägga till den aktuella prenumeranten i ett eller flera segment.
PushEngage.addSegments(["Premium Users", "US Customers"]) { response, error in
 if response {
 print("Segments added successfully.")
 } else {
 if let error = error {
 print("Failed to add segments: \(error.localizedDescription)")
 }
 }
}
För att ta bort en prenumerant från ett statiskt segment:
PushEngage.removeSegments(["US Customers"]) { response, error in
 if response {
 print("Segments removed successfully.")
 }
}
Dynamiskt segment (iOS)
Använd addDynamicSegments för att lägga till prenumeranten i ett segment under ett fast antal dagar. PushEngage tar automatiskt bort prenumeranten när tiden löper ut.
Varje post i matrisen är en dictionary med två nycklar: "name" (segmentnamnet som det visas i instrumentpanelen) och "duration" (antalet dagar prenumeranten ska behållas i det segmentet).
let dynamicSegments: [[String: Any]] = [
 ["name": "Recent Buyers", "duration": 30],
 ["name": "Trial Active", "duration": 14],
]

PushEngage.addDynamicSegments(dynamicSegments) { response, error in
 if response {
 print("Dynamic segments updated successfully.")
 } else {
 if let error = error {
 print("Failed to update dynamic segments: \(error.localizedDescription)")
 }
 }
}
Fullständiga metodsignaturer finns i iOS SDK-referensen.
Steg 3: Lägg till en app-prenumerant i ett segment (Android)
Statiskt segment (Android)
Använd addSegment för att permanent lägga till den aktuella prenumeranten i ett eller flera segment. Skicka en lista med segmentnamn som exakt matchar vad du skapade i instrumentpanelen.
Java:
List<String> segmentList = new ArrayList<>();
segmentList.add("Premium Users");

PushEngage.addSegment(segmentList, new PushEngageResponseCallback() {
 @Override
 public void onSuccess(Object responseObject) {
 // Segment added successfully
 }

 @Override
 public void onFailure(Integer errorCode, String errorMessage) {
 // Handle failure
 }
});
För att ta bort en prenumerant från ett statiskt segment:
List<String> segmentList = new ArrayList<>();
segmentList.add("Premium Users");

PushEngage.removeSegment(segmentList, new PushEngageResponseCallback() {
 @Override
 public void onSuccess(Object responseObject) {
 // Segment removed successfully
 }

 @Override
 public void onFailure(Integer errorCode, String errorMessage) {
 // Handle failure
 }
});
Dynamiskt segment (Android)
Använd addDynamicSegment för att lägga till prenumeranten i ett segment under ett visst antal dagar. Skapa ett Segment-objekt med ett namn och en varaktighet, skicka det sedan i en lista.
Java:
AddDynamicSegmentRequest addDynamicSegmentRequest = new AddDynamicSegmentRequest();
List<AddDynamicSegmentRequest.Segment> segments = new ArrayList<>();
AddDynamicSegmentRequest.Segment segment = addDynamicSegmentRequest.new Segment("Recent Buyers", 30);
segments.add(segment);

PushEngage.addDynamicSegment(segments, new PushEngageResponseCallback() {
 @Override
 public void onSuccess(Object responseObject) {
 // Dynamic segment added successfully
 }

 @Override
 public void onFailure(Integer errorCode, String errorMessage) {
 // Handle failure
 }
});
Fullständiga metodsignaturer och Kotlin-motsvarigheter finns i Android SDK-referensen.
Steg 4: Rikta ett segment i en kampanj
När prenumeranter har tilldelats segment kan du rikta dessa segment när du skapar en push-meddelandekampanj.
- Gå till Kampanj » Push-sändningar (för engångssändningar) eller öppna en utlösarkampanj som du vill konfigurera.
- Klicka på Skapa ny push-sändning eller öppna en befintlig kampanj.
- Fyll i meddelandets titel, meddelande och URL.
- I avsnittet Målgrupp, välj Skicka till ett segment.
- Välj segmentnamnet från rullgardinsmenyn.
- Slutför resten av kampanjinställningarna och schemalägg eller skicka.
Du kan också rikta flera segment samtidigt eller kombinera segmentinriktning med andra målgruppsfilter med hjälp av Målgruppsgrupper. Se dokumentationen för Målgruppsgrupper för mer information.
Steg 5: Hantera segment via REST API (valfritt)
Om din apps server hanterar prenumeranthantering kan du använda PushEngage REST API för att skapa segment och tilldela prenumeranter utan att gå via mobil-SDK:n.
REST API-segmentändpunkterna är:
| Ändpunkt | Metod | Vad det gör |
|---|---|---|
https://api.pushengage.com/apiv1/segments | POST | Skapa ett nytt segment |
https://api.pushengage.com/apiv1/segments | GET | Visa alla segment |
https://api.pushengage.com/apiv1/segments/addSegmentWithHash | POST | Lägg till en prenumerant via prenumeranthash |
https://api.pushengage.com/apiv1/profile | POST | Lägg till eller ta bort en prenumerant via profil-ID |
Alla REST API-anrop kräver din API-nyckel i rubriken Api-Key. Profil-ID är en flexibel identifierare som du tilldelar prenumeranter (till exempel en e-postadress eller användar-ID) som låter dig hantera samma prenumerant över olika enheter.
Exempel: Lägg till en prenumerant i ett segment med ett profil-ID:
curl -X POST \
 -H "Api-Key: <your_pushengage_api_key>" \
 -H "Content-Type: application/x-www-form-urlencoded" \
 -d 'segment_name=Recent+Buyers&profile_id=user123&operation=add' \
 "https://api.pushengage.com/apiv1/profile"
För att ta bort samma prenumerant från segmentet, ändra operation=add till operation=delete.
Se hela REST API Segment Reference för fullständig dokumentation.
Vanliga frågor
Vad är skillnaden mellan ett statiskt segment och ett dynamiskt segment? Ett statiskt segment behåller en prenumerant i gruppen tills du anropar en borttagningsmetod. Ett dynamiskt segment upphör automatiskt efter det antal dagar du anger när du lägger till prenumeranten. Använd statiska segment för permanenta tillstånd som kontotyp. Använd dynamiska segment för tidsbegränsade perioder som en period efter köp eller en gratis provperiod.
Behöver jag skapa ett separat segment i instrumentpanelen för dynamisk användning? Nej. Segment skapas på samma sätt i instrumentpanelen oavsett hur du lägger till prenumeranter. Skillnaden ligger bara i vilken SDK-metod du anropar: addSegments lägger till permanent, och addDynamicSegments lägger till med ett utgångsdatum.
Segmentnamnet jag skickar till SDK:n matchar inte. Vad bör jag kontrollera? Segmentnamn är skiftlägeskänsliga och måste matcha namnet i PushEngage Dashboard exakt, inklusive mellanslag och versalisering. Gå till Audience » Segments för att verifiera det exakta namnet.
Kan en prenumerant tillhöra flera segment samtidigt? Ja. Du kan lägga till en prenumerant i så många segment som du behöver. När du skickar en kampanj till ett segment, får alla prenumeranter som för närvarande är tilldelade det segmentet den.
Kan jag använda segment med Trigger Campaigns, inte bara Push Broadcasts? Ja. Segmentinriktning är tillgänglig för Push Broadcasts, Drip Autoresponders och Trigger Campaigns. Avsnittet Audience i varje kampanjtyp inkluderar alternativet att rikta in sig på segment.
Var kan jag se vilka prenumeranter som finns i ett segment? Gå till Audience » Segments i instrumentpanelen och klicka på segmentnamnet för att se prenumerantdetaljer och antal.
Om du stöter på några problem är du välkommen att kontakta oss genom att klicka här. Vårt supportteam kommer att kunna hjälpa dig.


