通知:この項目にはレガシー ドキュメントがありません。そのため、現在のドキュメントが表示されています。
iOSアプリ用のプッシュ通知をiOSアプリSDKを使用して実装できるようになりました。プッシュ通知の送信には開発者の協力が必要ですが、プッシュ通知ダッシュボードを使用してプッシュ通知を送信できるようになるまで、一度だけの統合となります。
開始する前に
- システムにXcodeがインストールされている必要があります。
- Apple Developer Portalで有効な開発者アカウントとApp IDが設定されている必要があります。
iOSアプリケーションでプッシュ通知を有効にするために、これらの手順に従います。
アプリの設定
リモート通知を有効にする
1. Xcodeプロジェクトを開き、プロジェクトナビゲーターでルートプロジェクトを選択します。メインのアプリターゲットを選択します。
2. 署名と機能に移動します。バックグラウンドモード機能が追加されていることを確認してください。追加されていない場合は、「+ 機能」ボタンをクリックして追加してください。
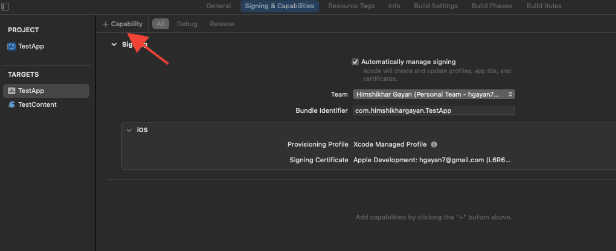
3. 同様に、プッシュ通知機能が追加されていることを確認してください。追加されていない場合は、「+ 機能」ボタンを使用して追加してください。

Xcodeでプッシュ通知機能が表示されない場合は、以下の手順に従う必要があります。
1. Apple Developerアカウントに移動します。
2. 証明書、ID、プロファイルに移動します。
3. アプリの識別子を選択します。アプリIDの設定を編集し、プッシュ通知が有効になっていることを確認してください。
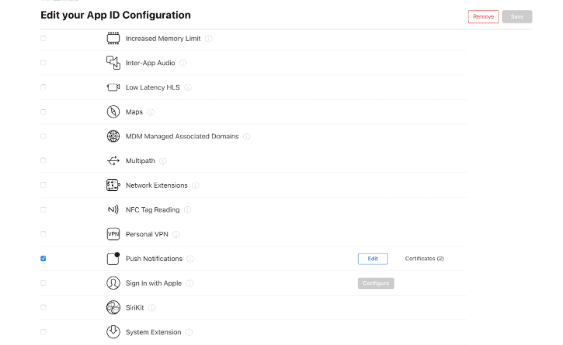
4. Xcodeに戻り、「プッシュ通知」機能を再度追加してみてください。
バックグラウンドモードを有効にする
1. Xcodeプロジェクトで、署名と機能に移動します。
2. バックグラウンドモード内で、リモート通知とバックグラウンド取得の両方を有効にします。
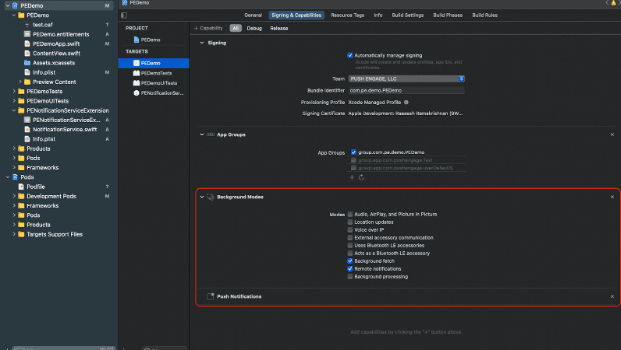
この手順により、アプリはリモート通知とバックグラウンド取得を効率的に処理できるようになります。
APNs証明書の作成方法についてはこちらをご覧ください。
PushEngage iOS SDKの統合
PushEngage iOS SDKは、SwiftパッケージおよびCocoaPodsポッドとして利用可能です。両方の方法をご確認いただくことをお勧めしますが、セットアップ完了時にはいずれか一方のみを使用してください。
SPMを使用したPushEngage iOS SDKの統合
Swift Package Managerを使用してPushEngage iOS SDKを統合するには、次の手順に従ってください。
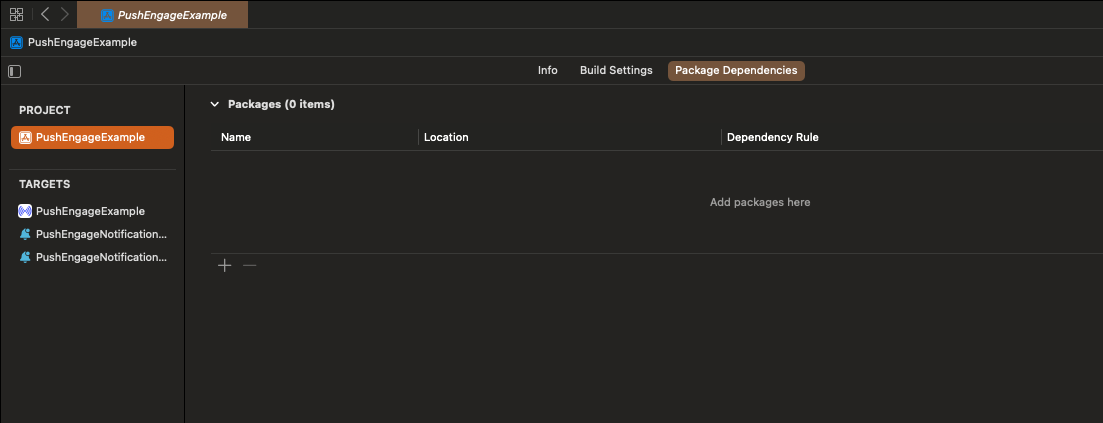
- XCodeを開き、プロジェクトに移動します。パッケージ依存関係タブを選択します。「+」ボタンをクリックします。
- URL
https://github.com/awesomemotive/pushengage-ios-sdkを検索バーに貼り付けます。「パッケージを追加」をクリックします。
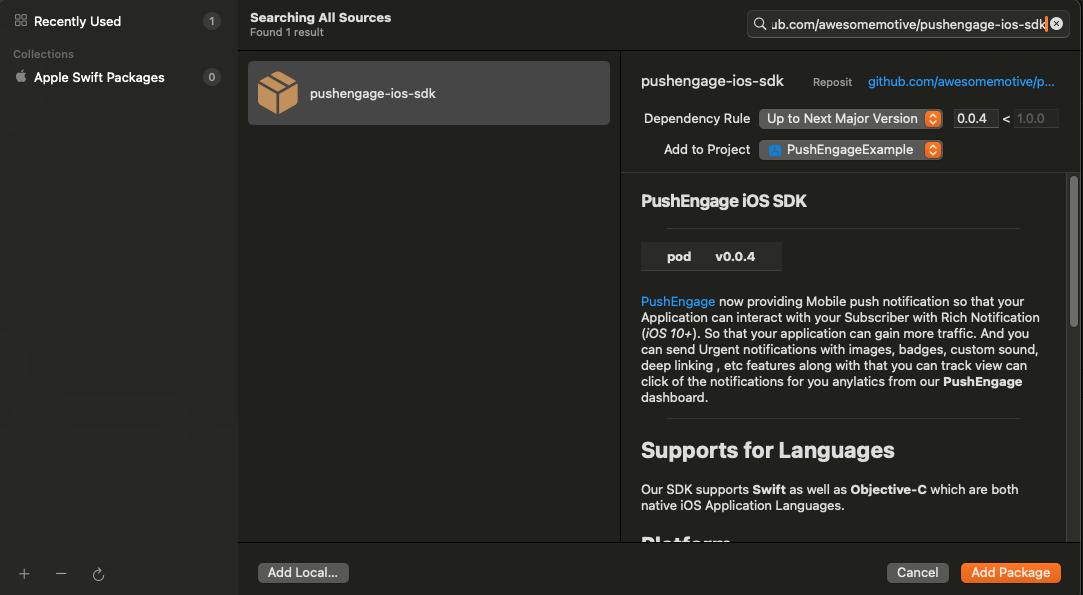
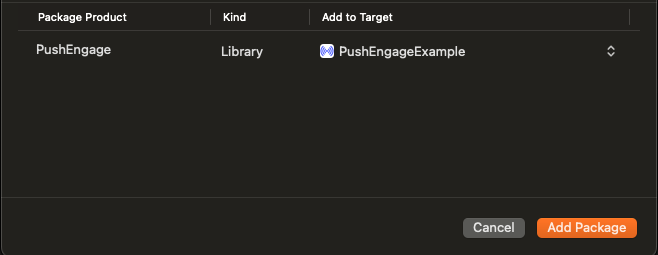
- 「ターゲットに追加」の下でメインのアプリターゲットを選択し、「パッケージを追加」をクリックします。
CocoaPodsを使用したPushEngage iOS SDKの統合
CocoaPodsを使用してPushEngage iOS SDKを統合するには、次の手順に従う必要があります。
CocoaPodsがインストールされていない場合は、現在のXcodeプロジェクトを閉じ、プロジェクトのルートディレクトリで次のコマンドを実行します。
sudo gem install cocoapods
プロジェクトにPodfileを初期化するには、次のコマンドを実行します。
pod init新しく作成されたPodfileをテキストエディタで開くか、ルートプロジェクトディレクトリのターミナルでコマンドに従って開きます。
open Podfileプロジェクトのターゲットの下にPushEngage依存関係を追加します。Podfileが以下の例と似ていることを確認してください。
# Uncomment the next line to define a global platform for your project
# platform :ios, '9.0'

target 'YourProjectName' do
  # Add PushEngage SDK dependency
  pod 'PushEngage'
  post_install do |installer|
    installer.pods_project.targets.each do |target|
      target.build_configurations.each do |config|
        config.build_settings['APPLICATION_EXTENSION_API_ONLY'] = 'NO'
      end
    end
  end
end
Podfileを保存し、ターミナルで次のコマンドを実行します。
pod repo update
pod installXcodeで新しく作成された<project-name>.xcworkspaceファイルを開きます。
PushEngage iOS SDKの初期化
SDKを統合したら、AppDelegateでiOS SDKを初期化する必要があります。
Swift言語を使用する場合、次のように実行できます。
import PushEngage
class AppDelegate: UIResponder, UIApplicationDelegate {
    var window: UIWindow?
    override init() {
        super.init()
        PushEngage.swizzleInjection(isEnabled: true)
    }

    func application(_ application: UIApplication, didFinishLaunchingWithOptions launchOptions: [UIApplication.LaunchOptionsKey: Any]?) -> Bool {
       // Set your PushEngage App ID (replace       "APP_ID_FROM_PUSH_ENGAGE_DASHBOARD" with your actual App ID)
        PushEngage.setAppId(key: "APP_ID_FROM_PUSH_ENGAGE_DASHBOARD")
        // Start PushEngage initial info
        PushEngage.setInitialInfo(for: application, with: launchOptions)
        // Enable logs for debugging (optional)
        PushEngage.enableLogs = true
        return true
    }
}
Objective-C言語を使用する場合、次のように実行できます。
#import "AppDelegate.h"
@import PushEngage;
@implementation AppDelegate

- (instancetype)init {
    self = [super init];
    if (self) {
       [PushEngage swizzleInjectionWithIsEnabled:YES];
    }
    return self;
}

- (BOOL)application:(UIApplication *)application didFinishLaunchingWithOptions:(NSDictionary *)launchOptions {
// Set your PushEngage App ID (replace "APP_ID_FROM_PUSH_ENGAGE_DASHBOARD" with your actual App ID)
    [PushEngage setAppIdWithKey:@"APP_ID_FROM_PUSH_ENGAGE_DASHBOARD"];
    // Set initial info
    [PushEngage setInitialInfoFor:application with:launchOptions];
    // Enable logs for debugging (optional)
    [PushEngage setEnableLogs:YES];
    return YES;
}

@end
SwiftUIを使用している場合、AppDelegateがデフォルトで利用できないことがあります。その場合は、メインのAppファイルでPushEngage SDKを初期化できます。SwiftUIでの例を次に示します。
import SwiftUI
import PushEngage

@main
struct PEDemoApp: App {
    @UIApplicationDelegateAdaptor(AppDelegate.self) var appDelegate
    var body: some Scene {
        WindowGroup {
            ContentView()
        }
    }
}

class AppDelegate: NSObject, UIApplicationDelegate {

    override init() {
        super.init()
        PushEngage.swizzleInjection(isEnabled: true)
    }

    func application(_ application: UIApplication, didFinishLaunchingWithOptions launchOptions: [UIApplication.LaunchOptionsKey : Any]? = nil) -> Bool {
        PushEngage.setAppId(key: "APP_ID_FROM_PUSH_ENGAGE_DASHBOARD")
        PushEngage.setIntialInfo(for: application,
                                             with: launchOptions)

        PushEngage.enableLogs = true
        return true
    }
}
注意: アプリケーションを開発している間、デバッグ目的でPushEngage SDKからのログを有効にすると役立つ場合があります。ただし、機密情報が公開されるのを避けるために、本番ビルドではログを無効にすることが不可欠です。
通知サービス拡張機能の作成
Notification Service Extensionは、iOSアプリの通知受信機能を強化します。これは、通知を受信したときに通知の内容を変更したり、データを取得/処理したりするために使用されます。Notification Service Extensionを作成するには、以下の手順に従ってください。
1. Xcodeを開き、プロジェクトに移動します。メニューからFile » New » Targetを選択します。
2. テンプレート選択ウィンドウで、Notification Service Extensionを選択し、Nextをクリックします。
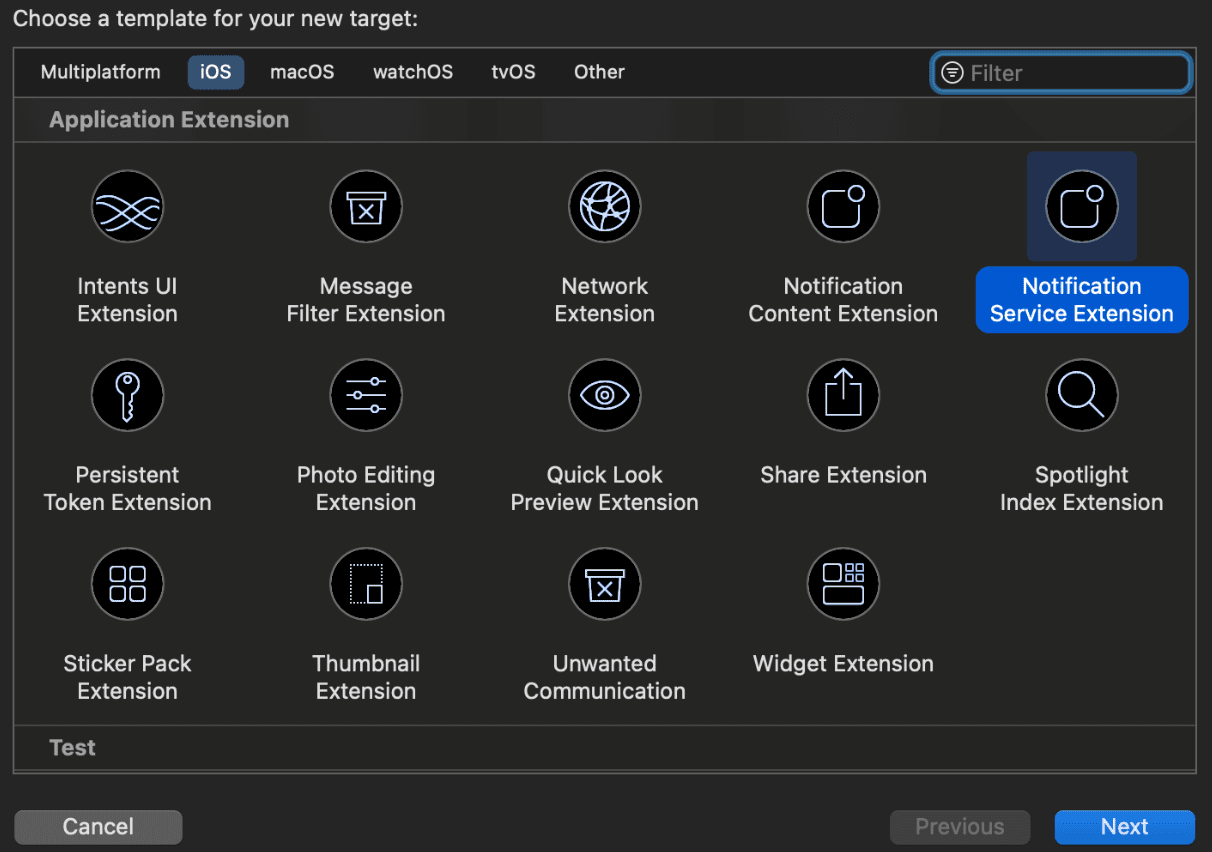
3. 拡張機能の名前(例:PushEngageNotificationServiceExtension)を入力し、Finishをクリックします。
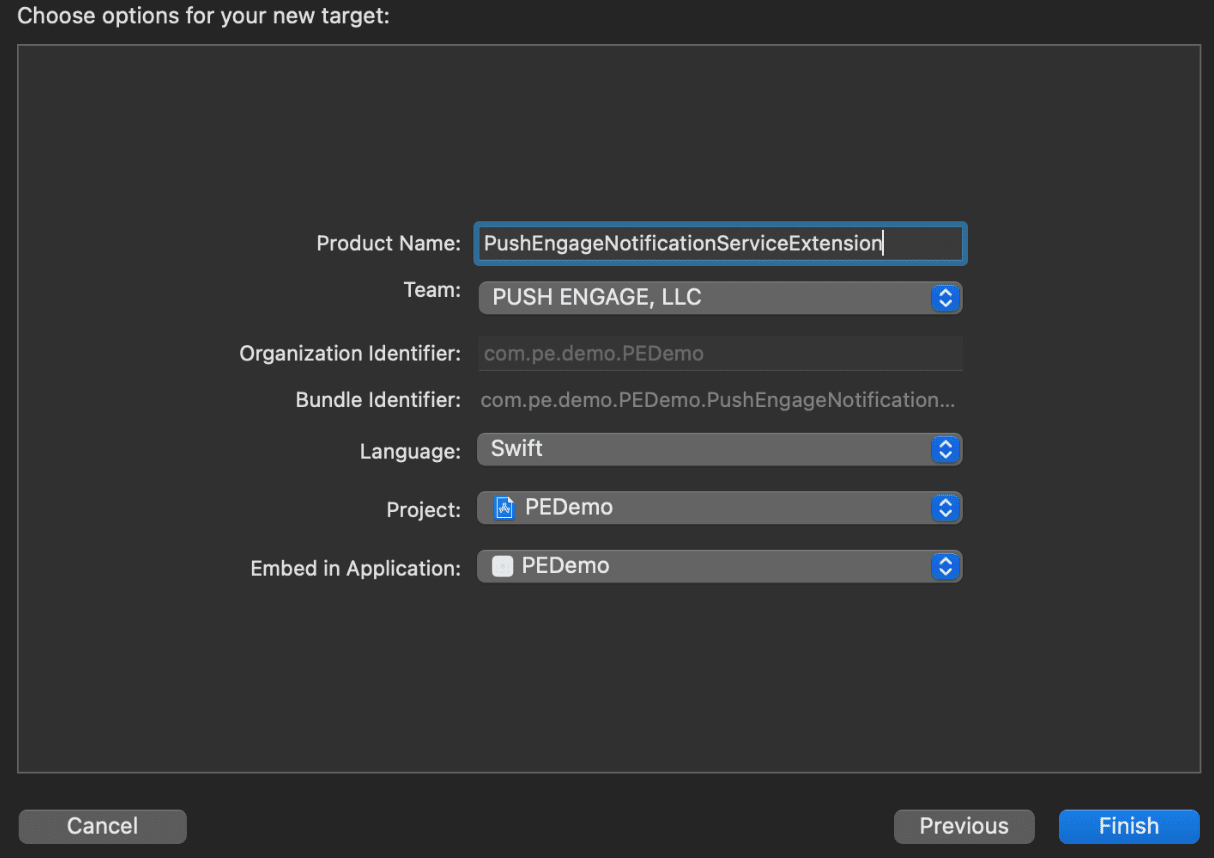
4. Notification Service Extensionの作成が完了したら、アクティブ化を求められる場合があります。すぐにアクティブ化しないでください。
拡張機能をアクティブ化すると、Xcodeのデバッグフォーカスがアプリから拡張機能に切り替わります。誤ってアクティブ化した場合は、心配しないでください。Xcode内でアプリのデバッグに切り替えることができます。
Notification Service ExtensionのPushEngage SDKの初期化
iOS Notification Service ExtensionでPushEngage SDKが正しく機能するようにするには、次の手順に従う必要があります。
1. プロジェクトに関連付けられたPodfileを開きます。
2. 次に依存関係を追加する必要があります。次のコードスニペットをPodfileに挿入します。
target 'Your_Main_Application_Target' do
      pod 'PushEngage'
      post_install do |installer|
          installer.pods_project.targets.each do |target|
            target.build_configurations.each do |config|
              config.build_settings['APPLICATION_EXTENSION_API_ONLY'] = 'NO'
          end
        end
      end

      target 'Your_Notification_Service_Extension_Target' do
              pod 'PushEngage'
      end
end
3. プロジェクトのルートディレクトリ内のターミナルで次のコマンドを実行します。
pod repo update
pod install
4. Notification Service Extensionターゲットで、PushEngageフレームワークをインポートし、必要な初期化コードを追加します。次のように実行します。
Swiftを使用
import UserNotifications
import PushEngage

@available(iOSApplicationExtension 10.0, *)
class PushEngageNotificationServiceExtension: UNNotificationServiceExtension {

    var contentHandler: ((UNNotificationContent) -> Void)?
    var bestAttemptContent: UNMutableNotificationContent?
    var request : UNNotificationRequest?

    override func didReceive(_ request: UNNotificationRequest, withContentHandler contentHandler: @escaping (UNNotificationContent) -> Void) {
        self.request = request
        self.contentHandler = contentHandler
        self.bestAttemptContent = (request.content.mutableCopy() as? UNMutableNotificationContent)

        if let bestContent = bestAttemptContent {
            PushEngage.didReceiveNotificationExtensionRequest(request, bestContentHandler: bestContent)
            contentHandler(bestContent)
        }
    }

    override func serviceExtensionTimeWillExpire() {
        // Called just before the extension will be terminated by the system.
        // Use this as an opportunity to deliver your "best attempt" at modified content, otherwise the original push payload will be used.
        if let contentHandler = contentHandler, let request = request ,let bestAttemptContent =  bestAttemptContent {
            guard let content = PushEngage.serviceExtensionTimeWillExpire(request, content: bestAttemptContent) else {
                contentHandler(bestAttemptContent)
                return
            }
            contentHandler(content)
        }
    }

}
Objective-Cを使用
#import "NotificationService.h"
@import PushEngage;

@interface NotificationService ()

@property (nonatomic, strong) void (^contentHandler)(UNNotificationContent *contentToDeliver);
@property (nonatomic, strong) UNMutableNotificationContent *bestAttemptContent;
@property (nonatomic, strong) UNNotificationRequest *request;

@end

@implementation NotificationService

- (void)didReceiveNotificationRequest:(UNNotificationRequest *)request withContentHandler:(void (^)(UNNotificationContent * _Nonnull))contentHandler {
    self.request = request;
    self.contentHandler = contentHandler;
    self.bestAttemptContent = [request.content mutableCopy];

    if (self.bestAttemptContent) {
        [PushEngage didReceiveNotificationExtensionRequest:request bestContentHandler:self.bestAttemptContent];
        contentHandler(self.bestAttemptContent);
    }
}

- (void)serviceExtensionTimeWillExpire {

    if (self.contentHandler && self.request && self.bestAttemptContent) {
        UNNotificationContent *content = [PushEngage serviceExtensionTimeWillExpire:self.request content:self.bestAttemptContent];
        if (content) {
            self.contentHandler(self.bestAttemptContent);
            return;
        }
    }
    self.contentHandler(self.bestAttemptContent);
}

@end
通知コンテンツ拡張機能の作成
カスタムUIを追加して表示方法を改善するには、通知コンテンツ拡張機能を作成する必要があります。拡張機能を設定するには、以下の手順に従ってください:
1. Xcodeで、ファイル » 新規 » ターゲット に移動します。
2. 「通知コンテンツ拡張機能」を選択し、「次へ」をクリックします。
3. Finishをクリックした後に表示されるダイアログで「Activate」を選択しないでください。キャンセルすると、Xcodeは拡張機能ではなくアプリのデバッグを続行します。誤ってアクティベートした場合は、Xcode内でアプリのデバッグに切り替えてください(実行ボタンの隣)。
4. プロジェクトナビゲーターで、最上位のプロジェクトディレクトリを選択し、ステップ2で作成したターゲットリストからプロジェクト内のNotificationContentExtensionターゲットを選択します。
5. Deployment TargetをiOS 10以上に設定します。これは、Appleがこの拡張機能のサポートをリリースしたiOSのバージョンです。
Notification Content ExtensionのPushEngage SDKの初期化
PushEngage SDK が iOS 通知コンテンツ拡張機能で正しく機能するようにするには、次の手順に従う必要があります。
1. プロジェクトに関連付けられたPodfileを開きます。
2. 依存関係を追加し、次のコードスニペットを Podfile に挿入します。
target 'Your_Main_Application_Target' do
  pod 'PushEngage'
  target 'Your_Notification_Content_Extension' do
    pod 'PushEngage'
  end
end
3. プロジェクトのルートディレクトリ内のターミナルで次のコマンドを実行します。
pod repo update

pod install
4. 通知コンテンツ拡張機能ターゲットで、PushEngage フレームワークをインポートし、必要な初期化コードを追加します。UI 要素の例をいくつか示します。
Swiftを使用
import UIKit
import UserNotifications
import UserNotificationsUI
import PushEngage

@available(iOSApplicationExtension 10.0, *)
class NotificationViewController: UIViewController, UNNotificationContentExtension {

    fileprivate var hostingView: UIHostingController<ContentView>?

    override func viewDidLoad() {
        super.viewDidLoad()
        self.view.backgroundColor = .white
    }

    func didReceive(_ notification: UNNotification) {
        if(notification.request.content.categoryIdentifier == "your_identifier"){
            let payLoad = PushEngage.getCustomUIPayLoad(for: notification.request)
  //pass the payload to your custom View
            let view = CustomView(payLoadInfo: payLoad)
            hostingView = UIHostingController(rootView: view)
If let customView = self.hostingView {
            addChild(hostingView!)
}
        }
    }

}
Objective-C:
#import "NotificationViewController.h"
#import <UserNotifications/UserNotifications.h>
#import <UserNotificationsUI/UserNotificationsUI.h>

@import PushEngage;
@import UIKit;

@interface NotificationViewController () <UNNotificationContentExtension>

@property IBOutlet UILabel *label;
@property (weak, nonatomic) IBOutlet UIImageView *imageView;
@property (weak, nonatomic) IBOutlet UIButton *firstButton;
@property (weak, nonatomic) IBOutlet UIButton *secondButton;

@end

@implementation NotificationViewController

- (IBAction)firstbuttonAction:(id)sender {
    // do what action you want to perform.
}

- (void)viewDidLoad {
    [super viewDidLoad];
    // Do any required interface initialization here.
}

- (void)didReceiveNotification:(UNNotification *)notification {

    NotificationViewController * __block blockSelf = self;
    CustomUIModel *object = [PushEngage getCustomUIPayLoadFor:notification.request];
    dispatch_async(dispatch_get_main_queue(), ^{
        blockSelf.label.text = object.title;
        blockSelf.imageView.image = object.image;
        [blockSelf.firstButton setTitle:object.buttons.firstObject.text forState:UIControlStateNormal];
        [blockSelf.secondButton setTitle:object.buttons.lastObject.text forState:UIControlStateNormal];
        blockSelf = NULL;
    });
}

@end
App Groupsの追加
App Groups は、メインアプリ、通知サービス拡張機能、およびコンテンツ拡張機能間の通信に不可欠です。次の手順に従って、iOS プロジェクトに App Groups を追加できます。
既存のアプリグループがあり、それのみを使用したい場合は、手順 5 にスキップしてください。
1. Xcode プロジェクトのプロジェクトナビゲーターで、最上位のプロジェクトディレクトリを選択し、アプリのメインターゲットを選択します。
2. 「署名と機能」タブに移動します。
3. 「+ 機能」ボタンをクリックし、リストから「App Groups」を選択します。
4. 「+」ボタンをクリックして App Group を追加します。App Group に一意の名前を付け、「OK」をクリックします。

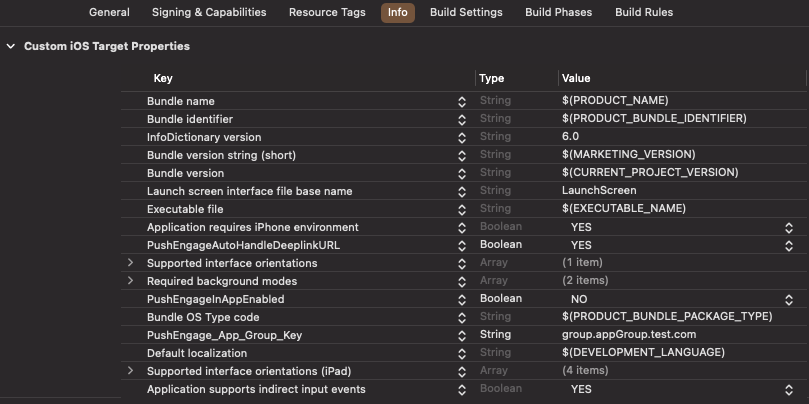
5. メインエディタ領域で、アプリのメインターゲットを選択し、アプリグループを作成します。アプリケーション Info.plist に PushEngage_App_Group_Key キーでグループ名を提供してください。
6. 通知サービス拡張機能の Info.plist ファイルに同じキーと値を追加します。
7. メインアプリケーションターゲットと YourNotificationServiceExtension で同じアプリグループを選択します。
上記のステップで通知サービス拡張機能を選択していることを確認してください。
ディープリンク
ディープリンクを使用すると、プッシュ通知の操作時に、サブスクライバーをアプリケーション内の特定の画面または指定されたウェブページに直接移動させることができます。デフォルトでは、有効な URL を提供すると、サブスクライバーはそのウェブページにリダイレクトされます。
ウェブ URL の処理:
- Info.plist に
PushEngageInAppEnabledを YES に設定すると、URL は WKWebview を使用してアプリケーション内で読み込まれます。 - Info.plist に
PushEngageInAppEnabledを NO に設定すると、サブスクライバーは URL を読み込むために Safari にリダイレクトされます。 - Info.plist に
PushEngageAutoHandleDeeplinkURLを YES に設定すると、SDK はPushEngageInAppEnabledの設定に従ってディープリンクを処理します。 - Info.plist に
PushEngageAutoHandleDeeplinkURLを NO に設定すると、ディープリンクの処理の制御は SDK からクライアントアプリに渡されます。 - ディープリンクが無効な URL の場合、
didFinishLaunchingWithOptionsメソッド内のAppDelegateでsetNotificationOpenHandlerを使用してナビゲーションを設定する必要があります。これにより、以下に示すように、提供された文字列に基づいて特定の画面に移動できます。設定しない場合、SDK は単にアプリケーションを開きます。
Swift の使用:
class AppDelegate: UIResponder, UIApplicationDelegate {

    var window: UIWindow?


    override init() {
        super.init()
        // method Swizzling enabled for the application.
        PushEngage.swizzleInjection(isEnabled: true)
    }

   func application(_ application: UIApplication, didFinishLaunchingWithOptions launchOptions: [UIApplication.LaunchOptionsKey: Any]?) -> Bool {

     PushEngage.setAppId(key: "APP_ID_FROM_PUSH_ENGAGE_DASHBOARD")
     PushEngage.setInitialInfo(for: application,with: launchOptions)


     // Notification open handler.
     // deep linking screen
     // here ShoesScreen and pepay are example deep link texts
     PushEngage.setNotificationOpenHandler { (result) in
            //replace this block with your own handling
            let additionData = result.notification.additionalData
            if result.notificationAction.actionID == "ShoesScreen" {
                print(additionData ?? [])
                let storyBoard = UIStoryboard(name: "Main", bundle: .main)
                let viewController = storyBoard.instantiateViewController(withIdentifier: "SportViewController")
                let navcontroller = application.windows.first?.rootViewController as? UINavigationController
                navcontroller?.popToRootViewController(animated: true)
                navcontroller?.pushViewController(viewController, animated: true)
            } else if result.notificationAction.actionID == "SalesScreen" {
                let storyBoard = UIStoryboard(name: "Main", bundle: .main)
                let viewController = storyBoard.instantiateViewController(withIdentifier: "NotificationApiTestViewconttoller")
                let navcontroller = application.windows.first?.rootViewController as? UINavigationController
                navcontroller?.popToRootViewController(animated: true)
                navcontroller?.pushViewController(viewController, animated: true)
            } else if result.notificationAction.actionID == "pepay" {
                let storyBoard = UIStoryboard(name: "Main", bundle: .main)
                let viewController = storyBoard.instantiateViewController(withIdentifier: "PEPay")
                let navcontroller = application.windows.first?.rootViewController as? UINavigationController
                navcontroller?.popToRootViewController(animated: true)
                navcontroller?.pushViewController(viewController, animated: true)
            }
        }

        PushEngage.enableLogs = true

        return true
    }
}
Objective-C の使用:
@implementation AppDelegate


- (instancetype)init
{
    self = [super init];
    if (self) {
       [PushEngage swizzleInjectionWithIsEnabled: YES];
    }
    return self;
}

typedef void (^PEnotificationOpenHandler)(PENotificationOpenResult * nonnull);

- (BOOL)application:(UIApplication *)application didFinishLaunchingWithOptions:(NSDictionary *)launchOptions {
    UNUserNotificationCenter.currentNotificationCenter.delegate = self;
    PEnotificationOpenHandler actionHandler = ^void(PENotificationOpenResult *result) {
       //replace this block with your own handling
        if ([result.notificationAction.actionID isEqualToString: @"ShoesScreen"]) {
            AddToCart *controller = [AddToCart new];
            UINavigationController *navigationController = (UINavigationController *) application.windows.firstObject.rootViewController;
            [navigationController popToRootViewControllerAnimated:YES];
            [navigationController pushViewController:controller animated:YES];
        } else if ([result.notificationAction.actionID isEqualToString: @"SalesScreen"]) {
            SportsViewcontroller *controller = [SportsViewcontroller new];
            UINavigationController *navigationController = (UINavigationController *) application.windows.firstObject.rootViewController;
            [navigationController popToRootViewControllerAnimated:YES];
            [navigationController pushViewController:controller animated:YES];
        }
    };
    application.applicationIconBadgeNumber = 0;
    [PushEngage setAppIdWithKey:@"APP_ID_FROM_PUSH_ENGAGE_DASHBOARD"];
    [PushEngage setInitialInfoFor:application with:launchOptions];
    [PushEngage setNotificationOpenHandlerWithBlock:actionHandler];
    [PushEngage setEnableLogs:true];
    return YES;
}
@end
フォアグラウンドでの通知の処理
フォアグラウンドで通知を受信した場合、通知アラートをデバイスに表示するかどうかを決定する必要があります。フォアグラウンドでの通知の処理には、setNotificationWillShowInForgroundHandlerを使用してください。
完了ブロックがまったく呼び出されない場合、SDKは29秒後に完了ブロックを呼び出します。いずれの場合も、アプリケーションがフォアグラウンドモードの場合、サイレント通知またはアラート通知です。
Swiftを使用
class AppDelegate: UIResponder, UIApplicationDelegate {

    var window: UIWindow?


    override init() {
        super.init()
        // method Swizzling enabled for the application.
       PushEngage.swizzleInjection(isEnabled: true)
    }

    func application(_ application: UIApplication, didFinishLaunchingWithOptions launchOptions: [UIApplication.LaunchOptionsKey: Any]?) -> Bool {

        PushEngage.setAppId(key: "APP_ID_FROM_PUSH_ENGAGE_DASHBOARD")
        PushEngage.setInitialInfo(for: application, with: launchOptions)

        // Notification handler when notification deliver's and app is in foreground.

        PushEngage.setNotificationWillShowInForgroundHandler { notification, completion in
            if notification.contentAvailable == 1 {
                // in case the developer failed to set the completion handler. After 29 sec the handler will call from the SDK after 29 sec.
                completion(nil)
            } else {
                completion(notification)
            }
        }

        PushEngage.enableLogs = true

        return true
    }
}
Objective-Cを使用
@implementation AppDelegate


- (instancetype)init
{
    self = [super init];
    if (self) {
       [PushEngage swizzleInjectionWithIsEnabled: YES];
    }
    return self;
}
// please create this handlers
typedef void (^ _Nonnull PENotificationDisplayHandler)(PENotification * _Nullable);

-(BOOL)application:(UIApplication*)application didFinishLaunchingWithOptions:(NSDictionary *)launchOptions {
    UNUserNotificationCenter.currentNotificationCenter.delegate = self;

    [PushEngage setNotificationWillShowInForgroundHandlerWithBlock:^(PENotification * _Nonnull notification, PENotificationDisplayHandler completion) {
        if (notification.contentAvailable == 1) {
            completion(nil);
        } else {
            completion(notification);
        }
    }];
    [PushEngage setAppIdWithKey:@"APP_ID_FROM_PUSH_ENGAGE_DASHBOARD"];
    [PushEngage setInitialInfoFor:application with:launchOptions];
    [PushEngage setEnableLogs:true];
    return YES;
}
@end
トラブルシューティング
問題:
サンドボックスに関連するビルドの問題が発生しています。
解決策:
- Xcodeでプロジェクトを開きます。
- ビルド設定に移動します。
- ユーザー スクリプト サンドボックスオプションを見つけます。
- いいえに設定します。
問題:
Firebase SDKとPushEngage SDKの両方でメソッドスワップリングを有効にして使用しており、問題が発生しています。
解決策:
PushEngage SDKのメソッドスワップリングを無効にし、PushEngageメソッドの処理については手動の手順に従ってください。詳細な手順は以下で確認できます。
PushEngage iOS SDK ドキュメント
iOS SDKの機能をさらに詳しく知りたい場合は、詳細なAPIドキュメントをご覧ください。
問題が発生した場合は、ここをクリックしてお問い合わせください。サポートチームがお手伝いします。


