通知:この項目にはレガシー ドキュメントがありません。そのため、現在のドキュメントが表示されています。
The Custom Subdomain feature is for collecting web push notification subscribers through another domain. It’s designed for specific situations where the standard setup isn’t possible of adding service worker to your website’s root or sub-folder as well.
This guide will walk you through what the feature is, when to use it, and how to implement it step-by-step.
When Should You Use a Custom Subdomain?
This feature is the perfect solution if you find yourself in one of these two scenarios:
- Platform Limitations: Your website is built on a platform (like Webflow, ClickFunnels or Blogspot) that doesn’t allow you to upload files to your site’s root directory. This prevents the standard installation of the PushEngage service worker file on your root folder, and forcing you to collect subscribers on our subdomain. So if you are willing to host a separate domain for adding subscriptions, you can use this feature.
- Centralized Subscriptions: You operate multiple domains or subdomains and want to collect and manage all your push subscribers under a single, centralized domain. This simplifies subscriber management and branding.
The Custom Subdomain feature works by using an intermediate page on a subdomain that you control. This page handles the subscription process, allowing you to bypass platform file restrictions and centralize your audience. This should be an HTTPS URL. This is where your subscription will happen and it will be visible in each push campaign.
Please note, if you are willing to use this feature, you cannot go ahead and use Push Single Step Optin. You will use any of the available double step Optin only
Setting Up Custom Subdomain
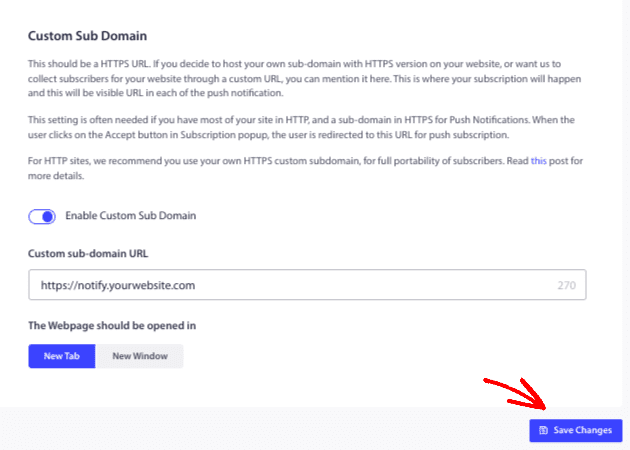
Enable Custom Subdomain in Your Settings
First, you need to tell PushEngage which subdomain you intend to use.
- Navigate to your PushEngage Dashboard.
- Go to Site Settings » Advanced Settings.
- Find the Custom Sub Domain for Subscription option.
- Toggle the switch to enable it.
- In the text box, enter the full URL of the subdomain you will be using (e.g.,
https://notify.yourwebsite.com). You can choose whether you want the added domain to open up in a new window or tab.
Making Updates to Installation Code
Step 1 : Add the Installation Code to Your Main Site (Site A)
This code needs to be placed on your main website. It will trigger the subscription opt-in prompt for your visitors.
- Copy the code snippet below.
- Paste it just before the
</head>tag on every page of your main website where you want to collect subscribers. - Replace
'YOUR APP ID'with your actual App ID. You can find your App ID by navigating to Site Settings » Installation Settings in your dashboard.
Code for Site A (Main Site):
<script>
(function(w, d) {
  w.PushEngage = w.PushEngage || [];
  w._peq = w._peq || [];
  PushEngage.push(['init', {
      appId: 'YOUR APP ID'
  }]);
  var e = d.createElement('script');
  e.src = 'https://clientcdn.pushengage.com/sdks/pushengage-web-sdk.js';
  e.async = true;
  e.type = 'text/javascript';
  d.head.appendChild(e);
})(window, document);
</script>
Step 2 : Add the Installation Code to Your Custom Subdomain (Site B)
This special version of the code needs to be placed on the intermediate page of your custom subdomain.
- Copy the code snippet below.
- カスタムサブドメインのメインページ(例:
index.html)の</head>タグの直前に貼り付けてください。 'YOUR APP ID'を、ステップ2で使用したものと同じApp IDに置き換えてください。
このコードにはisSubscriptionOnSubDomain:trueパラメータが含まれています。この行は、サブスクリプションのオプトインがサブドメイン自体に表示されるのを防ぐため、非常に重要です。その唯一の目的はサブスクリプションを処理することだからです。
サイトB(カスタムサブドメイン)のコード:
<script>
(function(w, d) {
  w.PushEngage = w.PushEngage || [];
  w._peq = w._peq || [];
  PushEngage.push(['init', {
      appId: 'YOUR APP ID',
      isSubscriptionOnSubDomain:true
  }]);
  var e = d.createElement('script');
  e.src = 'https://clientcdn.pushengage.com/sdks/pushengage-web-sdk.js';
  e.async = true;
  e.type = 'text/javascript';
  d.head.appendChild(e);
})(window, document);
</script>
ステップ3:サービスワーカーファイルをサブドメインに配置する
PushEngageサービスワーカーファイルは、独自のドメインからのプッシュ通知を可能にするものです。
- PushEngageダッシュボードのサイト設定 » インストール設定から
service-worker.jsファイルをダウンロードしてください。 - このファイルをサイトB(カスタムサブドメイン)のルートディレクトリにアップロードしてください。
- ファイルが公開からアクセス可能であることを確認してください。
https://your.subdomain.com/service-worker.jsにブラウザでアクセスしてテストできます。404エラーではなく、ファイルのコードが表示されるはずです。
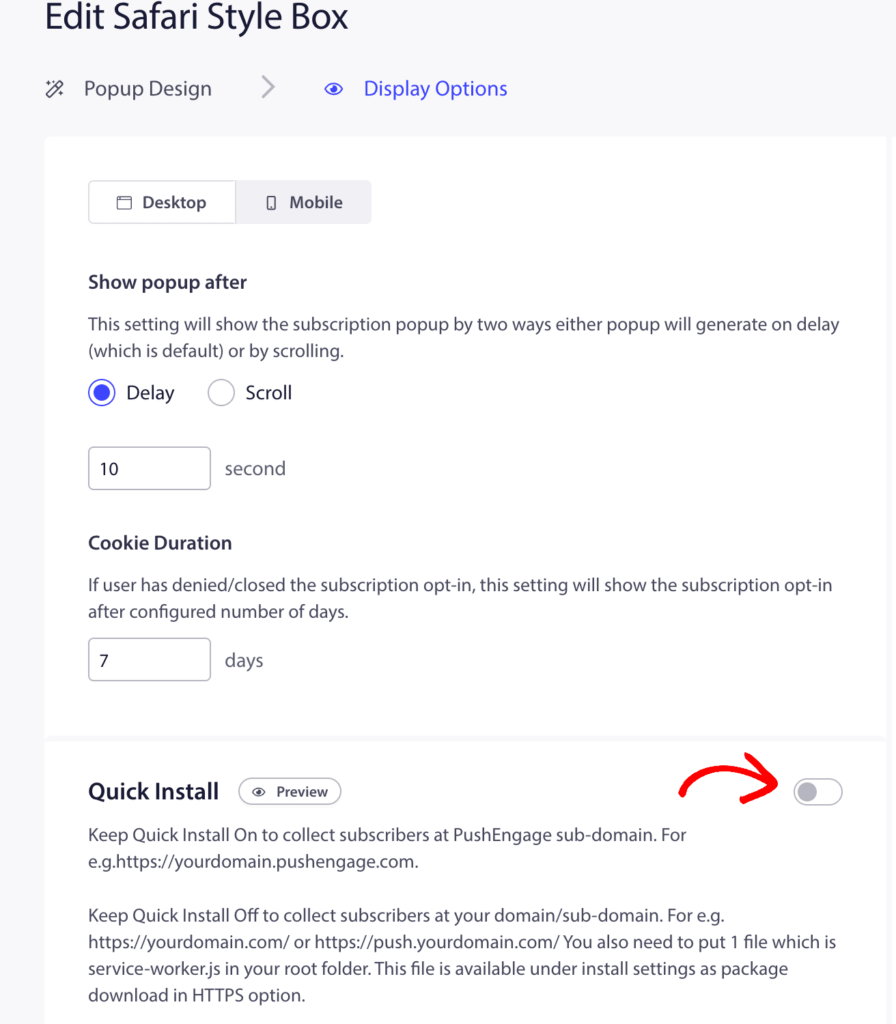
オプトインスタイルのクイックインストールを有効にする
これは必須の最終ステップです。カスタムサブドメイン方式を機能させるには、オプトインに対してクイックインストール機能を有効にする必要があります。この設定により、カスタムサブドメインを利用するポップアップウィンドウを通じてサブスクリプションが行われるようになります。
1. PushEngageダッシュボードで、デザイン » ポップアップモーダルに移動します。
2. サイトで使用することに抵抗のないポップアップモーダルを選択し、編集するためにクリックします。
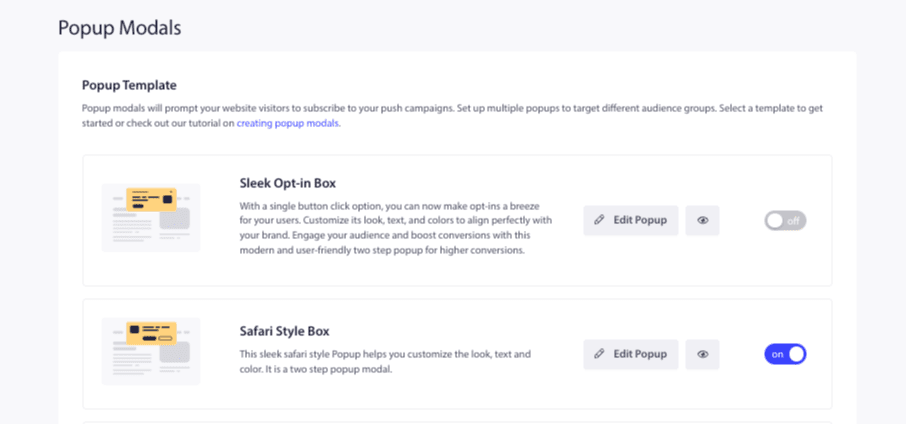
3. オプトインエディタ内で、クイックインストールトグルが有効になっていることを確認します。
4. 変更を保存します。
注意:サイトで使用されるオプトインスタイルでは、常にクイックインストールを有効にする必要があります。無効にすると、カスタムサブドメインは使用されず、サブスクリプションプロセスは失敗します。
これで完了です!これらのすべてのステップを完了すると、ウェブサイトはカスタムサブドメインを使用してプッシュ通知購読者を受け取る準備が整います。メインサイトの訪問者が購読をクリックすると、サブドメインページを通じてシームレスに購読されます。
問題が発生した場合は、こちらをクリックして お気軽にお問い合わせください 。サポートチームがお手伝いします。


