通知:この項目にはレガシー ドキュメントがありません。そのため、現在のドキュメントが表示されています。
PushEngage を使用すると、Android アプリケーションにプッシュ通知を実装できるようになりました。SDK を一度統合するだけで、マーケティングチームは Android アプリのユーザーにコンテキストに合わせたパーソナライズされたメッセージを送信できるようになります。これを実行するには、開発者の助けが必要になります。
Firebase プロジェクトの設定
アプリのプッシュ通知を開始する前に、既存の Firebase アカウントがあることを確認する必要があります。
1. Google アカウントを使用して、Firebase コンソールにログインする必要があります。
2. 次に、プロジェクトを追加をクリックするか、既存のプロジェクトを選択する必要があります。既存のプロジェクトを選択した場合は、手順 4 にスキップしてください。

3. プロジェクト名を入力し、続行をクリックします。次の画面で、記載されているすべての詳細とともにプロジェクトを作成をクリックします。


4. Android アイコンをクリックして、プロジェクトに Android アプリを追加します。

5. 次の画面で、Android アプリのパッケージ名と、統合しようとしている Android アプリの名前を入力し、登録をクリックします。

6. google-services.json ファイルをダウンロードし、Android アプリモジュールのルートディレクトリに配置します。

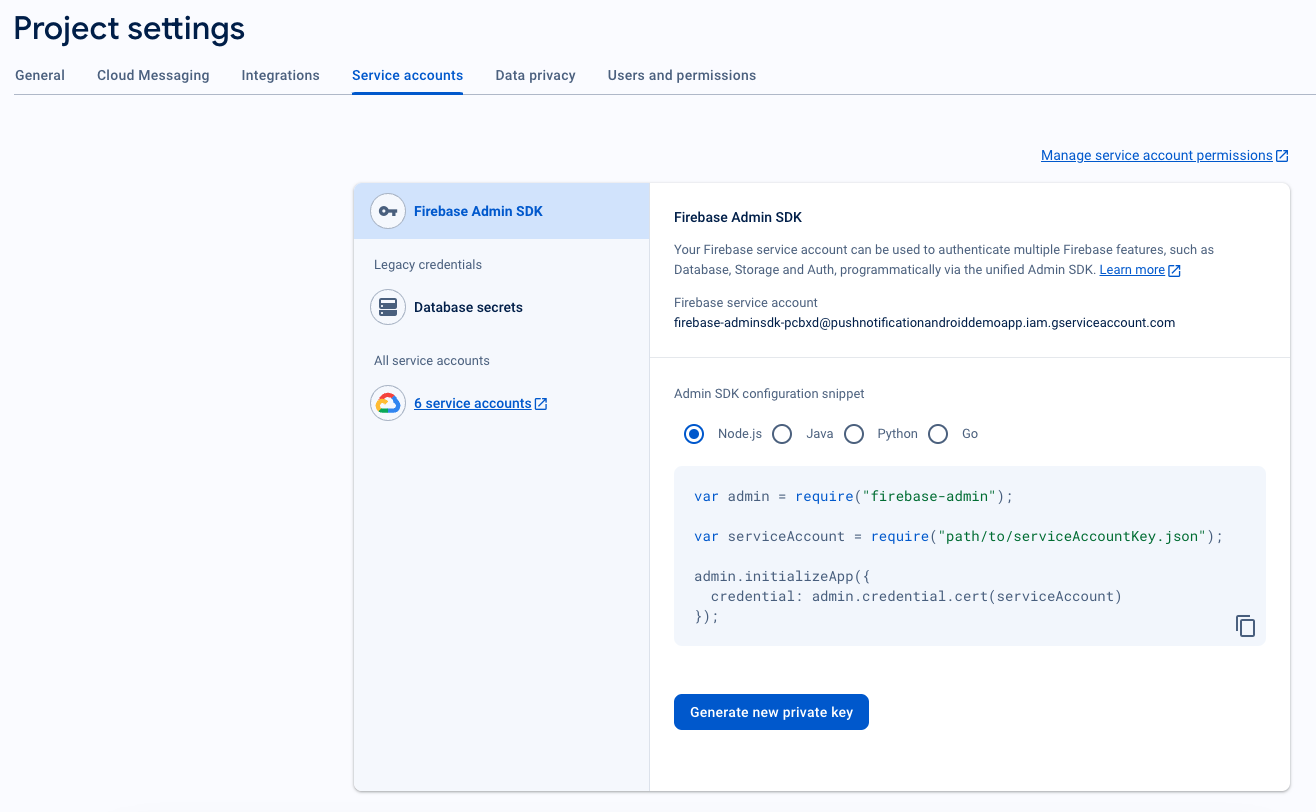
7. Firebase コンソールで、左上にあるプロジェクトの概要の横にある設定アイコンをクリックし、プロジェクトの設定を選択します。新しい秘密鍵を生成をクリックします。
前の手順でダウンロードした .json ファイルを安全に保存してください。これは PushEngage ダッシュボードで設定するために必要になります。
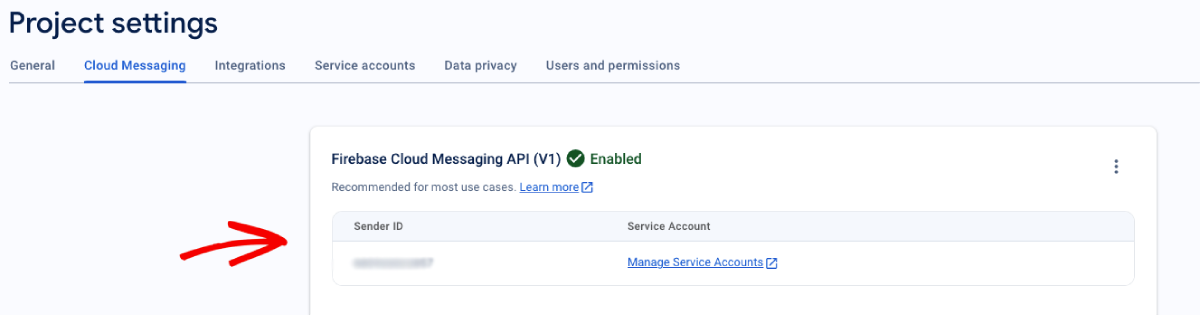
8. Firebase コンソールで、左上にあるプロジェクトの概要の横にある設定アイコンをクリックし、「プロジェクトの設定」を選択します。
Cloud Messaging タブを選択します。その下に送信者 ID が表示されます。
FCM を PushEngage ダッシュボードと統合する
Firebase でプロジェクトを作成したら、PushEngage ダッシュボードに送信者 ID を統合できます。
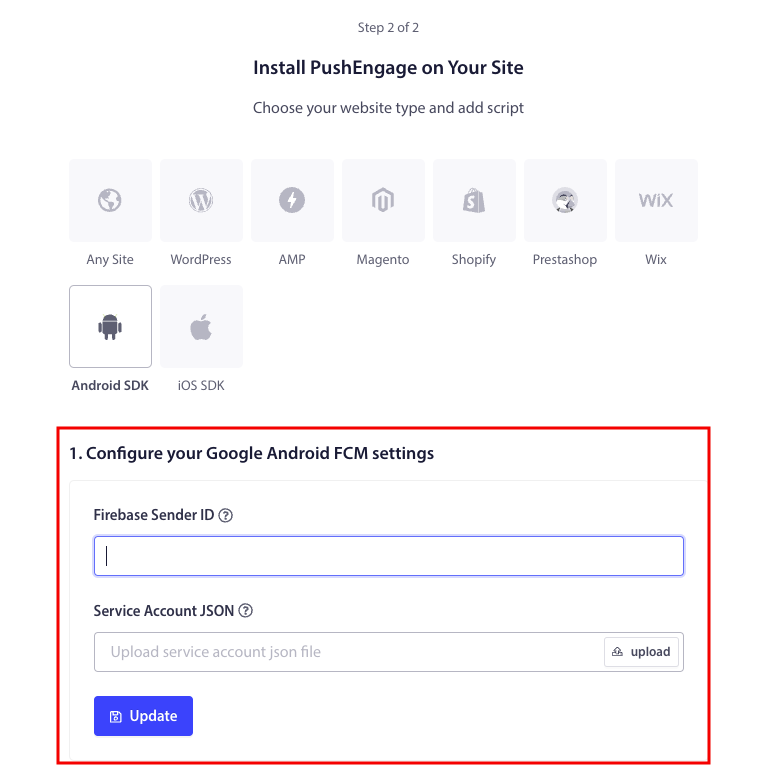
1. PushEngage アカウントで、サイト設定 » インストールに移動します。
2. プラットフォームを選択する際に、Android SDK タブを選択します。
3. 送信者 ID とサービスアカウント JSON を構成する
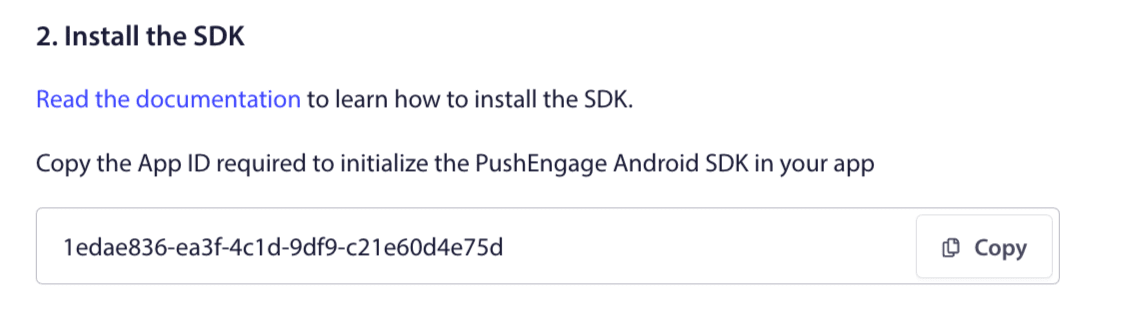
4. アプリケーションで PushEngage Android SDK を初期化するために必要なアプリ ID をコピーします。
SDK 依存関係の追加
次に SDK 依存関係を追加します。次の行をルートの build.gradle に追加します。
1. プロジェクトで集中リポジトリ宣言を使用していない場合は、プロジェクトレベルの build.gradle ファイルに次の行を追加します。それ以外の場合は、2 番目のセクションにスキップしてください。
// Project level build file where you can add configuration options common to all sub-projects/modules.
buildscript {
   repositories {
       google()
       jcenter()
   }
   dependencies {
       // ...
       // Add this line
       classpath "com.google.gms:google-services:4.3.10"

   }
}

allprojects {
   repositories {
      // ...
      // Check that you have the following line (if not, add it):
      google()
      maven {url 'https://jitpack.io' }
   }
}
プロジェクトで集中リポジトリ宣言を使用している場合は、settings.gradleファイルに次を追加します。
dependencyResolutionManagement {
    repositoriesMode.set(RepositoriesMode.FAIL_ON_PROJECT_REPOS)
    repositories {
        //add this line
        maven { url 'https://jitpack.io' }
    }
2. アプリケーションレベルの build.gradle ファイルに次を追加します。
plugins {
   id 'com.android.application'
   // Add this line
   id 'com.google.gms.google-services'
}

dependencies {
   // ...
   // Add the following lines
   implementation 'com.github.awesomemotive:pushengage-android-sdk:0.0.5'
   implementation platform('com.google.firebase:firebase-bom:26.1.1')
}
SDK の初期化
PushEngage SDK初期化コードブロックを、ApplicationクラスのonCreateメソッドに追加します。PUSHENGAGE_APP_IDは、PushEngageダッシュボードから取得したApp IDに置き換える必要があります。
注意: モバイルアプリケーションに PushEngage を拡張するカスタムクラスがない場合は、Application クラスを拡張するクラスを作成する必要があります。
Java の例を次に示します。
public class PEApplication extends Application {
@Override
public void onCreate() {
super.onCreate();

// PushEngage SDK Initialization code
PushEngage pushEngage = new PushEngage.Builder()
.addContext(getApplicationContext())
.setAppId("PUSHENGAGE_APP_ID")
.build();
// The small icon is displayed on the top status bar and in the notification.
// By default PushEngage displays a bell icon, however It is recommended to
// customize this so users easily recognize notifications from your app.
PushEngage.setSmallIconResource("your_icon_name");
}
}
Kotlin の例を次に示します。
class PEApplication : Application() {
   override fun onCreate() {
       super.onCreate()
       // PushEngage SDK Initialization code
       val pushEngage = PushEngage.Builder()
           .addContext(applicationContext)
           .setAppId("PUSHENGAGE_APP_ID")
           .build()
        // The small icon is displayed on the top status bar and in the notification.
       // By default PushEngage displays a bell icon, however It is recommended to
       // customize this so users easily recognize notifications from your app.
       PushEngage.setSmallIconResource("your_icon_name");
   }
}
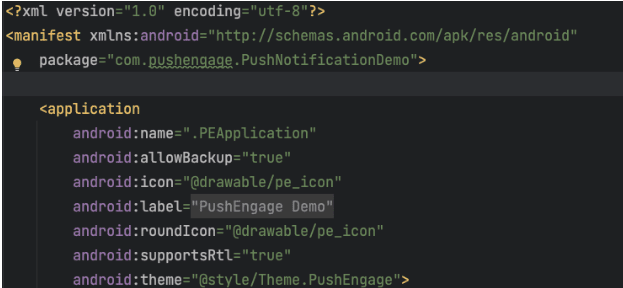
カスタムクラス名を登録するには、Applicationクラスを拡張し、アプリケーションのManifest.xmlファイルに移動します。「android:name=.”PEApplication”」という行を見つけ、「PEApplication」をカスタムクラスの名前に置き換えます。次のようになります。
上記の手順をすべて設定したら、Androidアプリケーションにプッシュ通知を送信できます。アプリケーションを物理デバイスでビルドして実行し、PushEngageダッシュボードからテストプッシュ通知を送信します。
Android 13以降の通知権限の処理
Android 13では、通知を送信する前に一部のデバイスで権限が必要になります。したがって、設定したい場合は、これを追加してください。必要となるコードは次のとおりです。
通知権限を要求するには、組み込みのSDKメソッドを使用します。
 /**
 * Request notification permission using the PushEngage SDK
 * SDK automatically calls subscribe when permission is granted
 */
private void requestNotificationPermissionUsingSDK() {
    PushEngage.requestNotificationPermission(this, new PushEngagePermissionCallback() {
        @Override
        public void onPermissionResult(boolean granted, Error error) {
            if (granted) {
                // Permission granted - SDK automatically calls subscribe
                Log.d("MainActivity", "Notification permission granted");
                Toast.makeText(MainActivity.this, "Permission granted and subscribed!", Toast.LENGTH_SHORT).show();
            } else {
                // Permission denied, handle accordingly
                Log.d("MainActivity", "Notification permission denied");
                Toast.makeText(MainActivity.this, "Permission denied!", Toast.LENGTH_SHORT).show();
                if (error != null) {
                    Log.e("MainActivity", "Permission error: " + error.getMessage());
                }
            }
        }
    });
}
権限ステータスを確認する
現在の通知権限ステータスを確認することもできます。
String permissionStatus = PushEngage.getNotificationPermissionStatus();
switch (permissionStatus) {
    case "granted":
        Log.d("Permission", "Notifications are allowed");
        break;
    case "denied":
        Log.d("Permission", "Notifications are denied");
        break;
    default:
        Log.d("Permission", "Unknown permission status");
        break;
}
Android SDKの機能についてさらに詳しく知りたい場合は、詳細なAPIドキュメントをご覧ください。
問題が発生した場合は、ここをクリックして お問い合わせ ください。サポートチームがお手伝いします。


