Bemærk: Der findes ingen ældre dokumentation tilgængelig for dette element, så du ser den aktuelle dokumentation.
Du kan nu implementere push-notifikationer til din iOS-app ved hjælp af vores iOS App SDK. Du skal bruge din udviklers hjælp, da det vil være en engangs-integration, før du kan sende dem push-notifikationer ved hjælp af PushEngage-dashboardet.
Før du starter
- Du skal have Xcode installeret på dit system.
- En gyldig udviklerkonto og App ID er konfigureret på Apple Developer Portal.
Vi vil følge disse trin for at aktivere push-notifikationer til din iOS-applikation.
- Konfiguration af din app
- Integration af PushEngage iOS SDK
- Initialisering af PushEngage iOS SDK
- Oprettelse af Notification Service Extension
- Initialiserer PushEngage SDK til Notification Service Extension
- Oprettelse af Notification Content Extension
- Initialiserer PushEngage SDK til Notification Content Extension
- Tilføj app-grupper
- Dybdegående links
- Håndtering af notifikationer i forgrunden
- Fejlfinding
Konfiguration af din app
Aktiver fjernnotifikationer
1. Åbn dit Xcode-projekt, og vælg rodprojektet i projektnavigator. Vælg din primære app-mål.
2. Naviger til Signing & Capabilities. Sørg for, at baggrundstilstande-kapabiliteten er tilføjet. Hvis ikke, skal du tilføje den ved at klikke på knappen “+ Capability”.
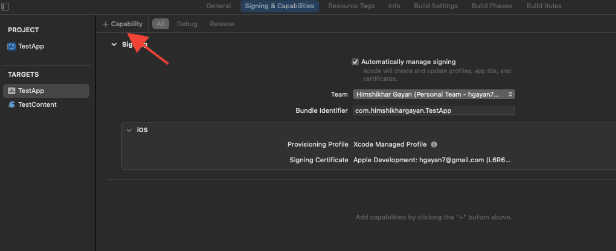
3. Sørg ligeledes for, at Push-notifikationer-kapabiliteten er tilføjet. Hvis ikke, skal du tilføje den ved hjælp af knappen “+ Capability”.

Hvis Push-notifikationer-kapabiliteten ikke er synlig i Xcode. Du skal følge nedenstående trin:
1. Gå til din Apple Developer-konto.
2. Naviger til Certificates, Identifiers & Profiles.
3. Vælg din app-identifikator. Rediger konfigurationen af dit App ID, og sørg for, at Push-notifikationer er aktiveret.
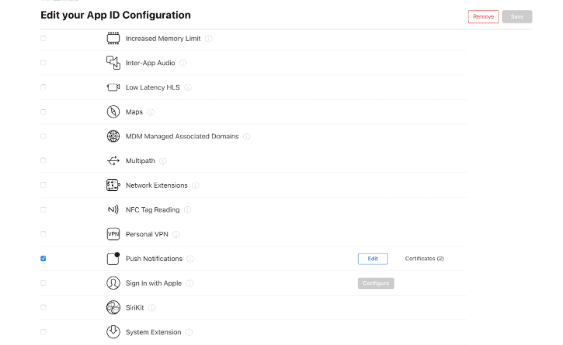
4. Gå tilbage til Xcode, og forsøg at tilføje “Push-notifikationer”-kapabiliteten igen.
Aktiver baggrundstilstande
1. I dit Xcode-projekt skal du navigere til Signing & Capabilities.
2. Inde i Background Modes skal du aktivere både Remote notifications og Background Fetch.
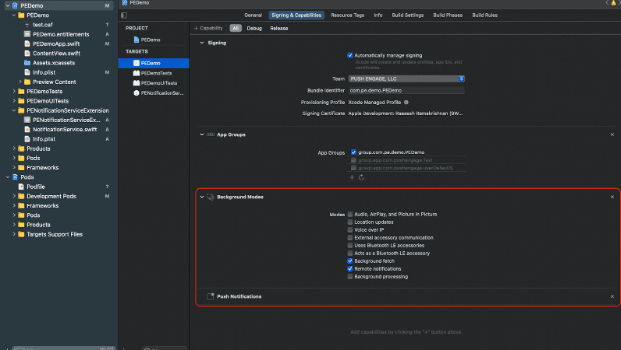
Dette trin sikrer, at din app effektivt kan håndtere fjernnotifikationer og baggrundshentninger.
Her er guiden til at oprette dit APNs-certifikat.
Integration af PushEngage iOS SDK
PushEngage iOS SDK er tilgængelig som en Swift-pakke og en CocoaPods-pod. Vi beder dig om at gennemgå begge metoder, men kun bruge en af dem, mens du fuldfører din opsætning.
Integration af PushEngage iOS SDK med SPM
For at integrere PushEngage iOS SDK ved hjælp af Swift Package Manager, skal du følge disse trin:
- Åbn XCode og naviger til dit projekt. Vælg fanen pakkeafhængigheder. Klik på +-knappen.
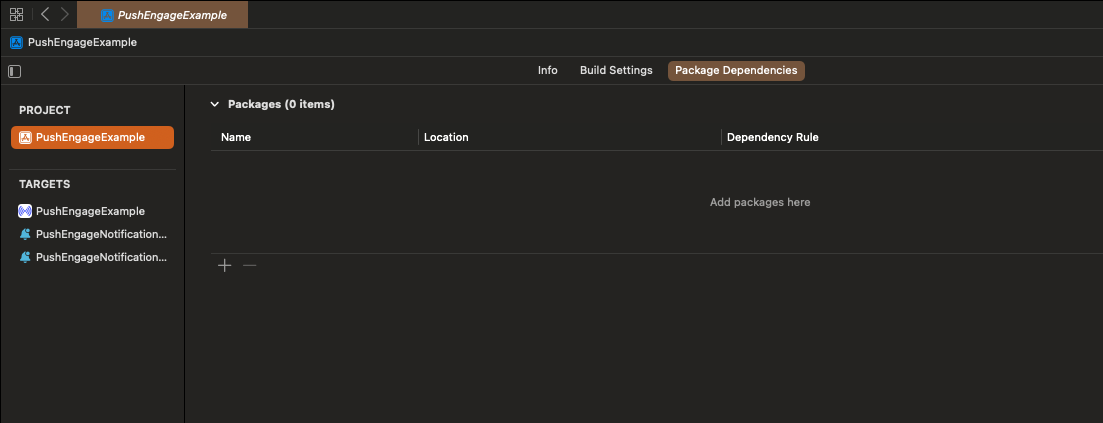
- Indsæt URL'en
https://github.com/awesomemotive/pushengage-ios-sdki søgefeltet. Klik på “Tilføj pakke”.
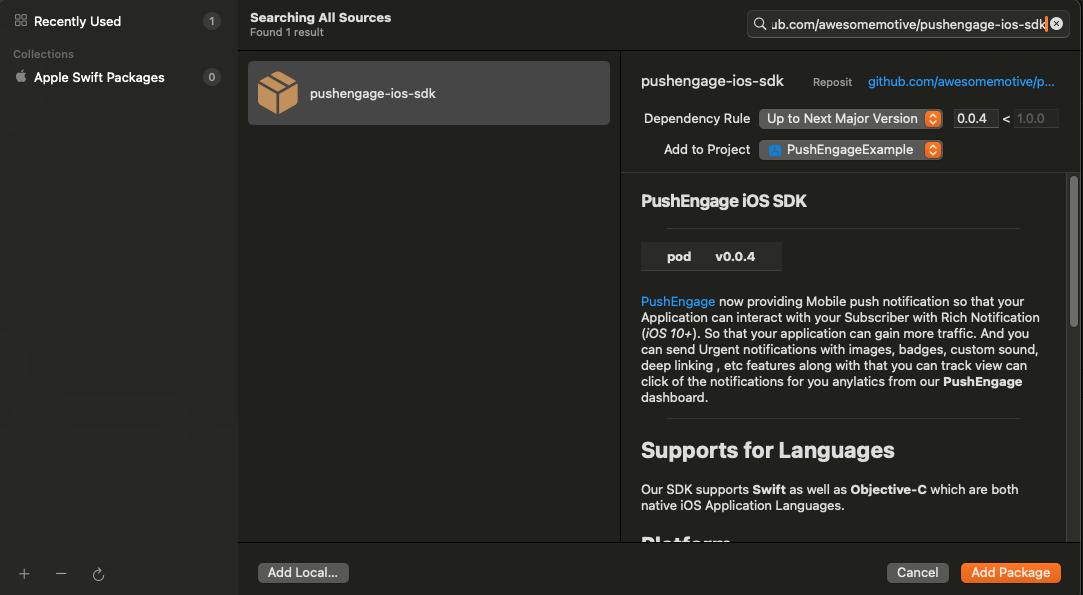
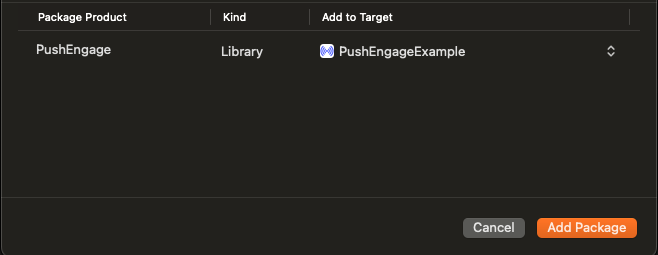
- Vælg din primære app-mål under “Tilføj til mål” og klik “Tilføj pakke”.
Integration af PushEngage iOS SDK med CocoaPods
For at integrere PushEngage iOS SDK ved hjælp af CocoaPods, skal du følge disse trin :
Hvis CocoaPods ikke er installeret, skal du lukke dit nuværende Xcode-projekt og køre følgende kommando i din rodmappe
sudo gem install cocoapods
Kør følgende kommando for at initialisere en Podfile i dit projekt
pod initÅbn den nyoprettede Podfile ved hjælp af en teksteditor eller ved at følge kommandoen i din terminal i rodprojektmappen.
open PodfileTilføj PushEngage-afhængigheden under dit projekts mål. Sørg for, at din Podfile ligner eksemplet nedenfor
# Uncomment the next line to define a global platform for your project
# platform :ios, '9.0'

target 'YourProjectName' do
  # Add PushEngage SDK dependency
  pod 'PushEngage'
  post_install do |installer|
    installer.pods_project.targets.each do |target|
      target.build_configurations.each do |config|
        config.build_settings['APPLICATION_EXTENSION_API_ONLY'] = 'NO'
      end
    end
  end
end
Gem Podfile og kør følgende kommandoer i terminalen.
pod repo update
pod install
Åbn den nyoprettede <project-name>.xcworkspace-fil i Xcode.
Initialisering af PushEngage iOS SDK
Når du har integreret SDK'en, skal vi initialisere iOS SDK'en i din AppDelegate.
Ved hjælp af Swift-sproget, her er hvordan du kan gøre det
import PushEngage
class AppDelegate: UIResponder, UIApplicationDelegate {
    var window: UIWindow?
    override init() {
        super.init()
        PushEngage.swizzleInjection(isEnabled: true)
    }

    func application(_ application: UIApplication, didFinishLaunchingWithOptions launchOptions: [UIApplication.LaunchOptionsKey: Any]?) -> Bool {
       // Set your PushEngage App ID (replace       "APP_ID_FROM_PUSH_ENGAGE_DASHBOARD" with your actual App ID)
        PushEngage.setAppId(key: "APP_ID_FROM_PUSH_ENGAGE_DASHBOARD")
        // Start PushEngage initial info
        PushEngage.setInitialInfo(for: application, with: launchOptions)
        // Enable logs for debugging (optional)
        PushEngage.enableLogs = true
        return true
    }
}
Ved hjælp af Objective-C-sproget, her er hvordan du kan gøre det
#import "AppDelegate.h"
@import PushEngage;
@implementation AppDelegate

- (instancetype)init {
    self = [super init];
    if (self) {
       [PushEngage swizzleInjectionWithIsEnabled:YES];
    }
    return self;
}

- (BOOL)application:(UIApplication *)application didFinishLaunchingWithOptions:(NSDictionary *)launchOptions {
// Set your PushEngage App ID (replace "APP_ID_FROM_PUSH_ENGAGE_DASHBOARD" with your actual App ID)
    [PushEngage setAppIdWithKey:@"APP_ID_FROM_PUSH_ENGAGE_DASHBOARD"];
    // Set initial info
    [PushEngage setInitialInfoFor:application with:launchOptions];
    // Enable logs for debugging (optional)
    [PushEngage setEnableLogs:YES];
    return YES;
}

@end
Nogle gange, når du bruger SwiftUI, er AppDelegate muligvis ikke tilgængelig som standard. I sådanne tilfælde kan du initialisere PushEngage SDK i din primære App-fil. Her er et eksempel i SwiftUI
import SwiftUI
import PushEngage

@main
struct PEDemoApp: App {
    @UIApplicationDelegateAdaptor(AppDelegate.self) var appDelegate
    var body: some Scene {
        WindowGroup {
            ContentView()
        }
    }
}

class AppDelegate: NSObject, UIApplicationDelegate {

    override init() {
        super.init()
        PushEngage.swizzleInjection(isEnabled: true)
    }

    func application(_ application: UIApplication, didFinishLaunchingWithOptions launchOptions: [UIApplication.LaunchOptionsKey : Any]? = nil) -> Bool {
        PushEngage.setAppId(key: "APP_ID_FROM_PUSH_ENGAGE_DASHBOARD")
        PushEngage.setIntialInfo(for: application,
                                             with: launchOptions)

        PushEngage.enableLogs = true
        return true
    }
}
Bemærk: Mens du udvikler din applikation, kan det være nyttigt at aktivere logs fra PushEngage SDK til fejlfindingsformål. Det er dog vigtigt at deaktivere logs i produktionsbuildet for at undgå at afsløre følsomme oplysninger.
Oprettelse af Notification Service Extension
Notification Service Extension forbedrer din iOS-apps evne til at modtage notifikationer. Dette bruges til at ændre notifikationens indhold eller hente/behandle data ved modtagelse af notifikationen. Du kan følge nedenstående trin for at oprette en Notification Service Extension:
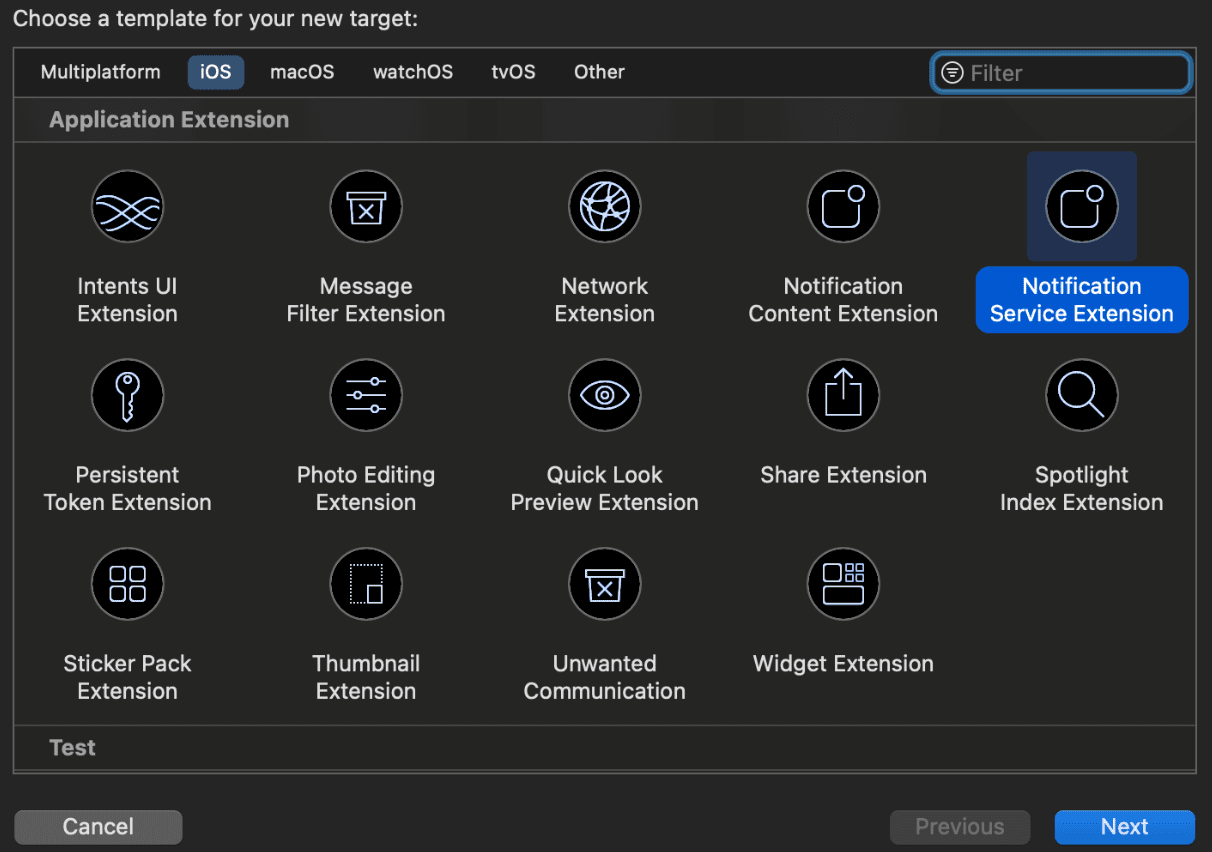
1. Åbn Xcode og naviger til dit projekt. Vælg Arkiv » Ny » Mål fra menuen.
2. I skabelonvalgsvinduet skal du vælge Notification Service Extension og klikke på Næste.
3. Angiv et navn til din udvidelse, for eksempel PushEngageNotificationServiceExtension, og klik på Afslut.
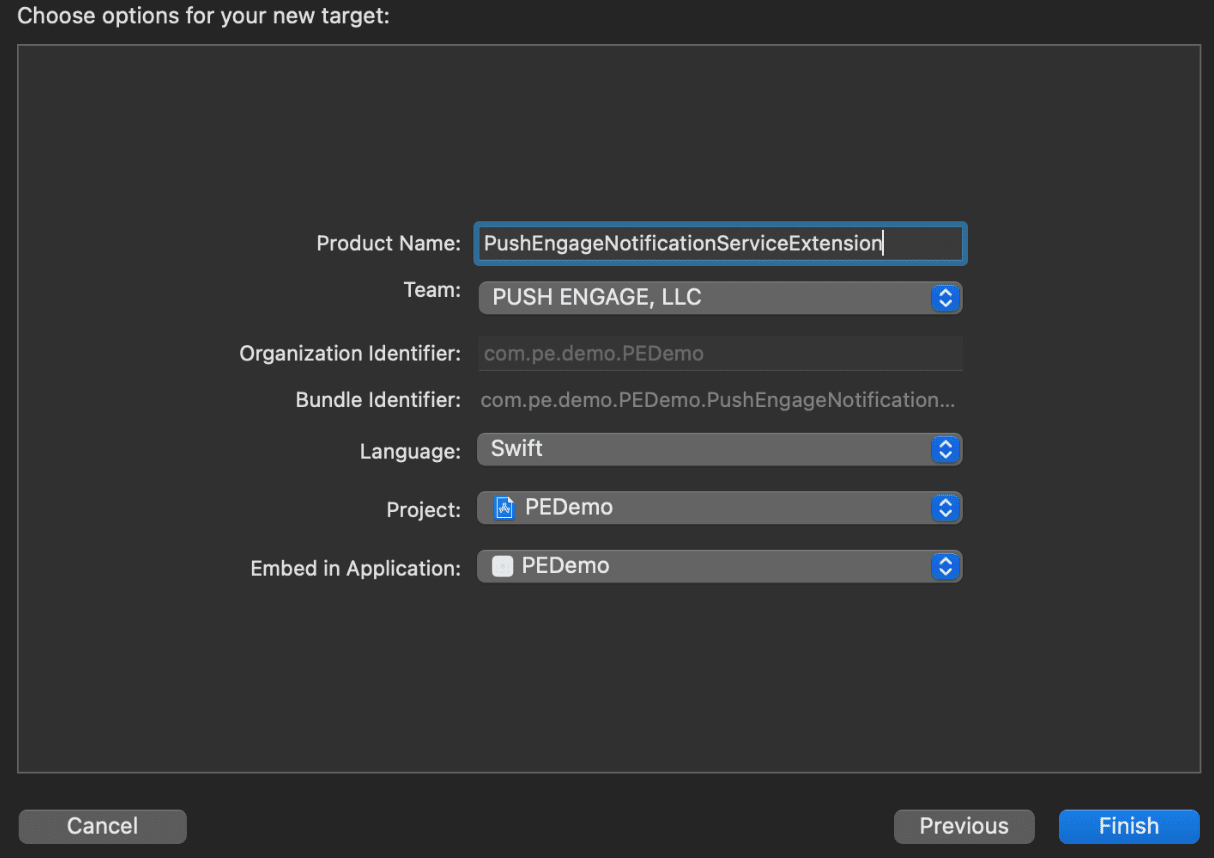
4. Når du er færdig med at oprette Notification Service Extension, kan du blive bedt om at aktivere den. Aktiver den ikke med det samme.
Aktivering af udvidelsen ville skifte Xcodes debugging-fokus fra din app til udvidelsen. Hvis du aktiverer den ved et uheld, skal du ikke bekymre dig; du kan skifte tilbage til at debugge din app i Xcode.
Initialiserer PushEngage SDK til Notification Service Extension
For at sikre korrekt funktion af PushEngage SDK i din iOS Notification Service Extension, skal du følge disse trin:
1. Åbn Podfile, der er tilknyttet dit projekt.
2. Derefter skal du tilføje Afhængighed. Indsæt følgende kodestykke i din Podfile:
target 'Your_Main_Application_Target' do
      pod 'PushEngage'
      post_install do |installer|
          installer.pods_project.targets.each do |target|
            target.build_configurations.each do |config|
              config.build_settings['APPLICATION_EXTENSION_API_ONLY'] = 'NO'
          end
        end
      end

      target 'Your_Notification_Service_Extension_Target' do
              pod 'PushEngage'
      end
end
3. Kør følgende kommandoer i din terminal inden for din rodprojektmappe:
pod repo update
pod install
4. I din Notification Service Extension-mål skal du importere PushEngage-frameworket og tilføje den nødvendige initialiseringskode. Her er, hvordan du kan gøre det.
Brug af Swift
import UserNotifications
import PushEngage

@available(iOSApplicationExtension 10.0, *)
class PushEngageNotificationServiceExtension: UNNotificationServiceExtension {

    var contentHandler: ((UNNotificationContent) -> Void)?
    var bestAttemptContent: UNMutableNotificationContent?
    var request : UNNotificationRequest?

    override func didReceive(_ request: UNNotificationRequest, withContentHandler contentHandler: @escaping (UNNotificationContent) -> Void) {
        self.request = request
        self.contentHandler = contentHandler
        self.bestAttemptContent = (request.content.mutableCopy() as? UNMutableNotificationContent)

        if let bestContent = bestAttemptContent {
            PushEngage.didReceiveNotificationExtensionRequest(request, bestContentHandler: bestContent)
            contentHandler(bestContent)
        }
    }

    override func serviceExtensionTimeWillExpire() {
        // Called just before the extension will be terminated by the system.
        // Use this as an opportunity to deliver your "best attempt" at modified content, otherwise the original push payload will be used.
        if let contentHandler = contentHandler, let request = request ,let bestAttemptContent =  bestAttemptContent {
            guard let content = PushEngage.serviceExtensionTimeWillExpire(request, content: bestAttemptContent) else {
                contentHandler(bestAttemptContent)
                return
            }
            contentHandler(content)
        }
    }

}
Brug af Objective-C
#import "NotificationService.h"
@import PushEngage;

@interface NotificationService ()

@property (nonatomic, strong) void (^contentHandler)(UNNotificationContent *contentToDeliver);
@property (nonatomic, strong) UNMutableNotificationContent *bestAttemptContent;
@property (nonatomic, strong) UNNotificationRequest *request;

@end

@implementation NotificationService

- (void)didReceiveNotificationRequest:(UNNotificationRequest *)request withContentHandler:(void (^)(UNNotificationContent * _Nonnull))contentHandler {
    self.request = request;
    self.contentHandler = contentHandler;
    self.bestAttemptContent = [request.content mutableCopy];

    if (self.bestAttemptContent) {
        [PushEngage didReceiveNotificationExtensionRequest:request bestContentHandler:self.bestAttemptContent];
        contentHandler(self.bestAttemptContent);
    }
}

- (void)serviceExtensionTimeWillExpire {

    if (self.contentHandler && self.request && self.bestAttemptContent) {
        UNNotificationContent *content = [PushEngage serviceExtensionTimeWillExpire:self.request content:self.bestAttemptContent];
        if (content) {
            self.contentHandler(self.bestAttemptContent);
            return;
        }
    }
    self.contentHandler(self.bestAttemptContent);
}

@end
Oprettelse af Notification Content Extension
For at forbedre måden ved at tilføje brugerdefineret UI, skal du oprette en Notification Content Extension. Følg nedenstående trin for at opsætte udvidelsen:
1. I Xcode skal du gå til Arkiv » Ny » Mål.
2. Vælg Notification Content Extension og klik på Næste.
3. Vælg ikke "Aktiver" i dialogboksen, der vises efter at have klikket på Udfør. Annullering holder Xcode til at debugge din app i stedet for udvidelsen. Hvis du ved et uheld aktiverer den, skal du skifte tilbage til at debugge din app i Xcode (ved siden af køreknappen).
4. I projektnavigatoren skal du vælge den øverste projektmappe og vælge NotificationContentExtension-målet i projektet fra listen over mål oprettet i trin 2.
5. Indstil Deployment Target til iOS 10 eller nyere, hvilket er den version af iOS, som Apple udgav understøttelsen for denne udvidelse.
Initialiserer PushEngage SDK til Notification Content Extension
For at sikre korrekt funktion af PushEngage SDK i din iOS Notification Content Extension, skal du følge disse trin:
1. Åbn Podfile, der er tilknyttet dit projekt.
2. Tilføj Afhængighed, indsæt følgende kodestykke i din Podfile:
target 'Your_Main_Application_Target' do
  pod 'PushEngage'
  target 'Your_Notification_Content_Extension' do
    pod 'PushEngage'
  end
end
3. Kør følgende kommandoer i din terminal inden for din rodprojektmappe:
pod repo update

pod install
4. I dit Notification Content Extension-mål skal du importere PushEngage-frameworket og tilføje den nødvendige initialiseringskode. Her er, hvordan du kan gøre det med nogle eksempler på UI-elementer:
Brug af Swift
import UIKit
import UserNotifications
import UserNotificationsUI
import PushEngage

@available(iOSApplicationExtension 10.0, *)
class NotificationViewController: UIViewController, UNNotificationContentExtension {

    fileprivate var hostingView: UIHostingController<ContentView>?

    override func viewDidLoad() {
        super.viewDidLoad()
        self.view.backgroundColor = .white
    }

    func didReceive(_ notification: UNNotification) {
        if(notification.request.content.categoryIdentifier == "your_identifier"){
            let payLoad = PushEngage.getCustomUIPayLoad(for: notification.request)
  //pass the payload to your custom View
            let view = CustomView(payLoadInfo: payLoad)
            hostingView = UIHostingController(rootView: view)
If let customView = self.hostingView {
            addChild(hostingView!)
}
        }
    }

}
Objective-C:
#import "NotificationViewController.h"
#import <UserNotifications/UserNotifications.h>
#import <UserNotificationsUI/UserNotificationsUI.h>

@import PushEngage;
@import UIKit;

@interface NotificationViewController () <UNNotificationContentExtension>

@property IBOutlet UILabel *label;
@property (weak, nonatomic) IBOutlet UIImageView *imageView;
@property (weak, nonatomic) IBOutlet UIButton *firstButton;
@property (weak, nonatomic) IBOutlet UIButton *secondButton;

@end

@implementation NotificationViewController

- (IBAction)firstbuttonAction:(id)sender {
    // do what action you want to perform.
}

- (void)viewDidLoad {
    [super viewDidLoad];
    // Do any required interface initialization here.
}

- (void)didReceiveNotification:(UNNotification *)notification {

    NotificationViewController * __block blockSelf = self;
    CustomUIModel *object = [PushEngage getCustomUIPayLoadFor:notification.request];
    dispatch_async(dispatch_get_main_queue(), ^{
        blockSelf.label.text = object.title;
        blockSelf.imageView.image = object.image;
        [blockSelf.firstButton setTitle:object.buttons.firstObject.text forState:UIControlStateNormal];
        [blockSelf.secondButton setTitle:object.buttons.lastObject.text forState:UIControlStateNormal];
        blockSelf = NULL;
    });
}

@end
Tilføj app-grupper
App Groups er essentielle for kommunikation mellem hovedappen, notifikationstjenesteudvidelsen og indholdsudvidelsen. Du kan følge disse trin for at tilføje App Groups til dit iOS-projekt:
Hvis du har en eksisterende app-gruppe og kun vil bruge den, skal du springe til trin nr. 5.
1. I dit Xcode-projekt, i projektnavigatoren, skal du vælge den øverste projektmappe og vælge appens hovedmål.
2. Naviger til fanen Signing & Capabilities.
3. Klik på knappen “+ Capability” og vælg App Groups fra listen.
4. Klik på knappen + for at tilføje en App Group. Tilføj et unikt navn til din App Group og klik på OK.

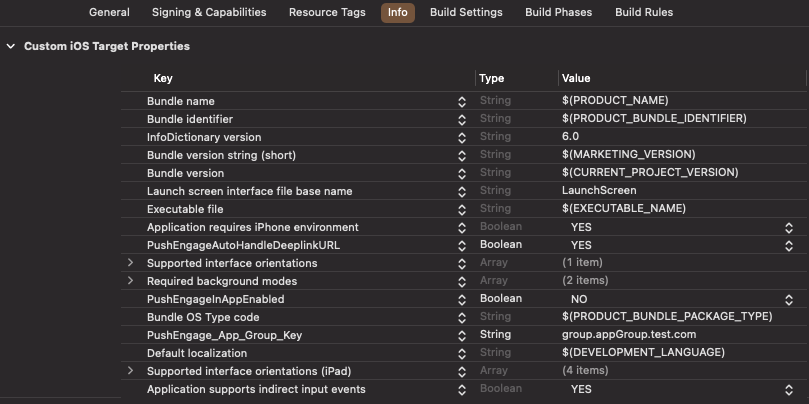
5. I hovedredigeringsområdet skal du vælge appens hovedmål og oprette en app-gruppe. Angiv venligst gruppens navn i din applikations Info.plist med nøglen PushEngage_App_Group_Key.
6. Tilføj den samme nøgle og værdi i Notification Service Extension's Info.plist-fil.
7. Vælg den samme app-gruppe i Main Application Target og YourNotificationServiceExtension.
Sørg for, at du vælger din notifikationstjenesteudvidelse i ovenstående trin.
Dybdegående links
Dybdegående links gør det muligt for dine abonnenter at navigere direkte til en specifik skærm i applikationen eller en bestemt webside, når de interagerer med push-notifikationer. Som standard, hvis du angiver en gyldig URL, vil abonnenten blive omdirigeret til den pågældende webside.
Håndtering af web-URL'er:
- Angiv
PushEngageInAppEnabledtil YES i Info.plist, hvorefter URL'en vil blive indlæst i applikationen ved hjælp af WKWebview. - Angiv
PushEngageInAppEnabledtil NO i Info.plist, hvis du vil have din abonnent omdirigeret til safari for at indlæse URL'en. - Angiv
PushEngageAutoHandleDeeplinkURLtil YES i Info.plist, hvorefter SDK'en vil håndtere dybdegående link i henhold tilPushEngageInAppEnabled-konfigurationen. - Angiv
PushEngageAutoHandleDeeplinkURLtil NO i Info.plist, hvorefter kontrollen med håndtering af dybdegående link vil blive givet til klientappen fra SDK'en. - Hvis dybdegående link ikke er en gyldig URL, skal du konfigurere navigation ved hjælp af
setNotificationOpenHandleriAppDelegateinden fordidFinishLaunchingWithOptions-metoden. Dette giver dig mulighed for at navigere til en specifik skærm baseret på den angivne streng, som vist nedenfor. Hvis det ikke er konfigureret, vil SDK'en blot åbne applikationen.
Brug af Swift:
class AppDelegate: UIResponder, UIApplicationDelegate {

    var window: UIWindow?


    override init() {
        super.init()
        // method Swizzling enabled for the application.
        PushEngage.swizzleInjection(isEnabled: true)
    }

   func application(_ application: UIApplication, didFinishLaunchingWithOptions launchOptions: [UIApplication.LaunchOptionsKey: Any]?) -> Bool {

     PushEngage.setAppId(key: "APP_ID_FROM_PUSH_ENGAGE_DASHBOARD")
     PushEngage.setInitialInfo(for: application,with: launchOptions)


     // Notification open handler.
     // deep linking screen
     // here ShoesScreen and pepay are example deep link texts
     PushEngage.setNotificationOpenHandler { (result) in
            //replace this block with your own handling
            let additionData = result.notification.additionalData
            if result.notificationAction.actionID == "ShoesScreen" {
                print(additionData ?? [])
                let storyBoard = UIStoryboard(name: "Main", bundle: .main)
                let viewController = storyBoard.instantiateViewController(withIdentifier: "SportViewController")
                let navcontroller = application.windows.first?.rootViewController as? UINavigationController
                navcontroller?.popToRootViewController(animated: true)
                navcontroller?.pushViewController(viewController, animated: true)
            } else if result.notificationAction.actionID == "SalesScreen" {
                let storyBoard = UIStoryboard(name: "Main", bundle: .main)
                let viewController = storyBoard.instantiateViewController(withIdentifier: "NotificationApiTestViewconttoller")
                let navcontroller = application.windows.first?.rootViewController as? UINavigationController
                navcontroller?.popToRootViewController(animated: true)
                navcontroller?.pushViewController(viewController, animated: true)
            } else if result.notificationAction.actionID == "pepay" {
                let storyBoard = UIStoryboard(name: "Main", bundle: .main)
                let viewController = storyBoard.instantiateViewController(withIdentifier: "PEPay")
                let navcontroller = application.windows.first?.rootViewController as? UINavigationController
                navcontroller?.popToRootViewController(animated: true)
                navcontroller?.pushViewController(viewController, animated: true)
            }
        }

        PushEngage.enableLogs = true

        return true
    }
}
Brug af Objective-C :
@implementation AppDelegate


- (instancetype)init
{
    self = [super init];
    if (self) {
       [PushEngage swizzleInjectionWithIsEnabled: YES];
    }
    return self;
}

typedef void (^PEnotificationOpenHandler)(PENotificationOpenResult * nonnull);

- (BOOL)application:(UIApplication *)application didFinishLaunchingWithOptions:(NSDictionary *)launchOptions {
    UNUserNotificationCenter.currentNotificationCenter.delegate = self;
    PEnotificationOpenHandler actionHandler = ^void(PENotificationOpenResult *result) {
       //replace this block with your own handling
        if ([result.notificationAction.actionID isEqualToString: @"ShoesScreen"]) {
            AddToCart *controller = [AddToCart new];
            UINavigationController *navigationController = (UINavigationController *) application.windows.firstObject.rootViewController;
            [navigationController popToRootViewControllerAnimated:YES];
            [navigationController pushViewController:controller animated:YES];
        } else if ([result.notificationAction.actionID isEqualToString: @"SalesScreen"]) {
            SportsViewcontroller *controller = [SportsViewcontroller new];
            UINavigationController *navigationController = (UINavigationController *) application.windows.firstObject.rootViewController;
            [navigationController popToRootViewControllerAnimated:YES];
            [navigationController pushViewController:controller animated:YES];
        }
    };
    application.applicationIconBadgeNumber = 0;
    [PushEngage setAppIdWithKey:@"APP_ID_FROM_PUSH_ENGAGE_DASHBOARD"];
    [PushEngage setInitialInfoFor:application with:launchOptions];
    [PushEngage setNotificationOpenHandlerWithBlock:actionHandler];
    [PushEngage setEnableLogs:true];
    return YES;
}
@end
Håndtering af notifikationer i forgrunden
Når notifikationer kommer i forgrunden, skal du træffe en beslutning om, hvorvidt notifikationsadvarslen skal vises for enheden. Brug setNotificationWillShowInForgroundHandler til at håndtere notifikationer i forgrunden.
Hvis fuldførelsesblokken slet ikke kaldes af dig, vil SDK'en kalde fuldførelsesblokken efter 29 sekunder. Under alle omstændigheder, uanset om notifikationen er lydløs eller en advarsel, når programmet er i forgrundstilstand.
Brug af Swift
class AppDelegate: UIResponder, UIApplicationDelegate {

    var window: UIWindow?


    override init() {
        super.init()
        // method Swizzling enabled for the application.
       PushEngage.swizzleInjection(isEnabled: true)
    }

    func application(_ application: UIApplication, didFinishLaunchingWithOptions launchOptions: [UIApplication.LaunchOptionsKey: Any]?) -> Bool {

        PushEngage.setAppId(key: "APP_ID_FROM_PUSH_ENGAGE_DASHBOARD")
        PushEngage.setInitialInfo(for: application, with: launchOptions)

        // Notification handler when notification deliver's and app is in foreground.

        PushEngage.setNotificationWillShowInForgroundHandler { notification, completion in
            if notification.contentAvailable == 1 {
                // in case the developer failed to set the completion handler. After 29 sec the handler will call from the SDK after 29 sec.
                completion(nil)
            } else {
                completion(notification)
            }
        }

        PushEngage.enableLogs = true

        return true
    }
}
Brug af Objective-C
@implementation AppDelegate


- (instancetype)init
{
    self = [super init];
    if (self) {
       [PushEngage swizzleInjectionWithIsEnabled: YES];
    }
    return self;
}
// please create this handlers
typedef void (^ _Nonnull PENotificationDisplayHandler)(PENotification * _Nullable);

-(BOOL)application:(UIApplication*)application didFinishLaunchingWithOptions:(NSDictionary *)launchOptions {
    UNUserNotificationCenter.currentNotificationCenter.delegate = self;

    [PushEngage setNotificationWillShowInForgroundHandlerWithBlock:^(PENotification * _Nonnull notification, PENotificationDisplayHandler completion) {
        if (notification.contentAvailable == 1) {
            completion(nil);
        } else {
            completion(notification);
        }
    }];
    [PushEngage setAppIdWithKey:@"APP_ID_FROM_PUSH_ENGAGE_DASHBOARD"];
    [PushEngage setInitialInfoFor:application with:launchOptions];
    [PushEngage setEnableLogs:true];
    return YES;
}
@end
Fejlfinding
Problem:
Du oplever build-problemer relateret til sandboxing.
Løsning:
- Åbn dit projekt i Xcode.
- Naviger til Build Settings.
- Find indstillingen User Script Sandboxing.
- Indstil den til No.
Problem:
Du bruger både Firebase SDK og PushEngage SDK med metode-swizzling aktiveret for begge, og det forårsager problemer.
Løsning:
Deaktiver metode-swizzling for PushEngage SDK og følg de manuelle trin til håndtering af PushEngage-metoder. Du kan finde detaljerede instruktioner på:
PushEngage iOS SDK Dokumentation
Hvis du vil udforske flere af iOS SDK'ens funktioner, kan du gennemgå vores detaljerede API-dokumentation.
Hvis du støder på problemer, bedes du kontakte os ved at klikke her. Vores supportteam vil kunne hjælpe dig.


