您现在可以使用我们的 iOS 应用 SDK 为您的 iOS 应用实现推送通知。您需要开发人员的帮助,因为这将是一次性集成,然后您就可以使用 PushEngage 控制面板向他们发送推送通知了。
开始之前
- 您需要您的系统上安装了 Xcode。
- 在 Apple Developer Portal 上已配置有效的开发者账户和 App ID。
我们将按照以下步骤为您的 iOS 应用启用推送通知。
配置您的应用
启用远程通知
1. 打开您的 Xcode 项目,然后在项目导航器中选择根项目。选择您的主应用目标。
2. 导航到 签名与功能。确保已添加后台模式功能。如果未添加,请单击“+ Capability”按钮进行添加。
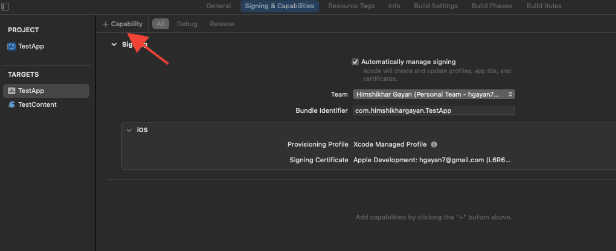
3. 同样,请确保已添加推送通知功能。如果未添加,请使用“+ Capability”按钮进行添加。
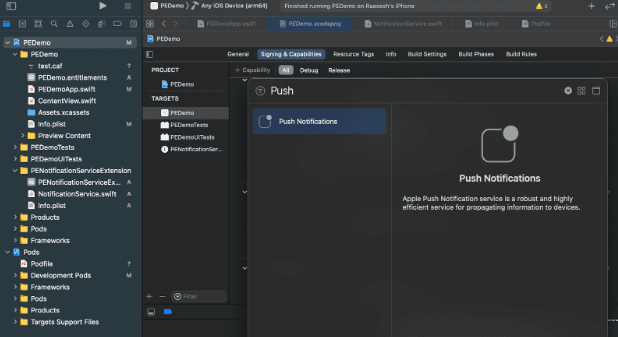
如果 Xcode 中未显示 推送通知 功能。您需要按照以下步骤操作:
1. 前往您的 Apple Developer 账户。
2. 导航到 证书、标识符和配置文件。
3. 选择您的 App 标识符。编辑您的 App ID 的配置,并确保 推送通知 已启用。
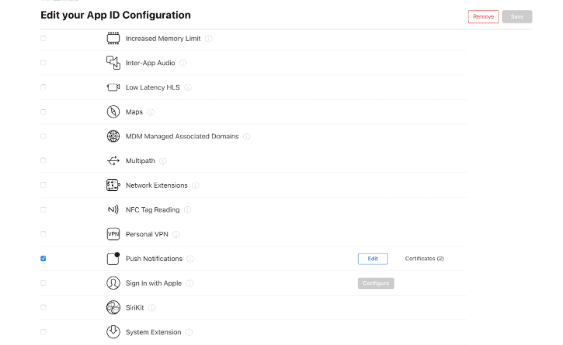
4. 返回 Xcode,然后尝试再次添加“推送通知”功能。
启用后台模式
1. 在您的 Xcode 项目中,导航到 签名与功能。
2. 在 后台模式 中,同时启用 远程通知 和 后台获取。
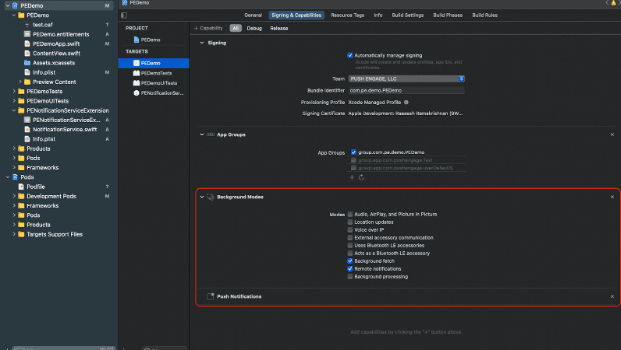
此步骤可确保您的应用能够高效地处理远程通知和后台获取。
此处是创建 APNs 证书的指南。
集成 PushEngage iOS SDK
PushEngage iOS SDK 可作为 Swift 包和 CocoaPods pod 使用。我们建议您同时了解这两种方法,但在完成设置时只使用其中一种。
使用 SPM 集成 PushEngage iOS SDK
要使用 Swift Package Manager 集成 PushEngage iOS SDK,请按照以下步骤操作:
- 打开 XCode 并导航到您的项目。选择包依赖项选项卡。单击 + 按钮。
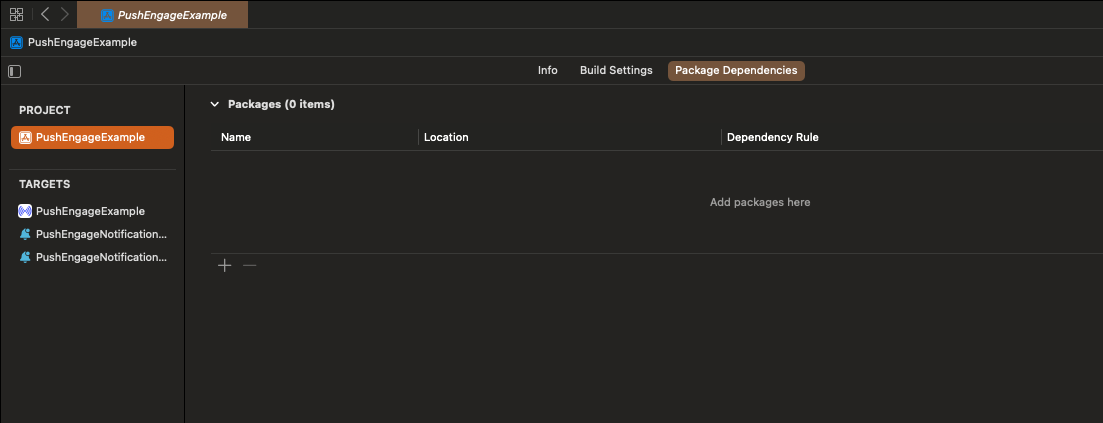
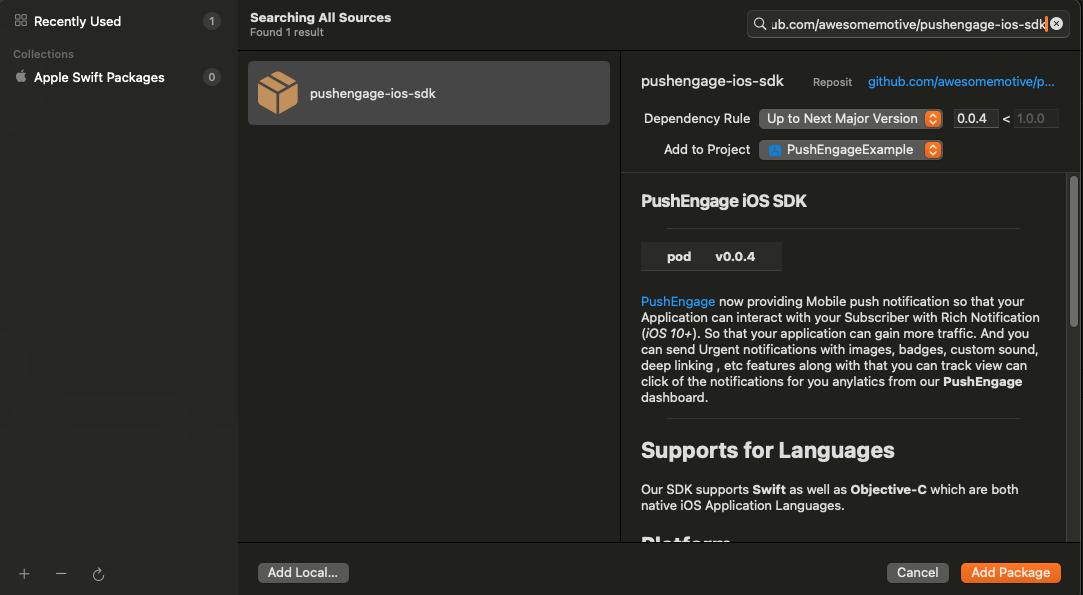
- 在搜索栏中粘贴 URL
https://github.com/awesomemotive/pushengage-ios-sdk。单击“添加包”。
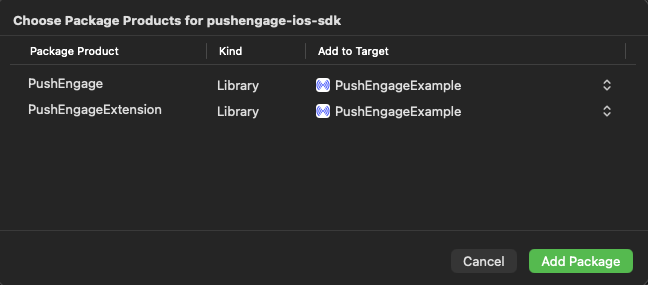
- 在“添加到目标”下选择您的主应用目标,然后单击“添加包”。
使用 CocoaPods 集成 PushEngage iOS SDK
要使用 CocoaPods 集成 PushEngage iOS SDK,您需要遵循以下步骤:
如果未安装 CocoaPods,请关闭当前 Xcode 项目并在项目根目录下运行以下命令
sudo gem install cocoapods
运行以下命令以在您的项目中初始化 Podfile
pod init使用文本编辑器或在项目根目录的终端中按照命令操作,打开新创建的 Podfile。
open Podfile在您的项目目标下添加 PushEngage 依赖项。确保您的 Podfile 与下面的示例类似
# Uncomment the next line to define a global platform for your project
# platform :ios, '9.0'

target 'YourProjectName' do
  # Add PushEngage SDK dependency
  pod 'PushEngage'
end
保存 Podfile 并在终端中运行以下命令。
pod repo update
pod install
在 Xcode 中打开新创建的 <project-name>.xcworkspace 文件。
初始化 PushEngage iOS SDK
集成 SDK 后,我们将在 AppDelegate 中初始化 iOS SDK。
使用 Swift 语言,您可以这样做:
import PushEngage
class AppDelegate: UIResponder, UIApplicationDelegate {
    var window: UIWindow?
    override init() {
        super.init()
        PushEngage.swizzleInjection(isEnabled: true)
    }

    func application(_ application: UIApplication, didFinishLaunchingWithOptions launchOptions: [UIApplication.LaunchOptionsKey: Any]?) -> Bool {
       // Set your PushEngage App ID (replace       "APP_ID_FROM_PUSH_ENGAGE_DASHBOARD" with your actual App ID)
        PushEngage.setAppId(id: "APP_ID_FROM_PUSH_ENGAGE_DASHBOARD")
        // Start PushEngage initial info
        PushEngage.setInitialInfo(for: application, with: launchOptions)
        // Enable logs for debugging (optional)
        PushEngage.enableLogs = true
        return true
    }
}
使用 Objective-C 语言,您可以这样做:
#import "AppDelegate.h"
@import PushEngage;
@implementation AppDelegate

- (instancetype)init {
    self = [super init];
    if (self) {
       [PushEngage swizzleInjectionWithIsEnabled:YES];
    }
    return self;
}

- (BOOL)application:(UIApplication *)application didFinishLaunchingWithOptions:(NSDictionary *)launchOptions {
// Set your PushEngage App ID (replace "APP_ID_FROM_PUSH_ENGAGE_DASHBOARD" with your actual App ID)
    [PushEngage setAppIDWithId:@"APP_ID_FROM_PUSH_ENGAGE_DASHBOARD"];
    // Set initial info
    [PushEngage setInitialInfoFor:application with:launchOptions];
    // Enable logs for debugging (optional)
    [PushEngage setEnableLogs:YES];
    return YES;
}

@end
有时,在使用 SwiftUI 时,AppDelegate 可能默认不可用。在这种情况下,您可以在主 App 文件中初始化 PushEngage SDK。以下是 SwiftUI 中的一个示例:
import SwiftUI
import PushEngage

@main
struct PEDemoApp: App {
    @UIApplicationDelegateAdaptor(AppDelegate.self) var appDelegate
    var body: some Scene {
        WindowGroup {
            ContentView()
        }
    }
}

class AppDelegate: NSObject, UIApplicationDelegate {

    override init() {
        super.init()
        PushEngage.swizzleInjection(isEnabled: true)
    }

    func application(_ application: UIApplication, didFinishLaunchingWithOptions launchOptions: [UIApplication.LaunchOptionsKey : Any]? = nil) -> Bool {
        PushEngage.setAppID(id: "APP_ID_FROM_PUSH_ENGAGE_DASHBOARD")
        PushEngage.setIntialInfo(for: application,
                                             with: launchOptions)

        PushEngage.enableLogs = true
        return true
    }
}
注意:在开发应用程序时,您可能会发现启用 PushEngage SDK 的日志进行调试很有用。但是,在生产版本中禁用日志以避免泄露敏感信息至关重要。
创建通知服务扩展
通知服务扩展增强了您的 iOS 应用接收通知的功能。这用于在接收通知时修改通知内容或获取/处理任何数据。您可以按照以下步骤创建通知服务扩展:
1. 打开 Xcode 并导航到您的项目。从菜单中选择 文件 » 新建 » 目标。
2. 在模板选择窗口中,选择通知服务扩展,然后单击下一步。
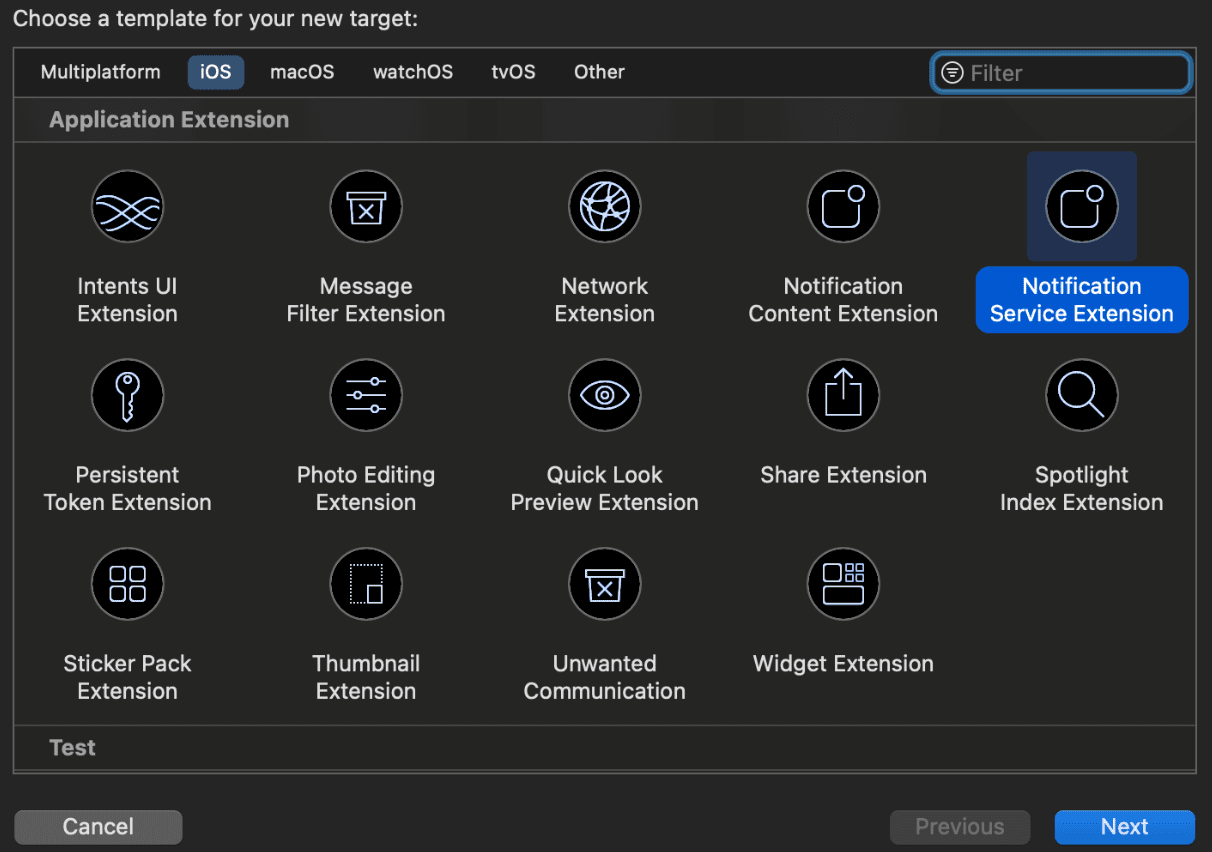
3. 为您的扩展名提供一个名称,例如 PushEngageNotificationServiceExtension,然后单击完成。
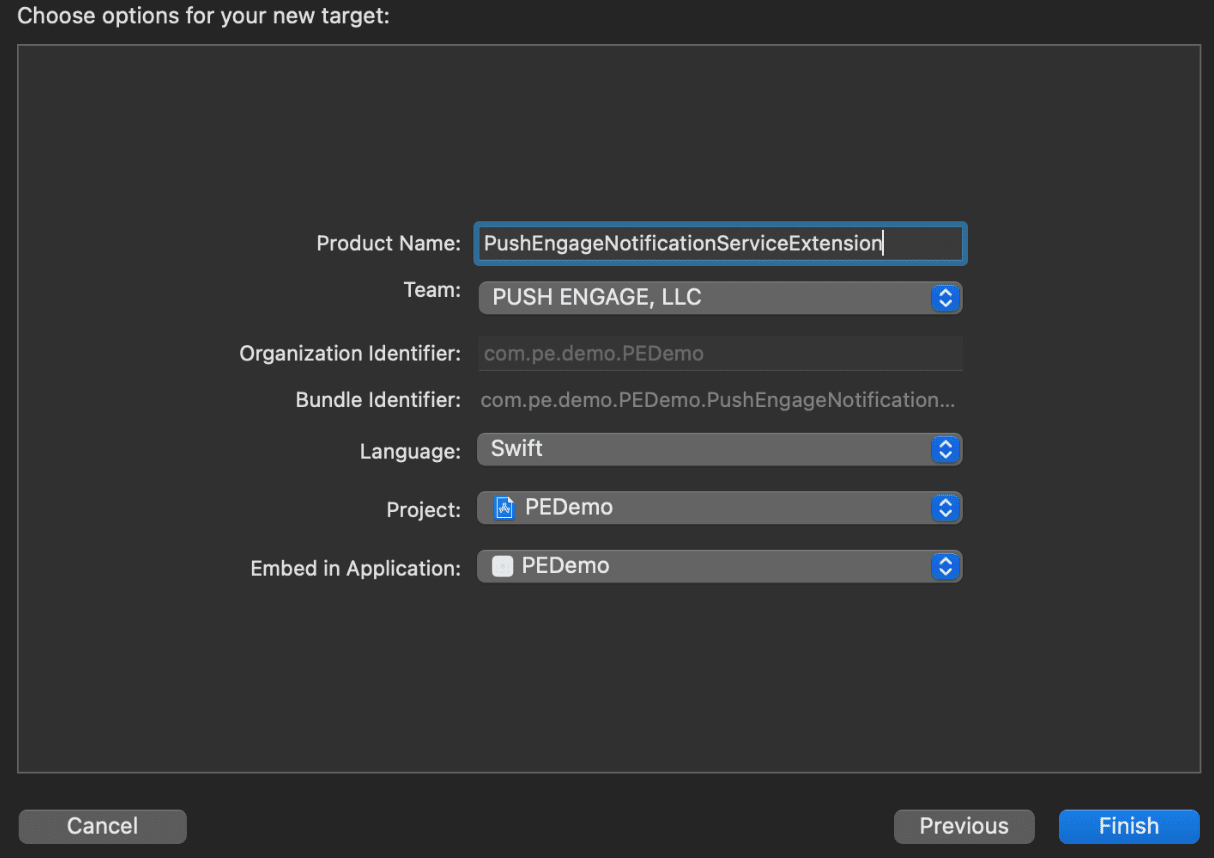
4. 完成创建通知服务扩展后,可能会提示您激活它。请勿立即激活。
激活扩展会将 Xcode 的调试焦点从您的应用转移到扩展。如果您不小心激活了它,请不要担心;您可以在 Xcode 中切换回调试您的应用。
初始化通知服务扩展的 PushEngage SDK
为确保 PushEngage SDK 在您的 iOS 通知服务扩展中正常运行,您需要遵循以下步骤:
1. 打开与您的项目关联的 Podfile。
2. 然后您需要添加依赖项。将以下代码片段插入到您的 Podfile 中:
target 'Your_Main_Application_Target' do
  use_frameworks!
  pod 'PushEngage'
end

target 'Your_Notification_Service_Extension_Target' do
  use_frameworks!
  pod 'PushEngageExtension'
end
3. 在您的项目根目录下的终端中运行以下命令:
pod repo update
pod install
4. 在您的通知服务扩展目标中,导入 PushEngage 框架并添加必要的初始化代码。方法如下。
使用 Swift
import UserNotifications
import PushEngageExtension

class NotificationService: UNNotificationServiceExtension {

    var contentHandler: ((UNNotificationContent) -> Void)?
    var bestAttemptContent: UNMutableNotificationContent?
    var request: UNNotificationRequest?

    override func didReceive(_ request: UNNotificationRequest,
                             withContentHandler contentHandler: @escaping (UNNotificationContent) -> Void) {
        self.request = request
        self.contentHandler = contentHandler
        self.bestAttemptContent = (request.content.mutableCopy() as? UNMutableNotificationContent)

        if let bestContent = bestAttemptContent {
            PushEngageExtension.didReceiveNotificationExtensionRequest(request, bestContentHandler: bestContent)
            contentHandler(bestContent)
        }
    }

    override func serviceExtensionTimeWillExpire() {
        // Called just before the extension will be terminated by the system.
        // Use this as an opportunity to deliver your "best attempt" at modified
        // content, otherwise the original push payload will be used.
        if let contentHandler = contentHandler, let request = request, let bestAttemptContent = bestAttemptContent {
            guard let content = PushEngageExtension.serviceExtensionTimeWillExpire(request, content: bestAttemptContent) else {
                contentHandler(bestAttemptContent)
                return
            }
            contentHandler(content)
        }
    }
}
使用 Objective-C
#import "NotificationService.h"
@import PushEngageExtension;

@interface NotificationService ()

@property (nonatomic, strong) void (^contentHandler)(UNNotificationContent *contentToDeliver);
@property (nonatomic, strong) UNMutableNotificationContent *bestAttemptContent;
@property (nonatomic, strong) UNNotificationRequest *request;

@end

@implementation NotificationService

- (void)didReceiveNotificationRequest:(UNNotificationRequest *)request
                   withContentHandler:(void (^)(UNNotificationContent * _Nonnull))contentHandler {
    self.request = request;
    self.contentHandler = contentHandler;
    self.bestAttemptContent = [request.content mutableCopy];

    if (self.bestAttemptContent) {
        [PushEngageExtension didReceiveNotificationExtensionRequest:request
                                                 bestContentHandler:self.bestAttemptContent];
        contentHandler(self.bestAttemptContent);
    }
}

- (void)serviceExtensionTimeWillExpire {
    if (self.contentHandler && self.request && self.bestAttemptContent) {
        UNNotificationContent *content = [PushEngageExtension serviceExtensionTimeWillExpire:self.request
                                                                                     content:self.bestAttemptContent];
        if (content) {
            self.contentHandler(content);
            return;
        }
    }
    self.contentHandler(self.bestAttemptContent);
}

@end
创建通知内容扩展
为了通过添加自定义 UI 来改进显示方式,您需要创建一个通知内容扩展。请按照以下步骤进行设置:
1. 在 Xcode 中,前往 文件 » 新建 » Target。
2. 选择 Notification Content Extension,然后点击 Next。
3. 点击完成后的对话框中,不要选择“激活”。取消会使 Xcode 继续调试您的应用而不是扩展。如果您不小心激活了它,请在 Xcode 中切换回调试您的应用(位于运行按钮旁边)。
4. 在项目导航器中,选择顶级项目目录,然后在目标列表中选择在第 2 步中创建的 NotificationContentExtension 目标。
5. 将部署目标设置为 iOS 10 或更高版本,这是 Apple 发布此扩展程序支持的版本。
初始化通知内容扩展的 PushEngage SDK
为确保 PushEngage SDK 在您的 iOS 通知内容扩展中正常运行,您需要遵循以下步骤:
1. 打开与您的项目关联的 Podfile。
2. 添加依赖项,将以下代码片段插入您的 Podfile:
target 'PushEngageNotificationContentExtension' do
  use_frameworks!
  pod 'PushEngageExtension'
end
3. 在您的项目根目录下的终端中运行以下命令:
pod repo update

pod install
4. 在您的 Notification Content Extension target 中,导入 PushEngage 框架并添加必要的初始化代码。以下是如何通过一些 UI 元素示例来实现的方法:
使用 Swift
import UIKit
import UserNotifications
import UserNotificationsUI
import SwiftUI
import PushEngageExtension

@available(iOSApplicationExtension 13.0, *)
class NotificationViewController: UIViewController, UNNotificationContentExtension {

    fileprivate var hostingView: UIHostingController<ContentView>?

    override func viewDidLoad() {
        super.viewDidLoad()
        self.view.backgroundColor = .white
    }

    func didReceive(_ notification: UNNotification) {
        if notification.request.content.categoryIdentifier == "your_identifier" {
            let payLoad = PushEngageExtension.getCustomUIPayLoad(for: notification.request)
            // Pass the payload to your custom SwiftUI view
            let view = ContentView(payLoadInfo: payLoad)
            hostingView = UIHostingController(rootView: view)
            if let hostingView = hostingView {
                addChild(hostingView)
                hostingView.view.translatesAutoresizingMaskIntoConstraints = false
                self.view.addSubview(hostingView.view)
                NSLayoutConstraint.activate([
                    hostingView.view.leadingAnchor.constraint(equalTo: self.view.leadingAnchor),
                    hostingView.view.trailingAnchor.constraint(equalTo: self.view.trailingAnchor),
                    hostingView.view.topAnchor.constraint(equalTo: self.view.topAnchor),
                    hostingView.view.bottomAnchor.constraint(equalTo: self.view.bottomAnchor)
                ])
            }
        }
    }
}
Objective-C:
#import "NotificationViewController.h"
#import <UserNotifications/UserNotifications.h>
#import <UserNotificationsUI/UserNotificationsUI.h>

@import PushEngageExtension;
@import UIKit;

@interface NotificationViewController () <UNNotificationContentExtension>

@property IBOutlet UILabel *label;
@property (weak, nonatomic) IBOutlet UIImageView *imageView;
@property (weak, nonatomic) IBOutlet UIButton *firstButton;
@property (weak, nonatomic) IBOutlet UIButton *secondButton;

@end

@implementation NotificationViewController

- (IBAction)firstbuttonAction:(id)sender {
    // do what action you want to perform.
}

- (void)viewDidLoad {
    [super viewDidLoad];
    // Do any required interface initialization here.
}

- (void)didReceiveNotification:(UNNotification *)notification {

    NotificationViewController * __block blockSelf = self;
    CustomUIModel *object = [PushEngageExtension getCustomUIPayLoadFor:notification.request];
    dispatch_async(dispatch_get_main_queue(), ^{
        blockSelf.label.text = object.title;
        blockSelf.imageView.image = object.image;
        [blockSelf.firstButton setTitle:object.buttons.firstObject.text forState:UIControlStateNormal];
        [blockSelf.secondButton setTitle:object.buttons.lastObject.text forState:UIControlStateNormal];
        blockSelf = NULL;
    });
}

@end
添加应用组
App Groups 对于主应用、通知服务扩展和内容扩展之间的通信至关重要。您可以按照以下步骤将 App Groups 添加到您的 iOS 项目中:
如果您已有应用组并只想使用该应用组,请跳至第 5 步。
1. 在您的 Xcode 项目中,在项目导航器中,选择顶层项目目录并选择应用的主 target。
2. 导航到 Signing & Capabilities 标签页。
3. 点击 “+ Capability” 按钮,然后从列表中选择 App Groups。
4. 点击 + 按钮添加一个 App Group。为您的 App Group 添加一个唯一的名称,然后点击 OK。
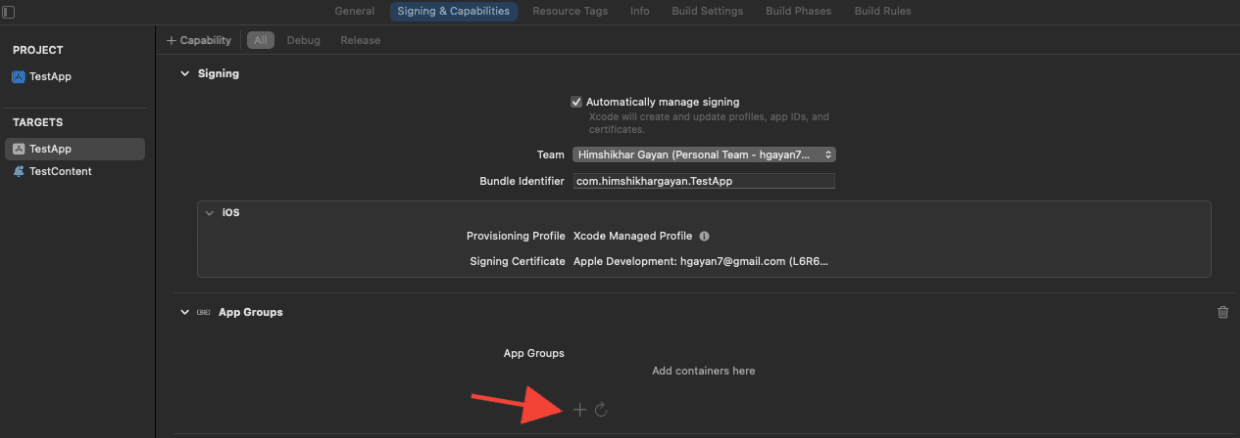
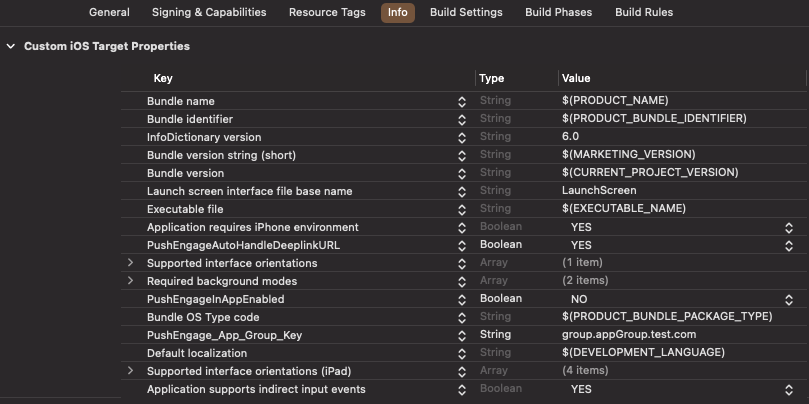
5. 在主编辑器区域,选择您应用的主 target 并创建一个应用组。请在您的应用程序 Info.plist 中使用 PushEngage_App_Group_Key 键提供群组名称。
6. 在通知服务扩展的 Info.plist 文件中添加相同的键和值。
7. 在主应用程序 Target 和您的通知服务扩展中选择相同的应用组。
请确保在上述步骤中选择了您的通知服务扩展。
深度链接
深度链接使您的订阅者在与推送通知互动时能够直接导航到应用程序内的特定屏幕或指定的网页。默认情况下,如果您提供有效的 URL,订阅者将被重定向到该网页。
处理 Web URL:
- 在 Info.plist 中将
PushEngageInAppEnabled提供为 YES,然后 URL 将在应用程序内使用 WKWebview 加载。 - 如果您希望您的订阅者重定向到 Safari 加载 URL,请在 Info.plist 中将
PushEngageInAppEnabled提供为 NO。 - 在 Info.plist 中将
PushEngageAutoHandleDeeplinkURL提供为 YES,然后 SDK 将根据PushEngageInAppEnabled配置处理深度链接。 - 在 Info.plist 中将
PushEngageAutoHandleDeeplinkURL提供为 NO,然后 SDK 将把处理深度链接的控制权交给客户端应用。 - 如果深度链接不是有效的 URL,您需要通过在
AppDelegate的didFinishLaunchingWithOptions方法中使用setNotificationOpenHandler来配置导航。这允许您根据提供的字符串导航到特定屏幕,如下所示。如果未配置,SDK 将仅打开应用程序。
使用 Swift:
class AppDelegate: UIResponder, UIApplicationDelegate {

    var window: UIWindow?


    override init() {
        super.init()
        // method Swizzling enabled for the application.
        PushEngage.swizzleInjection(isEnabled: true)
    }

   func application(_ application: UIApplication, didFinishLaunchingWithOptions launchOptions: [UIApplication.LaunchOptionsKey: Any]?) -> Bool {

     PushEngage.setAppID(id: "APP_ID_FROM_PUSH_ENGAGE_DASHBOARD")
     PushEngage.setInitialInfo(for: application,with: launchOptions)


     // Notification open handler.
     // deep linking screen
     // here ShoesScreen and pepay are example deep link texts
     PushEngage.setNotificationOpenHandler { (result) in
            //replace this block with your own handling
            let additionData = result.notification.additionalData
            if result.notificationAction.actionID == "ShoesScreen" {
                print(additionData ?? [])
                let storyBoard = UIStoryboard(name: "Main", bundle: .main)
                let viewController = storyBoard.instantiateViewController(withIdentifier: "SportViewController")
                let navcontroller = application.windows.first?.rootViewController as? UINavigationController
                navcontroller?.popToRootViewController(animated: true)
                navcontroller?.pushViewController(viewController, animated: true)
            } else if result.notificationAction.actionID == "SalesScreen" {
                let storyBoard = UIStoryboard(name: "Main", bundle: .main)
                let viewController = storyBoard.instantiateViewController(withIdentifier: "NotificationApiTestViewconttoller")
                let navcontroller = application.windows.first?.rootViewController as? UINavigationController
                navcontroller?.popToRootViewController(animated: true)
                navcontroller?.pushViewController(viewController, animated: true)
            } else if result.notificationAction.actionID == "pepay" {
                let storyBoard = UIStoryboard(name: "Main", bundle: .main)
                let viewController = storyBoard.instantiateViewController(withIdentifier: "PEPay")
                let navcontroller = application.windows.first?.rootViewController as? UINavigationController
                navcontroller?.popToRootViewController(animated: true)
                navcontroller?.pushViewController(viewController, animated: true)
            }
        }

        PushEngage.enableLogs = true

        return true
    }
}
使用 Objective-C :
@implementation AppDelegate


- (instancetype)init
{
    self = [super init];
    if (self) {
       [PushEngage swizzleInjectionWithIsEnabled: YES];
    }
    return self;
}

typedef void (^PEnotificationOpenHandler)(PENotificationOpenResult * nonnull);

- (BOOL)application:(UIApplication *)application didFinishLaunchingWithOptions:(NSDictionary *)launchOptions {
    UNUserNotificationCenter.currentNotificationCenter.delegate = self;
    PEnotificationOpenHandler actionHandler = ^void(PENotificationOpenResult *result) {
       //replace this block with your own handling
        if ([result.notificationAction.actionID isEqualToString: @"ShoesScreen"]) {
            AddToCart *controller = [AddToCart new];
            UINavigationController *navigationController = (UINavigationController *) application.windows.firstObject.rootViewController;
            [navigationController popToRootViewControllerAnimated:YES];
            [navigationController pushViewController:controller animated:YES];
        } else if ([result.notificationAction.actionID isEqualToString: @"SalesScreen"]) {
            SportsViewcontroller *controller = [SportsViewcontroller new];
            UINavigationController *navigationController = (UINavigationController *) application.windows.firstObject.rootViewController;
            [navigationController popToRootViewControllerAnimated:YES];
            [navigationController pushViewController:controller animated:YES];
        }
    };
    application.applicationIconBadgeNumber = 0;
    [PushEngage setAppIDWithId:@"APP_ID_FROM_PUSH_ENGAGE_DASHBOARD"];
    [PushEngage setInitialInfoFor:application with:launchOptions];
    [PushEngage setNotificationOpenHandlerWithBlock:actionHandler];
    [PushEngage setEnableLogs:true];
    return YES;
}
@end
在前台处理通知
当通知在前台收到时,您需要决定是否向设备显示通知警报。要处理前台通知,请使用 setNotificationWillShowInForgroundHandler
如果您根本不调用完成块,SDK 将在 29 秒后调用该完成块。在任何情况下,无论是静默通知还是警报通知,当应用程序处于前台模式时。
使用 Swift
class AppDelegate: UIResponder, UIApplicationDelegate {

    var window: UIWindow?


    override init() {
        super.init()
        // method Swizzling enabled for the application.
       PushEngage.swizzleInjection(isEnabled: true)
    }

    func application(_ application: UIApplication, didFinishLaunchingWithOptions launchOptions: [UIApplication.LaunchOptionsKey: Any]?) -> Bool {

        PushEngage.setAppID(id: "APP_ID_FROM_PUSH_ENGAGE_DASHBOARD")
        PushEngage.setInitialInfo(for: application, with: launchOptions)

        // Notification handler when notification deliver's and app is in foreground.

        PushEngage.setNotificationWillShowInForgroundHandler { notification, completion in
            if notification.contentAvailable == 1 {
                // in case the developer failed to set the completion handler. After 29 sec the handler will call from the SDK after 29 sec.
                completion(nil)
            } else {
                completion(notification)
            }
        }

        PushEngage.enableLogs = true

        return true
    }
}
使用 Objective-C
@implementation AppDelegate


- (instancetype)init
{
    self = [super init];
    if (self) {
       [PushEngage swizzleInjectionWithIsEnabled: YES];
    }
    return self;
}
// please create this handlers
typedef void (^ _Nonnull PENotificationDisplayHandler)(PENotification * _Nullable);

-(BOOL)application:(UIApplication*)application didFinishLaunchingWithOptions:(NSDictionary *)launchOptions {
    UNUserNotificationCenter.currentNotificationCenter.delegate = self;

    [PushEngage setNotificationWillShowInForgroundHandlerWithBlock:^(PENotification * _Nonnull notification, PENotificationDisplayHandler completion) {
        if (notification.contentAvailable == 1) {
            completion(nil);
        } else {
            completion(notification);
        }
    }];
    [PushEngage setAppIDWithId:@"APP_ID_FROM_PUSH_ENGAGE_DASHBOARD"];
    [PushEngage setInitialInfoFor:application with:launchOptions];
    [PushEngage setEnableLogs:true];
    return YES;
}
@end
故障排除
问题:
您遇到了与沙盒相关的构建问题。
解决方案:
- 在 Xcode 中打开您的项目。
- 导航到 构建设置。
- 找到 用户脚本沙盒 选项。
- 将其设置为 否。
问题:
您同时使用了 Firebase SDK 和 PushEngage SDK,并且为两者启用了方法调用,这导致了问题。
解决方案:
禁用 PushEngage SDK 的方法调用,并按照手动步骤处理 PushEngage 方法。您可以在此处找到详细说明:
PushEngage iOS SDK 文档
如果您想探索更多 iOS SDK 的功能,可以查阅我们详细的 API 文档。
如果您遇到任何问题,请 联系我们 。我们的支持团队将能够帮助您。