注意:此项目没有可用的旧版文档,因此您看到的是当前文档。
现在,您可以通过 PushEngage 为您的 Android 应用程序实现推送通知。只需集成一次 SDK,即可让您的营销团队能够向您的 Android 应用用户发送情境化和个性化的消息。您需要开发人员的帮助才能为您运行此程序。
设置 Firebase 项目
在开始应用推送通知之前,您需要确保您有一个现有的 Firebase 帐户。
1. 您需要使用您的 Google 帐户登录到Firebase 控制台。
2. 然后,您需要点击添加项目或选择一个现有项目。如果选择现有项目,请跳至第 4 步。

3. 输入项目名称,然后点击继续。在下一屏幕上,点击创建项目,并提供所有详细信息。


4. 点击 Android 图标将 Android 应用添加到项目中。

5. 在接下来的屏幕上,输入您的 Android 应用程序的包名称,提供您要集成的 Android 应用的名称,然后点击注册。

6. 下载 google-services.json 文件,并将其放入您的 Android 应用模块根目录。

7. 在 Firebase 控制台中,点击左上角项目概览旁边的设置图标,然后选择项目设置。点击生成新的私钥。
安全地保存上一步下载的 .json 文件,因为在 PushEngage 仪表板中设置它需要此文件。
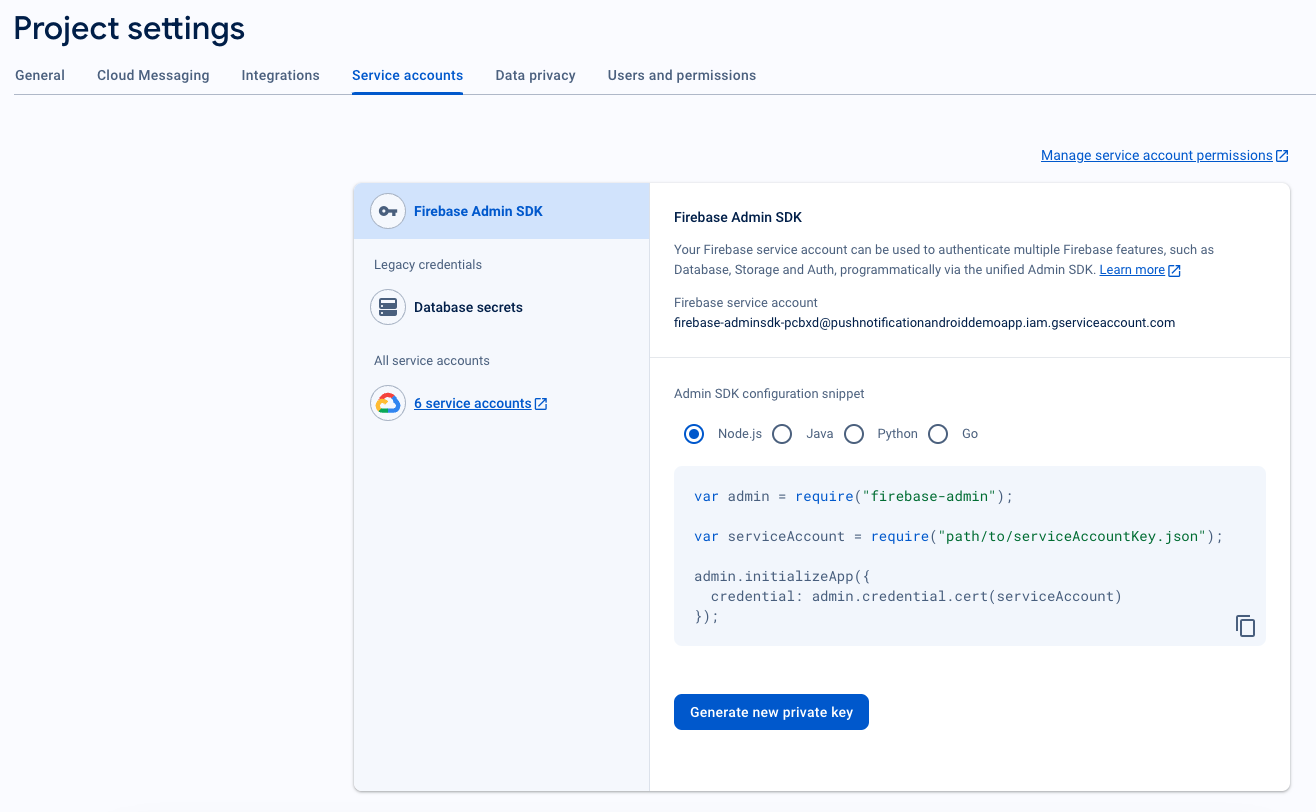
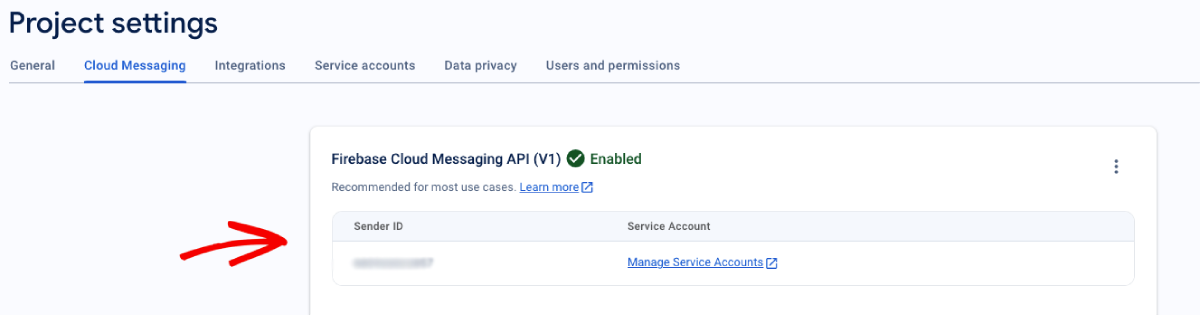
8. 在 Firebase 控制台中,点击左上角项目概览旁边的设置图标,然后选择“项目设置”。
选择Cloud Messaging选项卡,下方将显示发件人 ID。
将 FCM 与 PushEngage 仪表板集成
在 Firebase 中创建项目后,您就可以在 PushEngage 仪表板中集成发件人 ID 了。
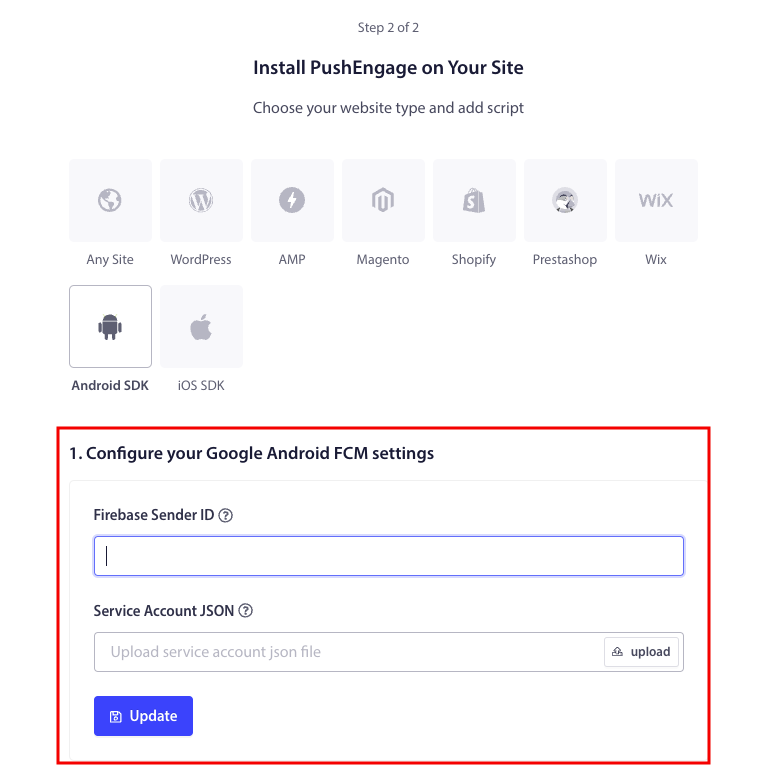
1. 在您的 PushEngage 帐户中,导航到网站设置 » 安装
2. 选择平台时,选择Android SDK选项卡。
3. 配置您的发件人 ID 和服务帐户 JSON
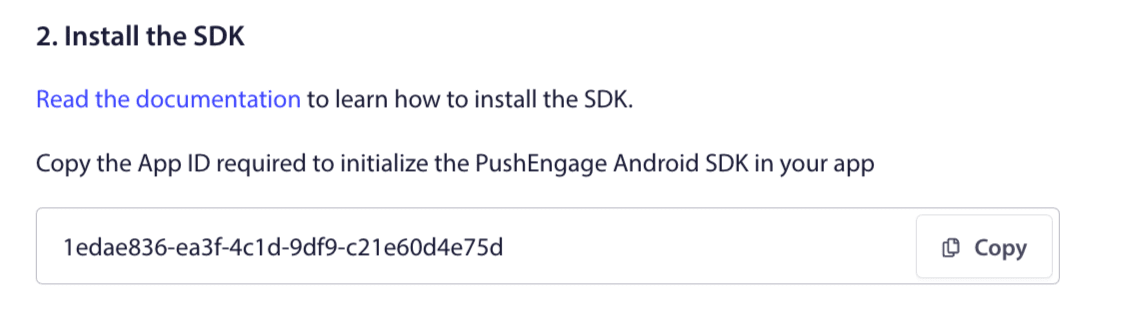
4. 复制在您的应用程序中初始化 PushEngage Android SDK 所需的应用 ID。
添加 SDK 依赖项
现在是时候添加 SDK 依赖项了。我们将以下行添加到您的根 build.gradle 文件中。
1. 如果您的项目未使用集中式存储库声明,请在项目级别的 build.gradle 文件中添加以下行。否则,您可以跳至第二部分。
// Project level build file where you can add configuration options common to all sub-projects/modules.
buildscript {
   repositories {
       google()
       jcenter()
   }
   dependencies {
       // ...
       // Add this line
       classpath "com.google.gms:google-services:4.3.10"

   }
}

allprojects {
   repositories {
      // ...
      // Check that you have the following line (if not, add it):
      google()
      maven {url 'https://jitpack.io' }
   }
}
如果您的项目使用集中式存储库声明,请将以下内容添加到您的 settings.gradle 文件中。
dependencyResolutionManagement {
    repositoriesMode.set(RepositoriesMode.FAIL_ON_PROJECT_REPOS)
    repositories {
        //add this line
        maven { url 'https://jitpack.io' }
    }
2. 然后在应用程序级别的 build.gradle 文件中添加以下内容:
plugins {
   id 'com.android.application'
   // Add this line
   id 'com.google.gms.google-services'
}

dependencies {
   // ...
   // Add the following lines
   implementation 'com.github.awesomemotive:pushengage-android-sdk:0.0.5'
   implementation platform('com.google.firebase:firebase-bom:26.1.1')
}
初始化 SDK
将 PushEngage SDK 初始化代码块添加到 Application 类中的 onCreate 方法。PUSHENGAGE_APP_ID 应替换为您从 PushEngage 仪表板获取的应用 ID。
注意:如果您的移动应用程序没有用于 PushEngage 的自定义类扩展 Application 类,则需要创建一个扩展 Application 类的类。
这里有一个Java示例
public class PEApplication extends Application {
@Override
public void onCreate() {
super.onCreate();

// PushEngage SDK Initialization code
PushEngage pushEngage = new PushEngage.Builder()
.addContext(getApplicationContext())
.setAppId("PUSHENGAGE_APP_ID")
.build();
// The small icon is displayed on the top status bar and in the notification.
// By default PushEngage displays a bell icon, however It is recommended to
// customize this so users easily recognize notifications from your app.
PushEngage.setSmallIconResource("your_icon_name");
}
}
这里有一个Kotlin示例
class PEApplication : Application() {
   override fun onCreate() {
       super.onCreate()
       // PushEngage SDK Initialization code
       val pushEngage = PushEngage.Builder()
           .addContext(applicationContext)
           .setAppId("PUSHENGAGE_APP_ID")
           .build()
        // The small icon is displayed on the top status bar and in the notification.
       // By default PushEngage displays a bell icon, however It is recommended to
       // customize this so users easily recognize notifications from your app.
       PushEngage.setSmallIconResource("your_icon_name");
   }
}
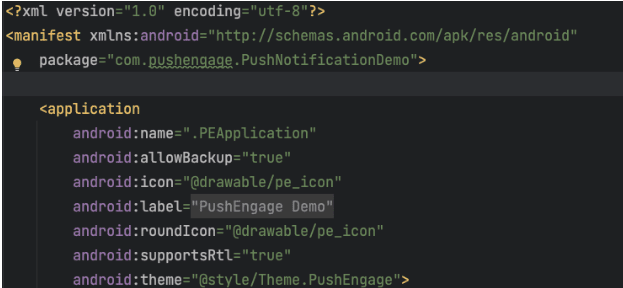
要注册您的自定义类名(该类名扩展了Application类),请导航到您的应用程序的Manifest.xml文件。找到显示“android:name=.”PEApplication”,”的行,然后将“PEApplication”替换为您自定义的类名。它看起来会像这样 -
配置完以上所有步骤后,您就可以向您的Android应用程序发送推送通知了。在实体设备上构建并运行该应用程序,然后从PushEngage仪表板发送测试推送通知。
处理Android 13及更高版本的通知权限
Android 13在向某些设备发送任何通知之前需要获得权限。因此,如果您愿意设置,请添加此项。这是所需的代码。
使用内置的SDK方法请求通知权限。
 /**
 * Request notification permission using the PushEngage SDK
 * SDK automatically calls subscribe when permission is granted
 */
private void requestNotificationPermissionUsingSDK() {
    PushEngage.requestNotificationPermission(this, new PushEngagePermissionCallback() {
        @Override
        public void onPermissionResult(boolean granted, Error error) {
            if (granted) {
                // Permission granted - SDK automatically calls subscribe
                Log.d("MainActivity", "Notification permission granted");
                Toast.makeText(MainActivity.this, "Permission granted and subscribed!", Toast.LENGTH_SHORT).show();
            } else {
                // Permission denied, handle accordingly
                Log.d("MainActivity", "Notification permission denied");
                Toast.makeText(MainActivity.this, "Permission denied!", Toast.LENGTH_SHORT).show();
                if (error != null) {
                    Log.e("MainActivity", "Permission error: " + error.getMessage());
                }
            }
        }
    });
}
检查权限状态
您还可以检查当前的通知权限状态:
String permissionStatus = PushEngage.getNotificationPermissionStatus();
switch (permissionStatus) {
    case "granted":
        Log.d("Permission", "Notifications are allowed");
        break;
    case "denied":
        Log.d("Permission", "Notifications are denied");
        break;
    default:
        Log.d("Permission", "Unknown permission status");
        break;
}
如果您想探索更多Android SDK的功能,可以查阅我们的详细API文档。
如果您遇到任何问题,请 联系我们 。我们的支持团队将能够帮助您。


