
Looking for a simple guide to iOS push alert campaigns? iOS push alerts, those handy little messages that pop up on your screen, can be a real game-changer for your business if used properly.
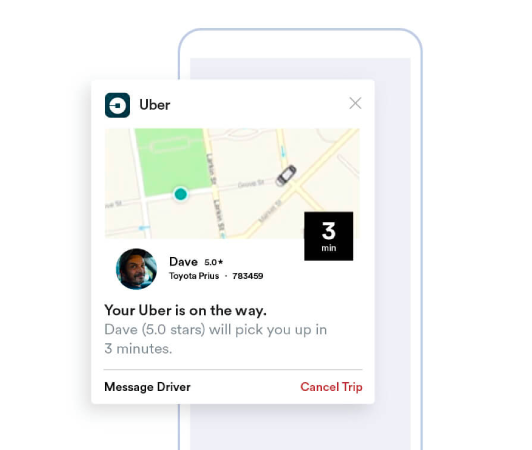
Now picture this: You’re a business owner and you’ve just launched a flash sale on your website and app. How do you get customers to immediately flock to your site? Simple, by sending out an iOS push alert. Just like that, shoppers receive a timely notification about the sale, and your website and app traffic shoots through the roof.
But what is an iOS push alert exactly? Think of it as your personal, pocket-sized billboard. It’s a brief message or notification pushed to iOS devices (iPhones, iPads) from apps installed on the device.
The best part is that you can get all this set up super fast! Sounds interesting, right? Let’s dive in.
What is an iOS Push Alert?
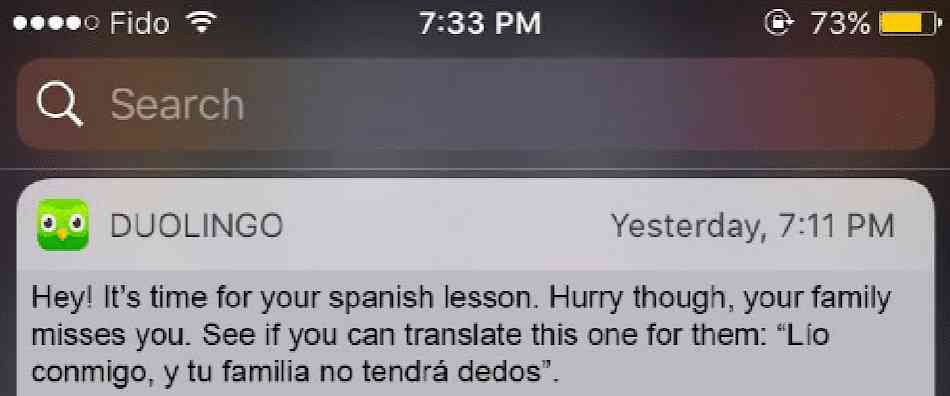
An iOS push alert is akin to a small digital memo that shows up on your Apple mobile devices. It could be from your favorite social media platforms, news distributors, or online shopping apps – all aiming to keep you in the loop, engaged, and connected.
Think of these mini-messages as gentle taps on your iOS device’s shoulder sent via the Apple Push Notification service (APNs). It’s almost as if the app is whispering to your device, requesting for your attention. The remarkable aspect of iOS push alerts is that you don’t even need to have the app active, or be using it. As if by a stroke of wizardry, notifications pop-up even on your locked screen, assuring you never bypass essential updates or prompts.
iOS push alerts offer a wealth of benefits. First and foremost, they are an exceptional tool for keeping you informed with up-to-the-minute information. Picture an alert from an online shopping app informing you about a current sale.

Additionally, they can save you precious time. Imagine your banking app sending an alert confirming a successful transaction, negating the need to login and check manually. On top of these pragmatic benefits, iOS push alerts enhance your overall app experience by making it more lively and interactive.
Navigating these notifications is made user-friendly by platforms such as PushEngage. Empowered with sophisticated features, PushEngage ensures these bite-sized information pieces serving your interests, reach you timely and are streamlined according to your preferences. Whether it’s notification frequency or the type of alerts; PushEngage places the control in your hands.
Armed with a basic understanding of what iOS push alerts are and their mechanics, let’s delve deeper into the variety of notifications and unravel how apps harness them to engage and convert their users.
Types of iOS Push Alert Campaigns You Can Use
There are many types of iOS push alerts that can be used to increase interaction with your audience. By understanding these different types, you can improve their effectiveness and create a more personalized and interactive user experience.
- In-App Alerts: These alerts can be sent when a user is actively using your app. For example, an e-commerce app can send an alert about a special discount on an item that the user is interested in. With PushEngage, businesses can easily send these relevant and timely messages to increase user engagement.
- Location-Based Notifications: These alerts are sent based on the user’s geographical location. They are great for businesses like retail outlets or events that want to inform nearby users about exclusive offers. PushEngage makes geo-targeting simple, ensuring businesses can effectively reach their target audience no matter where they are.
- Behavior-Based Alerts: These notifications are sent in response to specific actions taken (or not taken) by the user in the app. For example, if a user adds an item to their cart but doesn’t buy it, a behavior-based alert could remind them. With PushEngage, businesses can precisely manage these types of notifications.
- Timed Notifications: These push alerts are set to be sent at predetermined times and can be used for recurring events or notifications. With PushEngage, these notifications can be scheduled ahead of time, ensuring users stay informed about important updates or events.
A successful push alert campaign needs the right type of notification for its goals. So, if you’re looking to boost your business using iOS push alert campaigns, you need an iOS push notification service with many choices available to optimize your strategy for maximum engagement.
How Does an iOS Push Alert Work?
An iOS push alert is generated when the specific app on your iOS device communicates with the APNs. Once the notification is crafted and sent, APNs routes it to the intended device – all within the space of a few microseconds.
Now let’s dive deeper into the world of iOS push alerts. Consider checking your phone and you immediately see a notification from your favorite news app telling you about breaking news, or your go-to shopping app alerting you about a flash sale. These are the moments when iOS push alerts come into play. These notifications are small messages that apps send to appear on the device’s home or lock screen, even when the app is not currently in use.
iOS push alerts are vital parts of our day-to-day digital interaction. They are powered by Apple’s push notification service, known as APNs. This service coordinates the delivery of notifications from the servers of your apps to your Apple devices. This process ensures that you’re always in the loop, receiving real-time updates from your apps without having to check them manually.
These alerts not only provide information, but also save you time and keep you connected. Using our partner, PushEngage, businesses can send targeted iOS push alerts that enhance user dopamine and engagement levels. For instance, PushEngage-driven notifications can intelligently remind you about the items left in your e-commerce cart or alert you about the arrival of a much-awaited product. In this sense, they enrich the overall user experience by providing optimized and personalized notifications.
Think of it this way: iOS push notifications are like friendly gatekeepers, providing helpful updates right at the doorsteps of your device. And what’s more, their roles are becoming increasingly diverse and exciting with passing time. So, by using a powerful tool like PushEngage, both businesses and users can derive significant benefits from these sophisticated alert systems.
How to Add iOS Push Alerts to Your App
There are fundamentally two types of iOS push alert campaigns:
- An iOS web push alert
- An iOS app push alert
Based on your business, you might be able to send both web and app push notifications. And we highly recommend sending both types of push alerts. But before you create an iOS push alert, you need to select a push notification service. A push notification service is a software that allows you to create push campaigns without any coding.
Συνιστούμε τη χρήση του PushEngage.

Το PushEngage είναι το #1 plugin ειδοποιήσεων push στον κόσμο.
Οι ειδοποιήσεις push σας βοηθούν να αυξήσετε την επισκεψιμότητα του ιστότοπού σας και την αλληλεπίδραση σε αυτόματο πιλότο. Και αν διαχειρίζεστε ένα online κατάστημα, το PushEngage σας βοηθά επίσης να αυξήσετε τις πωλήσεις σας, βοηθώντας σας να δημιουργήσετε αυτοματοποιημένες ειδοποιήσεις push eCommerce.
Μπορείτε να ξεκινήσετε δωρεάν, αλλά αν σοβαρά θέλετε να αναπτύξετε την επιχείρησή σας, θα πρέπει να αγοράσετε ένα επί πληρωμή πρόγραμμα. Επίσης, πριν αγοράσετε οποιαδήποτε υπηρεσία ειδοποιήσεων push, θα πρέπει να δείτε αυτόν τον οδηγό για το κόστος ειδοποιήσεων push.
Ακολουθεί μια γρήγορη επισκόπηση του τι παίρνετε με το PushEngage:
- Αυτοματοποιημένες εκστρατείες με υψηλή μετατροπή
- Πολλαπλές επιλογές στόχευσης και προγραμματισμού καμπανιών
- Goal tracking and advanced analytics
- Έξυπνες Δοκιμές A/B
- Proven push notification templates to help you get more traffic and conversions
- Ένας Αφοσιωμένος Διαχειριστής Επιτυχίας
Θα δείτε ότι η PushEngage είναι μακράν η καλύτερη επιλογή αν θέλετε να αυξήσετε την επισκεψιμότητα, την αφοσίωση και τις πωλήσεις για την επιχείρησή σας. Και αν έχετε περιορισμένο προϋπολογισμό, μπορείτε πάντα να γίνετε λίγο δημιουργικοί με τις ειδοποιήσεις push σας.
How to Create a Free PushEngage Account
Μεταβείτε στο PushEngage και κάντε κλικ στο Ξεκινήστε Δωρεάν Τώρα:
Μπορείτε να ξεκινήσετε με το δωρεάν πρόγραμμα. Αλλά αν ψάχνετε για τις πιο ισχυρές ειδοποιήσεις μέσω προγράμματος περιήγησης, θα πρέπει να επιλέξετε ένα επί πληρωμή πρόγραμμα με βάση τις ανάγκες της επιχείρησής σας. Μόλις γνωρίζετε ποιο πρόγραμμα θέλετε, κάντε κλικ στο Ξεκινήστε για να δημιουργήσετε τον λογαριασμό σας στο PushEngage.
Sign Up for PushEngage
Τώρα, είναι ώρα να δημιουργήσετε τον λογαριασμό σας στο PushEngage. Ξεκινήστε κάνοντας εγγραφή με μια διεύθυνση email ή ένα αναγνωριστικό Gmail:

Στη συνέχεια, συμπληρώστε τα στοιχεία του λογαριασμού σας:

Και προσθέστε τα στοιχεία της πιστωτικής σας κάρτας για να αγοράσετε το πρόγραμμά σας:

Εάν επιλέξατε τον δωρεάν λογαριασμό, τότε η πιστωτική σας κάρτα δεν θα χρεωθεί ποτέ χρήματα μέχρι να επιλέξετε να αναβαθμίσετε το πρόγραμμά σας. Και τώρα, είστε έτοιμοι να αποκτήσετε πρόσβαση στον πίνακα ελέγχου του PushEngage. Απλώς κάντε κλικ στο Ολοκλήρωση Εγγραφής και Άμεση Πρόσβαση.
Εάν έχετε χρησιμοποιήσει το OneSignal ή το PushAlert στο παρελθόν, θα δείτε ότι το PushEngage σας προσφέρει μια πολύ πιο καθαρή εμπειρία από τον πίνακα ελέγχου. Ο πίνακας ελέγχου του OneSignal δεν είναι σχεδιασμένος για προηγμένες καμπάνιες. Για αυτό, θα χρειαστείτε το API περισσότερο από το plugin του OneSignal.
How to Add Web App iOS Push Alert Campaigns to Your Website
Let’s start by setting up iOS push alerts from your website. The idea behind this is simple. We turn your website into a simple web app that can send iOS and iPadOS push notifications. This approach is ideal for sending web app push notifications.
Step #1: Add a Web App Manifest to Your Website to Send Web Push Notifications
Think of a web app manifest as a special file that acts like a guidebook for your website when it’s installed on someone’s phone or computer. It’s written in a language called JSON, but you don’t have to worry about that part.
The manifest file contains important information about your Progressive Web App (PWA), like its name, description, icons, and colors. So, when someone adds your website to their home screen or installs it on their device, the browser uses this manifest to know how your app should look and behave. This allows you to send PWA push notifications.
For example, the manifest tells the browser what icon to use for your app on the home screen or app drawer, so it looks nice and recognizable. It also specifies the colors and theme of your app to give it a consistent and appealing appearance.
Additionally, the manifest includes the URL that should be opened when someone launches your app. This way, the browser knows which page or section of your website to show them first.
Creating a manifest file can be done quickly with online tools that do the hard work for you. We recommend using this free app manifest generator to build your web app manifest in a few clicks and zero coding.
Once you have the manifest ready, you usually name it “manifest.json” and upload it to the root folder of your website.
In a nutshell, the web app manifest is like a manual that makes your web app look and feel just right when people use it on their devices. It’s an essential part of creating a great user experience for your website visitors.
A typical manifest looks something like this:
{
	"name": "PushEngage",
	"short_name": "PushEngage",
	"start_url": "/",
	"display": "standalone",
	"theme_color": "#3b43ff",
	"background_color": "#ffffff",
	"icons": [
		{
			"src": "icon/icon-128x128.png",
				"sizes": "128x128",
				"type": "image/png"
		},
		{
			"src": "img/icon-192x192.png",
			"sizes": "192x192",
			"type": "image/png"
		},
		{
			"src": "img/icon-512x512.png",
			"sizes": "512x512",
			"type": "image/png"
		}
 	]
}
Once you add your manifest file to the root folder of your website server, you need to add a code snippet in the HTML head of your website. The snippet would look something like this:
<link rel="manifest" href="/manifest.json">If you’re using WordPress and need help adding this code snippet to your site’s header, you can use WPCode to upload the manifest file. It’s one of the best code snippet plugins for WordPress.
Step #2: Install PushEngage to Your WordPress Site
You’re done creating your account. So, head over to the PushEngage dashboard and follow along.
NOTE: If you’re not running a WordPress site, you should check out our other installation guides.

Κάντε κλικ στο Ρυθμίσεις Ιστότοπου » Λεπτομέρειες Ιστότοπου και κάντε κλικ στο κουμπί Κάντε Κλικ Εδώ Για Οδηγίες Εγκατάστασης:

Κάντε κλικ στην καρτέλα WordPress και κάντε κλικ στο κουμπί Εγκατάσταση Πρόσθετου PushEngage WordPress για να εγκαταστήσετε το πρόσθετο στον ιστότοπό σας.

Here’s the cool part: When you created your PushEngage account, you already synced your website with your PushEngage account. So, click on the installation link in the PushEngage dashboard to automatically install the PushEngage WordPress plugin to your website.
Step #3: Connect Your WordPress Website with PushEngage
When you’re done installing and activating the PushEngage WordPress plugin, you’ll see the PushEngage onboarding wizard:

Ο οδηγός είναι αρκετά απλός. Εάν είστε νέος χρήστης, κάντε κλικ στο Νέος; Διεκδικήστε τον Δωρεάν Λογαριασμό σας. Και αν έχετε ήδη εγγραφεί, κάντε κλικ στο Σύνδεση του Υπάρχοντος Λογαριασμού σας.
Στη συνέχεια, μπορείτε να επιλέξετε τον ιστότοπό σας από το αναπτυσσόμενο μενού Επιλογή Ιστότοπου κάτω από το Σύνδεση εγγεγραμμένου ιστότοπου εάν έχετε ήδη καταχωρήσει έναν ιστότοπο κατά την εγγραφή:

Εναλλακτικά, μπορείτε να κάνετε κλικ στο Εγγραφή νέου ιστότοπου για να προσθέσετε έναν νέο ιστότοπο εάν έχετε πακέτο τιμολόγησης Premium ή υψηλότερο. Στο επόμενο βήμα, ο οδηγός γνωριμίας θα σας ζητήσει να εγκαταστήσετε άλλα απαραίτητα πρόσθετα WordPress.

Εάν ακολουθήσατε κάθε βήμα σωστά, θα δείτε αυτό το μήνυμα επιτυχίας από τον οδηγό:

Είστε τώρα έτοιμοι να δημιουργήσετε καμπάνιες και αναδυόμενα παράθυρα ειδοποιήσεων push.
Step #4: Test Your Website Manifest
Alright, let’s walk through the steps to test your web app and make sure everything is working smoothly.
First, open your website using the Safari browser on your iPhone or iPad. Make sure your device is running iOS 16.4 or a newer version. Once your website is loaded, you’ll see a Share button. It looks like a square with an arrow pointing up. Tap on that button to open the sharing menu.
In the sharing menu, you should find an option called Add to Home Screen. Click on that option.
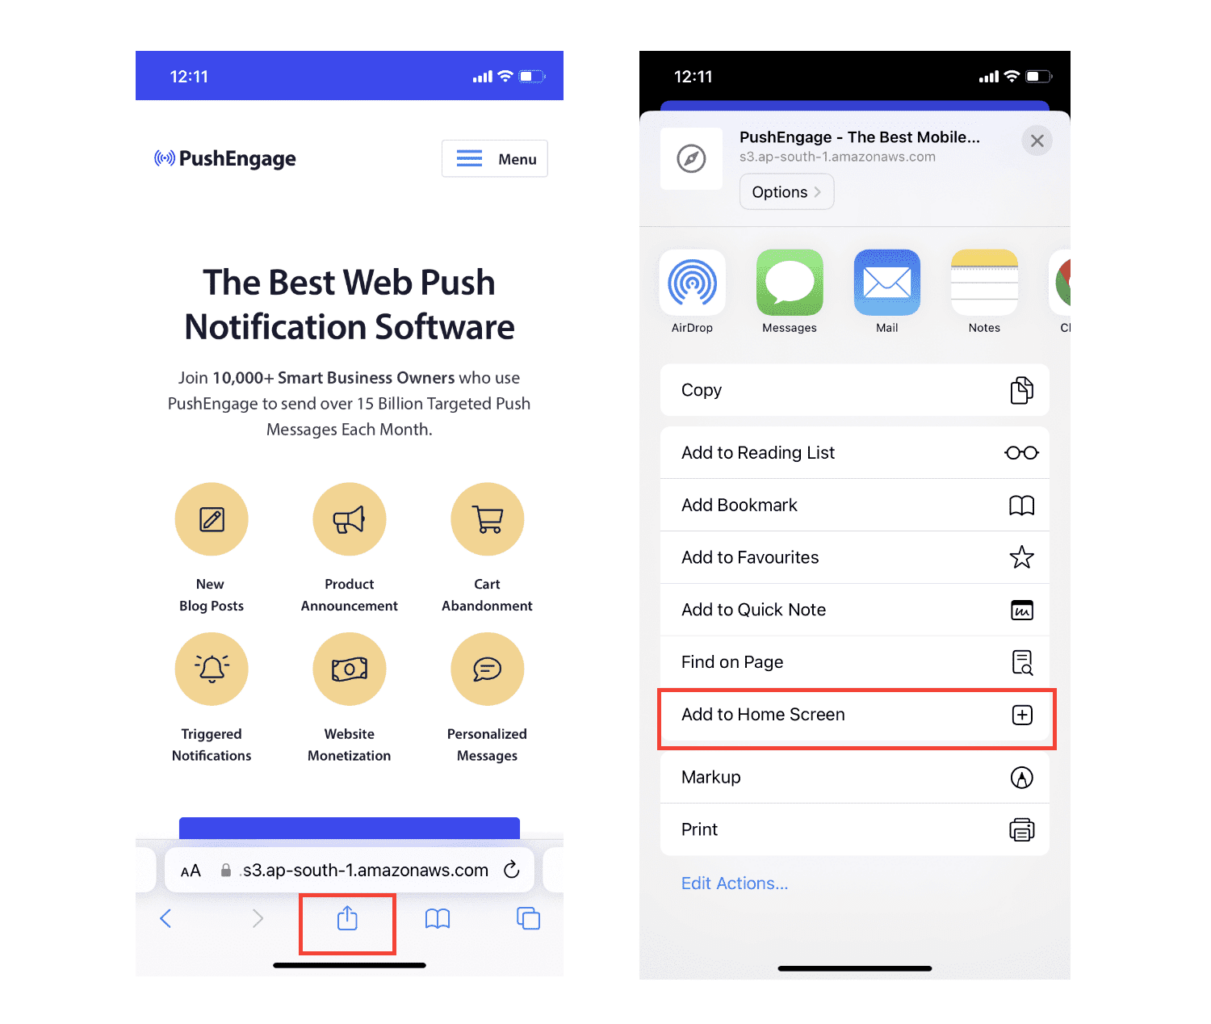
Now, the web app will be saved to your device’s Home Screen, just like any other app you download from the App Store.
If everything has been set up correctly, when you open the app from your Home Screen, it won’t open in the Safari browser anymore. Instead, it will feel like using a regular app on your iPhone or iPad.
To let your users know that they can get web push notifications from your app, you can show them a banner on the screen. This banner will prompt them to add your app to their Home Screen and subscribe to the web push notifications. It’s a handy way to keep your users engaged with your app and receive important updates.
So, follow these steps, and you’ll be all set to provide a smooth and app-like experience to your users on iOS devices! For a full walkthrough on testing your push notifications, check out our documentation on iOS web push notifications.
How to Add Mobile App iOS Push Alert Campaigns to Your App
The easiest way to send mobile iOS mobile app push alerts from your native iOS app is to use the PushEngage iOS SDK. Right till now, you had to use skeleton SDKs to send app push notifications. The problem with using those SDKs is that they are pretty bare bones.
Θεωρητικά, μπορείτε να στείλετε οποιονδήποτε τύπο καμπάνιας push notifications για mobile apps με αυτές. Αλλά μετά, πρέπει επίσης να δημιουργήσετε:
- Μια διεπαφή για τη διαχείριση των καμπανιών σας
- Μια σουίτα αναλύσεων για την παρακολούθηση της απόδοσης των καμπανιών σας
- Καλύτερη υποστήριξη για πλούσια μέσα και συνδέσμους ανακατεύθυνσης εντός εφαρμογής (ή deep links)
- Διαδικασίες για τη συνεννόηση μεταξύ των ομάδων μάρκετινγκ και ανάπτυξης
Όλα για την εισαγωγή ενός μόνο καναλιού ανάπτυξης. Η χρήση των παλιών εργαλείων για την αποστολή push notifications για mobile apps είναι κουραστική, δαπανηρή, απαιτεί πολλούς πόρους και χρονοβόρα. Και φυσικά, απαιτεί βαθιές δεξιότητες κωδικοποίησης στην ομάδα σας για την ανάπτυξη και διαχείριση όλων όσων δημιουργείτε.
Με τα SDK της PushEngage για Android και iOS, μπορείτε να στέλνετε ειδοποιήσεις push εφαρμογών για κινητά χρησιμοποιώντας το ίδιο αξιόπιστο λογισμικό για εξαιρετικά ποσοστά παράδοσης. Έχουμε όμως δημιουργήσει πολλά επίπεδα από πάνω που καθιστούν εξαιρετικά εύκολη τη δημιουργία προσαρμοσμένων ενσωματώσεων με την εφαρμογή σας. Και η PushEngage διαχειρίζεται ολόκληρο το SDK. Έτσι, δεν χρειάζεται καν να ξοδέψετε πολύ χρόνο και χρήμα για να διαχειριστείτε τις ενσωματώσεις σας.
Το μόνο που έχετε να κάνετε είναι να δημιουργήσετε!
Μπορείτε να στέλνετε μαζικές ειδοποιήσεις απευθείας από τον πίνακα ελέγχου της PushEngage αφού έχετε ρυθμίσει την εφαρμογή σας για να στέλνετε ειδοποιήσεις push εφαρμογών για κινητά χρησιμοποιώντας το SDK της PushEngage. Ναι, εξακολουθείτε να πρέπει να προσθέσετε κώδικα στην εφαρμογή σας και να αναπτύξετε τους συνδέσμους μεταξύ της εφαρμογής σας και του API της PushEngage. Αλλά μόλις γίνει αυτό, μπορείτε εύκολα να δημιουργήσετε καμπάνιες push εφαρμογών για κινητά από μια προκατασκευασμένη διεπαφή λογισμικού που έρχεται επίσης με:
- Άκρως ελκυστικοί τύποι καμπανιών push
- Αποδεδειγμένα πρότυπα καμπάνιας με υψηλά ποσοστά μετατροπής
- Αυτοματοποιημένες καμπάνιες για την προώθηση του περιεχομένου σας όποτε δημοσιεύετε
- Πολλαπλές επιλογές στόχευσης και προγραμματισμού καμπάνιας
- Καμπάνιες push στο web ως συμπληρωματικό κανάλι ανάπτυξης
- Αυξημένη διατήρηση κοινού χρησιμοποιώντας εξατομίκευση βάσει δεδομένων
- Παρακολούθηση στόχων και προηγμένη ανάλυση
- Έξυπνες δοκιμές A/B
- Ένας Αφοσιωμένος Διαχειριστής Επιτυχίας
And so much more. PushEngage takes the pain out of developing Android and iOS mobile push campaigns for your app.
We created a detailed step-by-step guide to setting up iOS app push notifications for PushEngage. Go check that out to start sending iOS app push alerts right away.
How to Personalize Your Campaigns
Before you create a campaign, you should set up segments and audience groups to send personalized push messages.
Τίποτα δεν ξεπερνά το επίπεδο εξατομίκευσης που μπορείτε να πετύχετε δημιουργώντας τμήματα και ομάδες κοινού για τους συνδρομητές σας στις ειδοποιήσεις push. Μεταβείτε στο PushEngage » Audience και ξεκινήστε αμέσως τη δημιουργία τμημάτων και ομάδων κοινού.
Στην καρτέλα Segments (Τμήματα), μπορείτε να δημιουργήσετε νέα τμήματα ή να επεξεργαστείτε υπάρχοντα:

Και αν χρειάζεστε ακόμη βαθύτερη εξατομίκευση, δημιουργήστε μια ομάδα κοινού στην καρτέλα Audience Groups (Ομάδες Κοινού):

Αν είστε νέοι στα τμήματα ειδοποιήσεων push και στις εξατομικευμένες ειδοποιήσεις push, θα πρέπει να διαβάσετε το άρθρο μας σχετικά με το πώς να δημιουργήσετε τμήματα και την ανακοίνωσή μας σχετικά με την προηγμένη ομαδοποίηση κοινού.
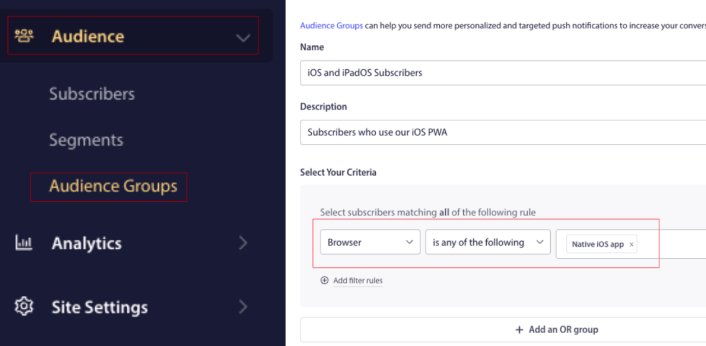
The coolest bit is that you can create targeted push campaigns by creating an Audience Group for just your iOS and iPadOS users:
And you can use this Audience Group for your drip campaigns and broadcasts.
How to Create a Push Notification Drip Campaign
Μεταβείτε στον πίνακα ελέγχου PushEngage και πηγαίνετε στο Campaign » Drip Autoresponders και κάντε κλικ στο Create New Drip Autoresponder:

Στη συνέχεια, δώστε ένα όνομα στην καμπάνια σας (προτείνουμε κάτι σαν Welcome Drip) και κάτω από το Content, επιλέξτε την επιλογή που λέει, “Send notification immediately after user subscribes“):

Σε αυτό το σημείο, μπορείτε να κάνετε κλικ στο βέλος δίπλα στην ειδοποίηση για να επεξεργαστείτε το περιεχόμενο της ειδοποίησής σας.
Εάν έχετε πρόγραμμα Premium ή Enterprise με το PushEngage, θα μπορείτε να προσθέσετε περισσότερες από μία ειδοποιήσεις για να δημιουργήσετε μια σειρά από αυτοματοποιημένα μηνύματα καλωσορίσματος. Απλώς κάντε κλικ στο Add New Notification και επεξεργαστείτε το περιεχόμενο.
Μόλις τελειώσετε, κάντε κλικ στο Drip Settings και επιλέξτε την επιλογή αποστολής της καμπάνιας καλωσορίσματός σας σε όλους τους συνδρομητές:

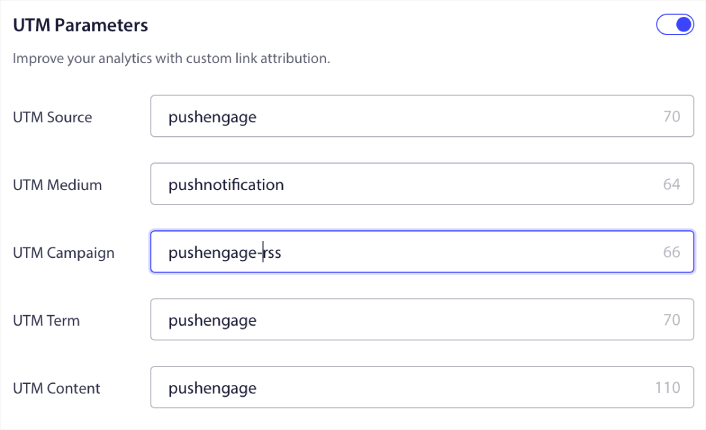
Στη συνέχεια, κάντε κύλιση προς τα κάτω για να ορίσετε τις δικές σας παραμέτρους UTM για να παρακολουθείτε τις ειδοποιήσεις push:
Και όταν τελειώσετε, κάντε κύλιση προς τα πάνω και κάντε κλικ στο κουμπί Activate Autoresponder:

Και τελειώσατε!
How to Send a iOS Web Push Broadcast
Μεταβείτε στον πίνακα ελέγχου PushEngage σας και πηγαίνετε στο Campaign » Push Broadcasts και κάντε κλικ στο κουμπί Create a New Push Broadcast:

Στην καρτέλα Content, προσθέστε το περιεχόμενο της ειδοποίησης push σας:

Και μπορείτε να ρυθμίσετε μια δοκιμή A/B για να αυξήσετε τα ποσοστά κλικ σας ή μπορείτε να προγραμματίσετε τις εκπομπές push σας για να λάβετε περισσότερες προβολές. Σε κάθε περίπτωση, θα πρέπει να ελέγξετε τις βέλτιστες πρακτικές ειδοποιήσεων push για τα καλύτερα αποτελέσματα.
How to Create a iOS Push Notification Popup Modal
Ένα modal αναδυόμενης ειδοποίησης push είναι ένα μικρό παράθυρο που εμφανίζεται πάνω από τη διεπαφή μιας ιστοσελίδας ή εφαρμογής για κινητά για να εμφανίσει ένα μήνυμα ή μια ειδοποίηση στον επισκέπτη της ιστοσελίδας.
Το modal αναδυόμενο παράθυρο μπορεί να ενεργοποιηθεί από διάφορα γεγονότα. Μπορείτε να ρυθμίσετε αναδυόμενα παράθυρα για να ενεργοποιούνται κατά την επίσκεψη σελίδας, κατά το βάθος κύλισης, ακόμη και κατά προσαρμοσμένες ενέργειες όπως κλικ σε κουμπί.
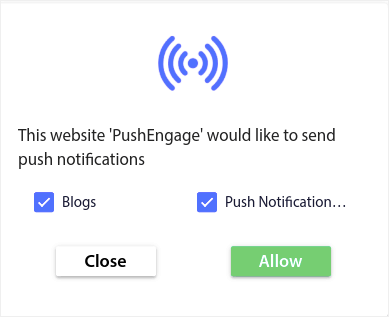
Συνήθως, θα δείτε μια παρότρυνση για δράση στο αναδυόμενο παράθυρο, όπως «Εγγραφή» ή «Να επιτραπεί», για να λάβετε τη συγκατάθεση των επισκεπτών για την αποστολή ειδοποιήσεων push. Αν ακολουθήσετε αυτό το σεμινάριο, μπορείτε να δημιουργήσετε ένα αναδυόμενο παράθυρο σαν αυτό:
Μπορείτε να δημιουργήσετε αναδυόμενα παράθυρα που μπορούν να τμηματοποιήσουν τους συνδρομητές απευθείας ή να δημιουργήσετε κανονικά αναδυόμενα παράθυρα που απλώς συλλέγουν συνδρομητές με τα προεπιλεγμένα χαρακτηριστικά, όπως γεωγραφική τοποθεσία και πρόγραμμα περιήγησης.
Επιστρέψτε στον πίνακα ελέγχου του WordPress. Μεταβείτε στο PushEngage » Σχεδίαση:
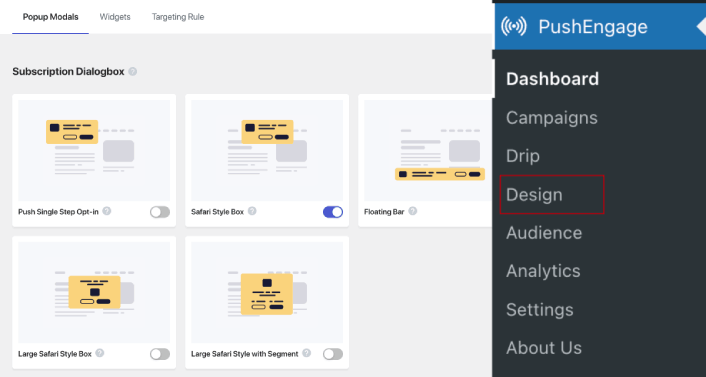
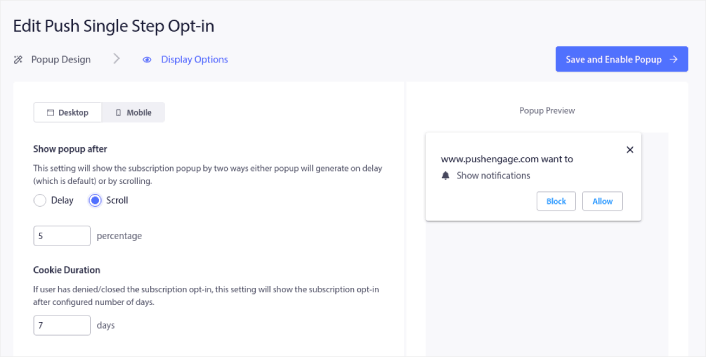
Και μπορείτε να ρυθμίσετε όσα αναδυόμενα παράθυρα θέλετε. Φυσικά, μπορείτε να βεβαιωθείτε ότι ενεργοποιούνται σε διαφορετικές χρονικές στιγμές κάτω από τις Επιλογές Εμφάνισης για κάθε αναδυόμενο παράθυρο.
Η ιδέα εδώ είναι να δώσετε στους επισκέπτες σας έναν ισχυρό λόγο για να εγγραφούν. Εάν χρειάζεστε βοήθεια με αυτό, ελέγξτε το άρθρο μας σχετικά με το πώς να δημιουργήσετε μια προσαρμοσμένη φόρμα εγγραφής για ειδοποιήσεις push.
Και αν θέλετε να δημιουργήσετε πιο στοχευμένα αναδυόμενα παράθυρα, μπορείτε να χρησιμοποιήσετε τους κανόνες στόχευσης κάτω από την καρτέλα Κανόνας Στόχευσης:
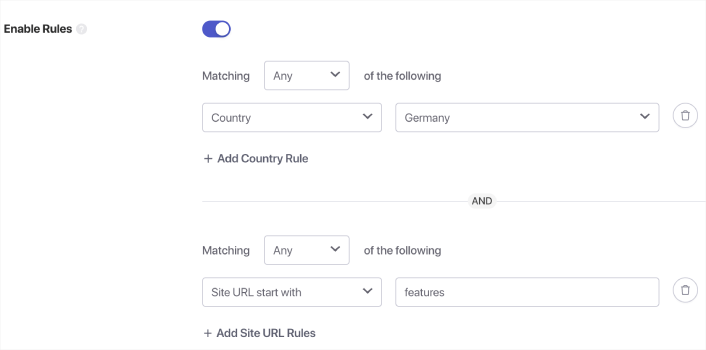
Αυτοί είναι καθολικοί κανόνες στόχευσης και θα έχουν προτεραιότητα έναντι των κανόνων στόχευσης για μεμονωμένα αναδυόμενα παράθυρα. Αλλά αν θέλετε, μπορείτε να δημιουργήσετε ισχυρούς κανόνες στόχευσης για κάθε αναδυόμενο παράθυρο επεξεργαζόμενοι τα.
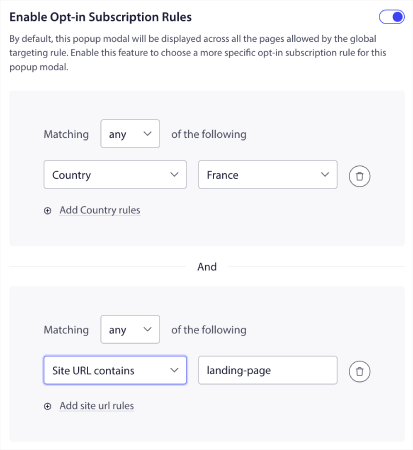
Για παράδειγμα, μπορείτε να δημιουργήσετε αναδυόμενα παράθυρα σε διαφορετικές γλώσσες για να στοχεύσετε επισκέπτες από διαφορετικές χώρες.
Και αν θέλετε μερικά πρότυπα με υψηλό ποσοστό κλικ για να ξεκινήσετε, θα πρέπει να ελέγξετε αυτό το άρθρο σχετικά με τα πρότυπα εγγραφής για ειδοποιήσεις push με υψηλές μετατροπές.
What to Do Before You Send iOS Push Alerts
Είστε σχεδόν έτοιμοι.
Before you start sending web push notifications for iOS and iPadOS, you’ll need to set up a subscription opt-in for your website. Your opt-in will convert web visitors into push notification subscribers. So, this is a critical element.
Αν χρειάζεστε έμπνευση, μπορείτε να δείτε αυτό το άρθρο σχετικά με επιλογές εγγραφής για ειδοποιήσεις push με υψηλή μετατροπή. Μόλις ολοκληρώσετε τη ρύθμιση της επιλογής, ο ιστότοπός σας μπορεί να συλλέγει συνδρομητές. Αλλά πώς ξέρετε καν ότι η επιλογή σας λειτουργεί σωστά;
Έτσι, το λογικό είναι να ρυθμίσετε μια ειδοποίηση καλωσορίσματος push.
Συμβουλή: Θα πρέπει να αφιερώσετε λίγο χρόνο για μια ολοκληρωμένη δοκιμή των ειδοποιήσεων push. Αυτό θα επιλύσει τα πιο συνηθισμένα προβλήματα και δεν θα χάσετε χρόνο προσπαθώντας να επιλύσετε ζητήματα αργότερα.
What to Do After You Send iOS Push Alerts
Αυτό ήταν για αυτό το θέμα, φίλοι!
Αν βρήκατε αυτό το άρθρο χρήσιμο, φροντίστε να αφήσετε ένα σχόλιο παρακάτω.
Η έναρξη με τις ειδοποιήσεις push μπορεί να φαίνεται τρομακτική. Αλλά αν παρακολουθείτε την παρακολούθηση στόχων και την ανάλυση, θα είστε εντάξει. Το πιο σημαντικό, θα κερδίσετε πολύ περισσότερα κέρδη με τη βοήθεια καμπανιών ειδοποιήσεων push. Ακολουθούν μερικοί δροσεροί πόροι για να ξεκινήσετε:
- Πώς να χρησιμοποιήσετε ειδοποιήσεις push επανα στόχευσης για να διπλασιάσετε τα έσοδά σας
- Πώς να ταξινομήσετε τις ειδοποιήσεις push και να βρείτε επιτυχημένες καμπάνιες
- Πώς να καθαρίσετε τις λίστες συνδρομητών ειδοποιήσεων push (Εύκολο)
- Πώς να στέλνετε αυτόματα ειδοποιήσεις push RSS
- Πώς να χρησιμοποιείτε ειδοποιήσεις push για την προώθηση ενός ειδησεογραφικού ιστότοπου
- Πώς να χρησιμοποιείτε ειδοποιήσεις push cross-selling για να διπλασιάσετε τις πωλήσεις σας
- Πώς να χρησιμοποιείτε ειδοποιήσεις push εγκατάλειψης περιήγησης (4 βήματα)
Αν είστε νέοι στις ειδοποιήσεις push, θα πρέπει να δοκιμάσετε το PushEngage. Το PushEngage είναι το #1 λογισμικό ειδοποιήσεων push στην αγορά. Και οι καμπάνιες σας θα είναι σε ασφαλή χέρια.
Έτσι, αν δεν το έχετε κάνει ήδη, ξεκινήστε με το PushEngage σήμερα!


