If email open rates are dropping and your social posts are getting buried, it might be time to try something different. A web push notification campaign could be exactly what you need.
Web push is fast, direct, and shows up right when your subscriber is online. No inbox. No algorithm. Just a quick message that brings people back to your site when it matters most.
In this guide, I’ll show you how to set up your first web push notification campaign using PushEngage. It’s easier than you might think, and you’ll see how even a simple campaign can drive real results.
Ακούγεται καλό; Ας βουτήξουμε κατευθείαν.
Send Web Push Notifications Today!
Οι ειδοποιήσεις push είναι ένα εξαιρετικά αποτελεσματικό, χαμηλού κόστους εργαλείο μάρκετινγκ που σας βοηθά να αυξήσετε την επαναλαμβανόμενη επισκεψιμότητα, την αλληλεπίδραση και τις πωλήσεις σας αυτόματα.
Why Web Push Works (Even When Other Channels Don’t)
Web push notifications cut through the noise in a way that email and social just can’t.
- You don’t need a phone number or email address to grow your list
- Messages show up while your subscriber is actively browsing
- You can automate everything — from cart recovery to product drops
- It works across devices and browsers (no app required)
It’s like having your own private traffic channel… one that actually gets noticed. Think about it… when was the last time you ignored a browser notification that popped up with your name, a juicy headline, and a call to action you cared about?
⚡ Instant Visibility: Unlike emails that sit unread for days, push notifications hit instantly. Right on the user’s screen. Desktop, mobile, doesn’t matter. You’re not waiting for them to open an inbox. You’re showing up exactly when it matters.
🧠 Zero Memory Required: Users don’t need to remember your website. Or your product. Or even their login.
Once they subscribe, you can re-engage them anytime — no forms, no friction, no fuss. It’s like having a fast lane straight into their attention span.
📈 Stupid-High Engagement: Web push CTRs often 2–3x email. Why? Because it’s short. Unexpected. And native to how people browse. Plus, no one’s inbox is drowning in push notifications (yet). So you stand out.
💸 You Own the Channel: No algorithms. No bidding. No social feed shenanigans. Push subscribers are yours. You decide what they see and when. It’s your audience, not rented from Meta or Google.
🧪 Perfect for Testing: Need to know if a headline works? If people care about a new feature? Push is the fastest A/B testing tool you didn’t know you had. Send a headline variation. See which one gets more clicks. Learn fast. Move faster.
Web push is the rare channel that’s cheap, high-converting, and brutally effective when used right.
And the best part… it takes under 10 minutes to launch your first campaign.
Let’s build one.
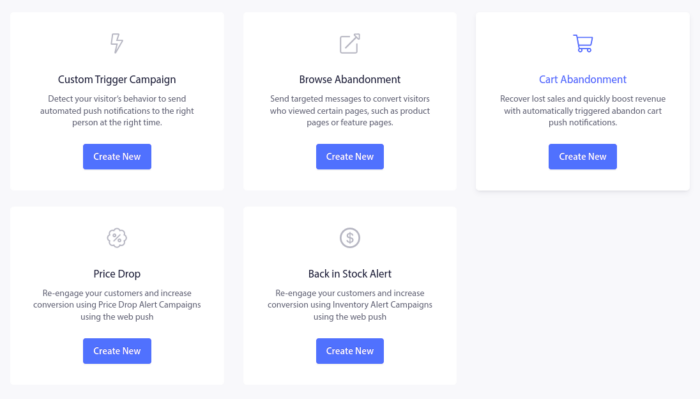
A Breakdown of Web Push Notification Campaign Types
In the broadest sense, there are 3 types of web push notification campaigns:
- Broadcast notifications
- Drip web push notification campaigns
- Triggered web push notification campaigns
Broadcasts are push notifications that you send out as a single notification. You can schedule them, but they will only fire off once. Triggered campaigns involve setting up a push notification, defining a trigger to set it off, and a workflow to control its scheduling. Automated drip notifications are a series of notifications that set off automatically at specific times or when specific conditions are met.
For all intents and purposes, triggered campaigns and automated drip campaigns look the same from the outside. The critical difference is that trigger campaigns are way more flexible and customizable. If you consider that push notifications cost way less than most other channels, it makes perfect sense to use a combination of all three to grow your business.
If you’re new to push notifications, we strongly recommend starting your journey using proven templates.
NOTE: Most triggered campaigns need some development experience. You’d need to use an API to make the best use of triggered notifications. However, there are some triggered notifications that you can send straight off the rack. If you’re curious, check our article on eCommerce push notifications for a better idea.
The Best Service to Send a Web Push Notification Campaign
Let’s start things off by saying that most of the “free push notification services” out there are actually free trials. Some of the providers we’ve listed here are trial software, while others have a forever-free plan that you can opt for.
There are some other freemium options, such as Firebase Cloud Messaging (FCM), but that’s not really a good option at all. You can read more about why FCM can’t compete with a service provider like PushEngage. But for now, just take our word for it and jump into the better options.
Συνιστούμε τη χρήση του PushEngage.

Το PushEngage είναι το #1 plugin ειδοποιήσεων push στον κόσμο.
Οι ειδοποιήσεις push σας βοηθούν να αυξήσετε την επισκεψιμότητα του ιστότοπού σας και την αλληλεπίδραση σε αυτόματο πιλότο. Και αν διαχειρίζεστε ένα online κατάστημα, το PushEngage σας βοηθά επίσης να αυξήσετε τις πωλήσεις σας, βοηθώντας σας να δημιουργήσετε αυτοματοποιημένες ειδοποιήσεις push eCommerce.
Μπορείτε να ξεκινήσετε δωρεάν, αλλά αν σοβαρά θέλετε να αναπτύξετε την επιχείρησή σας, θα πρέπει να αγοράσετε ένα επί πληρωμή πρόγραμμα. Επίσης, πριν αγοράσετε οποιαδήποτε υπηρεσία ειδοποιήσεων push, θα πρέπει να δείτε αυτόν τον οδηγό για το κόστος ειδοποιήσεων push.
Ακολουθεί μια γρήγορη επισκόπηση του τι παίρνετε με το PushEngage:
- Αυτοματοποιημένες εκστρατείες με υψηλή μετατροπή
- Πολλαπλές επιλογές στόχευσης και προγραμματισμού καμπανιών
- Goal tracking and advanced analytics
- Έξυπνες δοκιμές A/B
- Push campaign templates
- Powerful segmentation options
- Ένας Αφοσιωμένος Διαχειριστής Επιτυχίας
Και αυτό είναι μόνο η αρχή. Δείτε τη πλήρη λίστα χαρακτηριστικών του PushEngage πριν προχωρήσετε παραπέρα.
Αλλά το πιο ελκυστικό κομμάτι του PushEngage είναι ότι μπορείτε να ξεκινήσετε με ένα δωρεάν πρόγραμμα για πάντα. Και μπορείτε να το χρησιμοποιήσετε για να αναπτύξετε πραγματικά την επιχείρησή σας χρησιμοποιώντας πολλαπλές επιλογές προσαρμογής.
Θα δείτε ότι η PushEngage είναι μακράν η καλύτερη επιλογή αν θέλετε να αυξήσετε την επισκεψιμότητα, την αφοσίωση και τις πωλήσεις για την επιχείρησή σας. Και αν έχετε περιορισμένο προϋπολογισμό, μπορείτε πάντα να γίνετε λίγο δημιουργικοί με τις ειδοποιήσεις push σας.
NOTE: If you’re running a WordPress site, you should install and activate the PushEngage WordPress plugin.
Η δωρεάν έκδοση επιτρέπει έως και 200 συνδρομητές και 30 ειδοποιήσεις εφ' όρου ζωής. Αυτό είναι αρκετά καλό για να φτάσετε την επιχείρησή σας σε ένα σημείο όπου μπορείτε εύκολα να αντέξετε οικονομικά τα επί πληρωμή πακέτα που ξεκινούν από 9 $/μήνα για 100.000 συνδρομητές.

Και μην ανησυχείτε αν δεν γνωρίζετε απολύτως τίποτα για τον προγραμματισμό. Μπορείτε να εγκαταστήσετε το PushEngage χρησιμοποιώντας έναν από τους πολλούς οδηγούς εγκατάστασης για οποιονδήποτε ιστότοπο και CMS.
Pushengage’s AI-powered optimization helps you craft better titles and messages, leading to increased engagement and campaign success. Ever wished that your push notifications would write themselves? Well, now they can!
In all likelihood, you can cut down campaign creation time for push broadcasts, drip campaigns, and automated trigger campaigns by as much as 50% while improving the quality of your copywriting.
The PushEngage AI uses high-performing campaigns as a reference point for all copywriting and will always stick to best practices by default.
And the best part is that it works for web push, Android native notifications, iOS native notifications, Flutter notifications, and React Native notifications from the same dashboard!
You can use AI text generation for any campaign type. For this example, I’m using a push broadcast to demonstrate the capabilities. But if you want to see its full potential in action, watch this video!
Create a new campaign or choose any from the Templates. You can then click on Generate Text Button.
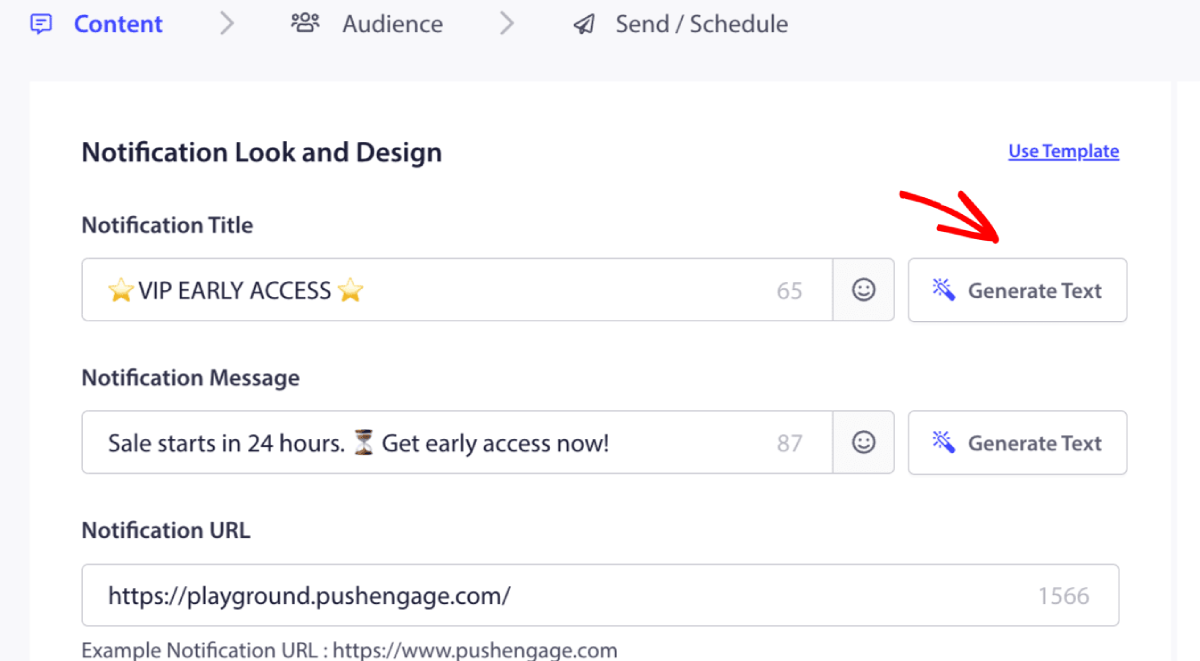
It will open up a small window for the web push notification campaign title & message. You can start by adding any keywords that will act as a prompt for the AI. The prompt can be as detailed as you like.
You can also set the tone for the web push notification campaign title or message. The tone of the conversation is very important in deciding the type of campaign that will be created. Make sure that it resonates with your brand style.
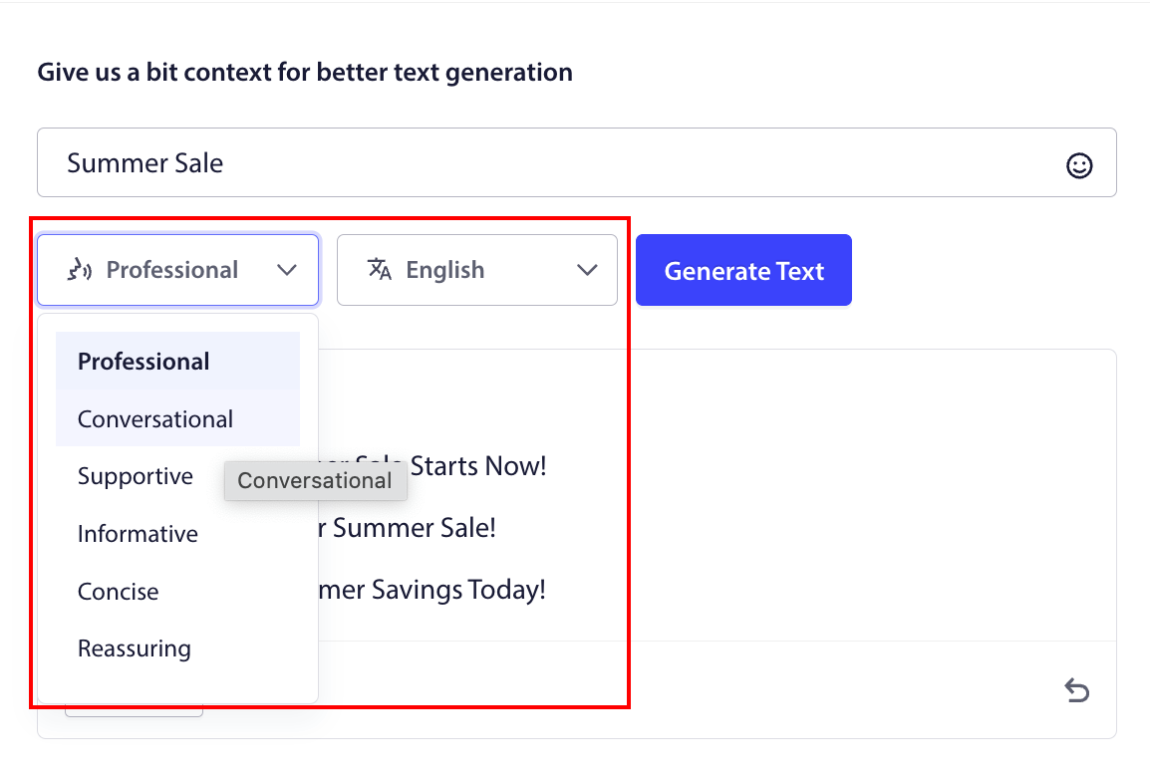
Once it’s set, you can click on the Generate Text button. Not happy with the generated text? Simply click the Rewrite button!
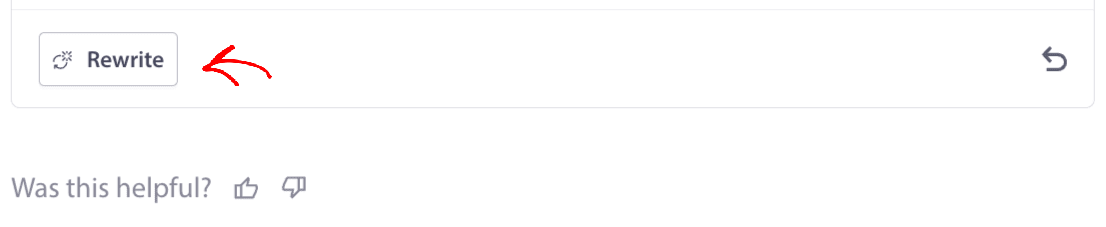
You can actually craft copy in ANY LANGUAGE!
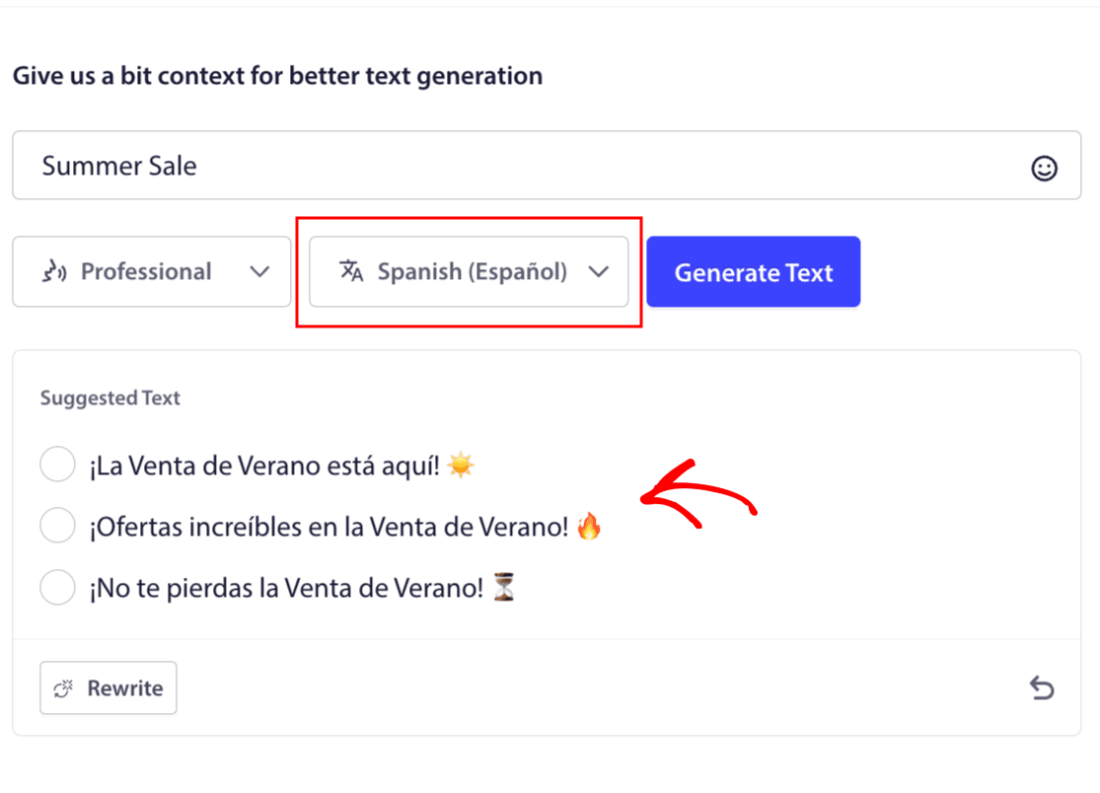
This level of built-in multi-language support simply doesn’t exist in any other push notification software. And don’t worry, the translations are dead on! So, you can send geo-specific campaigns very easily now. Select the right Audience Group, select the language, and let our AI do its magic.
How to Send a Web Push Notification Campaign
Now that you know what a web push notification campaign is and what service you need to send them, it’s time to check out how to send different notifications.
Here’s what web push campaigns look like in the wild:
🛒 E-commerce:
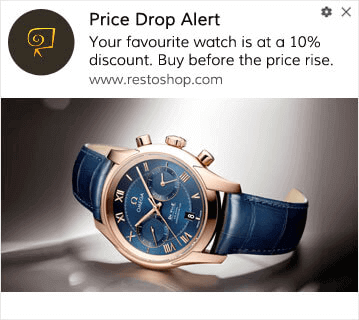
- Welcome discount: “Thanks for subscribing! Here’s 10% off.”
- Price drop alert: “The jacket you liked? It’s finally on sale.”
- Product drops: “New arrivals just landed. Be the first to shop.”
📚 Publishers & Bloggers:
- New post alert: “Don’t miss this week’s breakdown on [Topic].”
- Weekly digest: “Your Friday readlist is here.”
- Lead magnet delivery: “Here’s your free guide. Let us know what you think.”
💼 SaaS & Tools:
- Feature updates: “We just launched something new. Try it free.”
- Trial reminders: “Your free trial ends tomorrow.”
- Abandoners: “Still thinking it over? Here’s 20% off to try us out.”
Start small. Steal these. Tweak them to match your tone. Done.
For practical purposes, we aren’t talking about custom triggered campaigns you can create using an API service here. If you’re more interested in custom notifications, you should check out our documentation.
#1. Welcome Web Push Notification Campaign
A welcome web push notification campaign is a simple push notification meant to welcome any new subscriber.
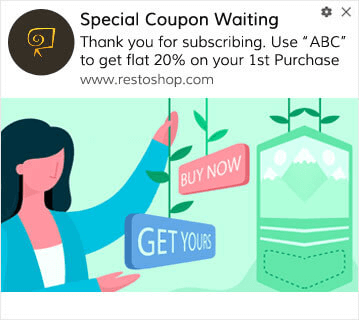
You can also send an offer or a gift for subscribing to your push notifications. This is pretty common with a lot of our customers. You can use your welcome push notifications to:
- Μοιραστείτε ένα Κουπόνι Καλωσορίσματος
- Προσφέρετε Premium Λειτουργίες
- Αποστολή Δωρεάν Παράδοσης
- Προσφορά Δωρεάν Δώρων
- Ενσωμάτωση του Συνδρομητή σας με έναν Οδηγό
Τώρα, ας ρυθμίσουμε την πρώτη σας ειδοποίηση καλωσορίσματος push χρησιμοποιώντας το PushEngage.
Here is how to Enable Welcome Notifications in PushEngage. Go to the PushEngage dashboard and head over to Campaign » Drip Autoresponders and click on Create New Drip Autoresponder:

Στη συνέχεια, δώστε ένα όνομα στην καμπάνια σας (προτείνουμε κάτι σαν Welcome Drip) και κάτω από το Content, επιλέξτε την επιλογή που λέει, “Send notification immediately after user subscribes“):

Σε αυτό το σημείο, μπορείτε να κάνετε κλικ στο βέλος δίπλα στην ειδοποίηση για να επεξεργαστείτε το περιεχόμενο της ειδοποίησής σας. Εάν έχετε πρόγραμμα Premium ή Enterprise με το PushEngage, θα μπορείτε να προσθέσετε περισσότερες από μία ειδοποιήσεις για να δημιουργήσετε μια σειρά αυτοματοποιημένων μηνυμάτων καλωσορίσματος. Απλώς κάντε κλικ στο Add New Notification και επεξεργαστείτε το περιεχόμενο.
Μόλις τελειώσετε, κάντε κλικ στο Drip Settings και επιλέξτε την επιλογή αποστολής της καμπάνιας καλωσορίσματός σας σε όλους τους συνδρομητές:

Στη συνέχεια, κάντε κύλιση προς τα κάτω για να ορίσετε τις δικές σας παραμέτρους UTM για να παρακολουθείτε τις ειδοποιήσεις push:

Και όταν τελειώσετε, κάντε κύλιση προς τα πάνω και κάντε κλικ στο κουμπί Activate Autoresponder:

Now you know why setting up a welcome push notification campaign is important. You also know how to set it up. Go ahead and activate welcome push notifications to re-engage new subscribers, or check out this article on website welcome messages for inspiration.
#2. Abandoned Cart Web Push Notification Campaign
Η εγκατάλειψη καλαθιού αγορών συμβαίνει όταν ένας πιθανός πελάτης προσθέτει ένα προϊόν στο καλάθι αγορών και δεν ολοκληρώνει τη διαδικασία ολοκλήρωσης αγοράς.
Η δουλειά σας είναι να μειώσετε την εγκατάλειψη καλαθιού όσο το δυνατόν περισσότερο.
One way to recover your lost sales is to use a cart abandonment web push notification campaign. Cart abandonment recovery campaigns target subscribers with an abandoned cart and send them follow-ups, reminders, offers, coupons, and discounts.

Είναι μια απλή ιδέα: Κάντε όσο το δυνατόν περισσότερους ανθρώπους να αγοράσουν κάτι.
Οι ειδοποιήσεις push εγκατάλειψης καλαθιού έχουν πολύ πραγματικό αντίκτυπο στο κάτω μέρος της γραμμής σας. Για παράδειγμα, η WickedWeasel λαμβάνει 2.000 – 4.000 $ ανά εβδομάδα σε πρόσθετες πωλήσεις από την καμπάνια push εγκατάλειψης καλαθιού.
Τώρα, ας πάμε και ας ρυθμίσουμε την πρώτη σας καμπάνια εγκαταλελειμμένου καλαθιού με το PushEngage.
Go to the PushEngage dashboard and head over to Campaign » Triggered Campaigns, and click on Create New Triggered Campaign:

Στη συνέχεια, επιλέξτε το πρότυπο Cart Abandonment και κάντε κλικ στο Create New:
Και μπορείτε να αρχίσετε να συντάσσετε έναν αυτοματοποιημένο απόκριση εγκαταλελειμμένου καλαθιού. Στην καρτέλα Περιεχόμενο, μπορείτε να δημιουργήσετε μια σειρά από ειδοποιήσεις push:
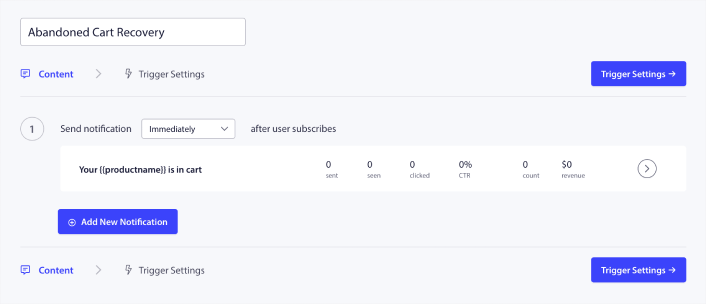
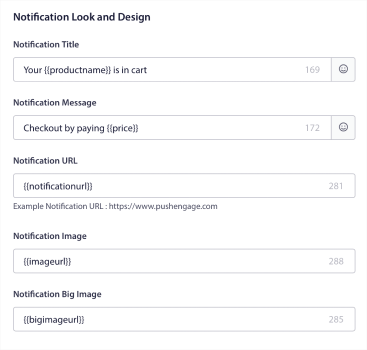
To edit a notification, simply click the arrowhead next to it, and you can customize the push notification:
Για ένα πιο αναλυτικό σεμινάριο, ελέγξτε αυτό το άρθρο σχετικά με το πώς να ρυθμίσετε ειδοποιήσεις push εγκαταλελειμμένου καλαθιού.
#3. Browse Abandonment Web Push Notification Campaigns
Εγκατάλειψη περιήγησης είναι ακριβώς όπως ακούγεται. Είναι όταν ένας επισκέπτης ιστοτόπου περιηγείται στον ιστότοπό σας και αποφασίζει να φύγει ξαφνικά. Αυτά τα περιστατικά είναι επίσης γνωστά ως εγκατάλειψη καναλιού από άλλους προμηθευτές.
Η εγκατάλειψη περιήγησης είναι ένα πολύ συνηθισμένο περιστατικό σε σχεδόν κάθε κλάδο.
And it’s really difficult to reduce or control because there’s no way to incentivize a random user to stay on your website. This is where browse abandonment campaigns are so powerful.
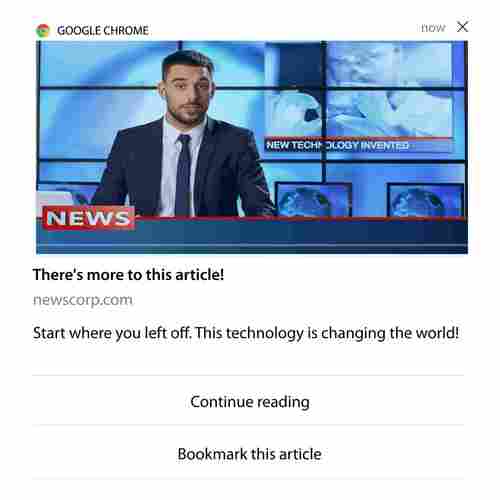
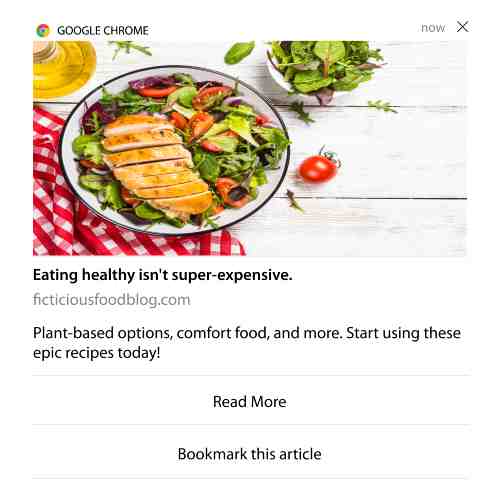
Here’s an example of browse abandonment push notifications for a publisher:
The impressive part about PushEngage is that you can set up campaigns for pretty much any industry. So, you can send browse abandonment push notifications for SaaS and travel websites as well.
So, how do you set up browse abandonment campaigns?
With cart abandonment, there’s a very clear parameter to fire your push notifications. For browse abandonment, you may want to consider parameters such as:
- Added the product to Wishlist
- Looked at the same product more than X times
- Browsed more than X products in the same category
- Έκανε αναζήτηση στον ιστότοπο για ένα συγκεκριμένο προϊόν
- Stayed on site for at least X minutes before bouncing
The idea behind this campaign for an eCommerce site is to get the subscriber to add the product to their cart. For publishers, it could be a click or a download on the article they were reading.
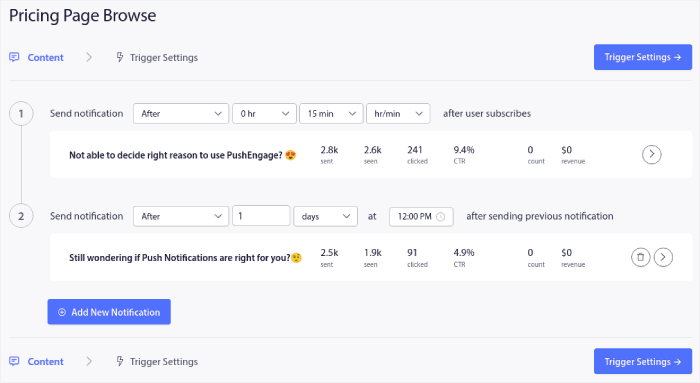
Head over to the PushEngage dashboard again and go to Campaign » Triggered Campaigns to create a new triggered campaign:

Then, create a new Browse Abandonment campaign by click on the Create New button:

Next, you’ll be able to set up your entire sequence of push notifications along with a delay in between each notification:
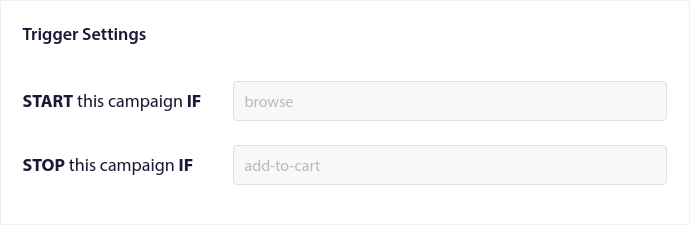
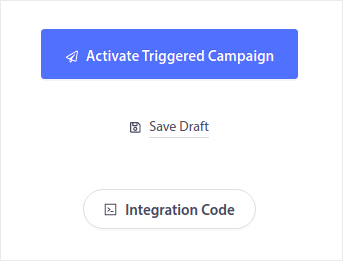
If you’re new to push notifications, you should check out our article on push notification best practices. When you’re happy with your push notification content, click on Trigger Settings. You’ll see that the conditions for a browse abandonment campaign have been pre-configured into the sequence.
Click on the Integration Code button to get the code snippet you need to embed the browse abandonment campaign on your site.
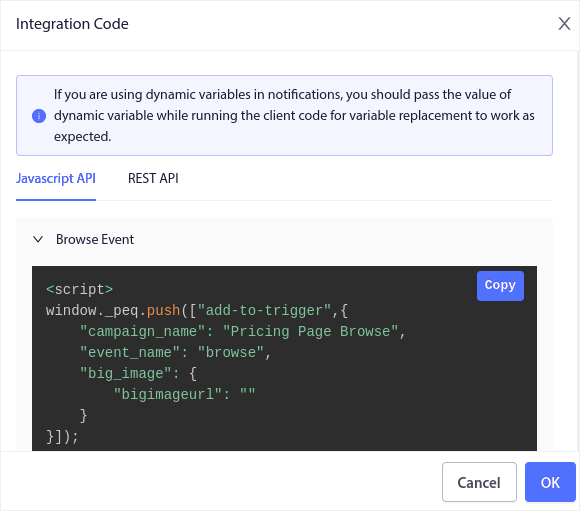
Then, copy the code and paste it into your site. You want to paste that code into the HTML <head> section of the page that you want to track. Finally, click on the Activate Triggered Campaign button:
Και τελειώσατε!
#4. RSS Feed Web Push Notification Campaign
RSS Auto Push allows you to automate your notifications via RSS.
PushEngage checks every 10 minutes for a new post added to your RSS feed. If a new post is found, PushEngage converts it into a push notification and sends it out to all your subscribers. The best part is that it happens on complete autopilot.
RSS Feed campaigns are perfect for publishers and news sites:
If you’re a big publisher and you publish more than 1 post every 30 minutes, PushEngage keeps a delay of 5 minutes between 2 post notifications.
Before we go any further, you should check out this article on how to use RSS feeds for more epic tips and tricks.
Now, let’s go set up an RSS feed web push notification campaign on PushEngage.
Create a New RSS Web Push Notification Campaign
Once you’ve installed PushEngage on your site, head over to your PushEngage dashboard and go to Campaign » RSS Auto Push and click on Create New Campaign:

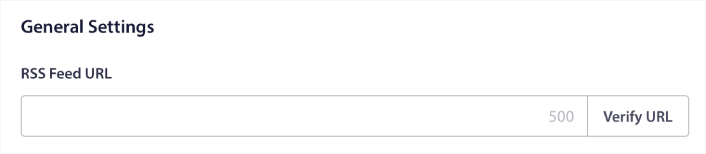
This will create a brand new RSS web push notification campaign. You can set up multiple RSS feed campaigns in PushEngage. Start by giving your campaign a descriptive name. Then, paste in the URL for your RSS feed:
Set Up RSS Notification Settings
Next, you want to set the Campaign Frequency:
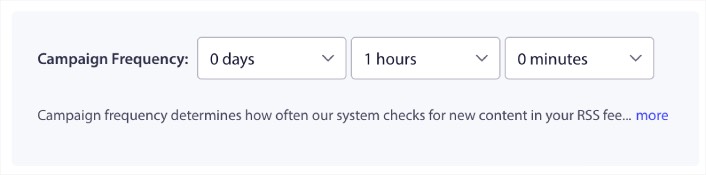
The Campaign Frequency is how often the RSS feed web push notification campaign looks for new content in your blog to send an automated push notification. The minimum value is 15 minutes, and the maximum value is 7 days.
Συνιστούμε να αναζητάτε περιεχόμενο προς προώθηση κάθε 2 ημέρες, εκτός αν είστε ειδησεογραφικό πρακτορείο. Για τα ειδησεογραφικά πρακτορεία, θα πρέπει να το περιορίσετε στα 15 λεπτά. Λάβετε υπόψη ότι το PushEngage θα αναζητήσει νέο περιεχόμενο μόνο αφού ρυθμίσετε και δημοσιεύσετε την καμπάνια σας RSS feed.
Επιλογή Αναρτήσεων για Προώθηση
You can select what posts to promote. You can choose between Only the latest item or All items. If you set up the RSS push notifications to select only the latest item, PushEngage only sends the latest post:
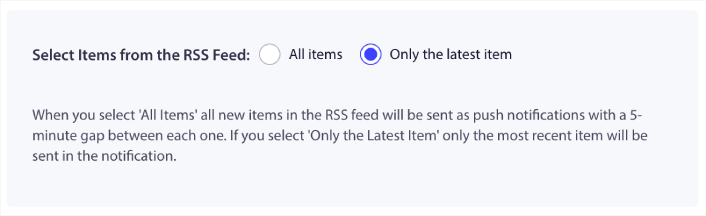
Or, you can select the All items options. In this case, the campaign will select all the posts on your site and send out a web push notification campaign for each with a 5-minute gap between them.
Set an RSS Push Notifications Icon
Your push notification icon establishes your brand identity in your RSS push notifications. We recommend using your brand mark so that your subscribers know instantly that the notification is from your brand.
Τώρα, υπάρχουν δύο επιλογές εδώ. Μπορείτε είτε να ανεβάσετε χειροκίνητα το εικονίδιο ειδοποίησης:
And that’s really simple to do. Just click on Change image and upload your notification icon. Or, you can fetch it from your RSS feed:
You can either select the item element or the attribute inside an element to dynamically select your notification icon from the feed. Typically, most RSS feeds will hold the site icon inside the media:content item element. Even more specifically, it’s usually inside the media:thumbnail attribute of the media:content element.
To target the element, you can select the Item Element Value option and set it to media:content. Or, you can select the Element Attribute Value option and set it to media:content > media:thumbnail.
NOTE: We recommend using this option only if you know how to read XML. RSS feeds might not contain the site icon in the same XML tags as our example. So, if you’re not sure how to fetch the notification icon from the RSS feed, we recommend uploading it manually instead.
Select Large Image for RSS Feed Notifications
Now, we’re going to select the large image for your RSS feed web push notifications. Again, there are two ways to do this. You can let PushEngage automatically find the image from the RSS feed:

Εναλλακτικά, μπορείτε να επιλέξετε χειροκίνητα ποια εικόνα θέλετε από τη ροή:
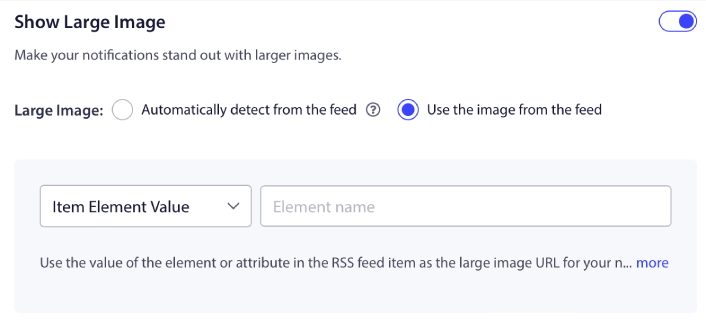
Αυτό είναι ακριβώς το ίδιο με την επιλογή του εικονιδίου ειδοποίησης από τη ροή RSS. Μπορείτε για άλλη μια φορά να επιλέξετε την εικόνα από το στοιχείο XML που την περιέχει ή μπορείτε να επιλέξετε το συγκεκριμένο χαρακτηριστικό που περιέχει την προτιμώμενη εικόνα σας.
NOTE: We only recommend selecting a URL from your RSS feed if you know how to read XML. If you’re not sure how to read XML, it’s better to let PushEngage find the best image for your notifications.
Set Web Push Notification Campaign Duration
The web push notification campaign duration is how long the notification stays in your subscriber’s notification tray before it gets automatically deleted.
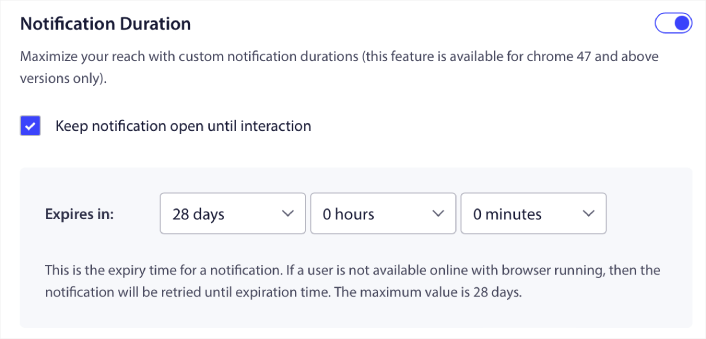
Αν δεν θέλετε να κατακλύσετε τους συνδρομητές σας με πολλές μη αναγνωσμένες ειδοποιήσεις, είναι καλύτερο να αφήσετε τις ειδοποιήσεις push να λήξουν σε μερικές ημέρες.
Unlike broadcast notifications or even other automated web push notifications, you can’t really schedule RSS push notifications. So, you always have the option to keep the notification open until your subscriber interacts with it, even within the expiry limit.
Set UTM Parameters
Σχεδόν τελειώσαμε. Κάντε κύλιση προς τα κάτω για να ορίσετε τις δικές σας παραμέτρους UTM για να παρακολουθείτε τις ειδοποιήσεις push:
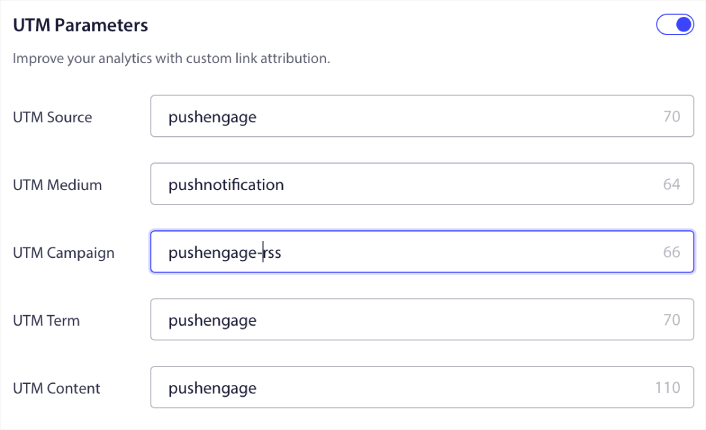
Με αυτόν τον τρόπο, μπορείτε εύκολα να αποδώσετε την επισκεψιμότητά σας από αυτές τις ειδοποιήσεις push στο Google Analytics.
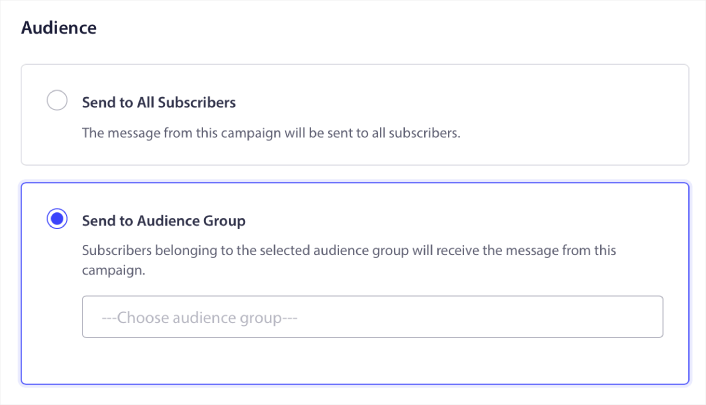
Select Audience Group
Finally, we’re going to select an Audience Group to send your RSS web push notification campaign. You can either send the RSS feed campaign to all your subscribers, or you can create Audience Groups to send personalized push notifications even from your RSS feed.
Και αυτό είναι όλο! Αυτό είναι πραγματικά όλο.
Τώρα, κάθε φορά που δημοσιεύετε μια νέα ανάρτηση, οι συνδρομητές ειδοποιήσεων push στην επιλεγμένη Ομάδα Κοινού θα λαμβάνουν αυτόματα μια ειδοποίηση push σχετικά με το νέο σας περιεχόμενο.
Αυτό ήταν! Είστε έτοιμοι. Κάθε φορά που δημοσιεύετε μια νέα ανάρτηση, θα πηγαίνει αυτόματα σε όλους τους συνδρομητές σας.
#5. Αυτοματοποιημένες Ειδοποιήσεις Επανενεργοποίησης
Μπορείτε να ρυθμίσετε αυτοματοποιημένες καμπάνιες επανενεργοποίησης για συνδρομητές που δεν έχουν αλληλεπιδράσει με το περιεχόμενό σας για λίγο.
Αλλά γιατί να το κάνετε εξαρχής;
Τι θα λέγατε για αυτό:
- Το κόστος απόκτησης νέων πελατών είναι 5 φορές μεγαλύτερο από το κόστος διατήρησης υπαρχόντων πελατών
- Είναι εύκολο να στοχεύσετε και να επαναπροωθήσετε σε ένα γνωστό κοινό του οποίου τις προσωπικές προτιμήσεις κατανοούμε ήδη.
- Μακροπρόθεσμα, οι αφοσιωμένοι πελάτες προσφέρουν περισσότερες επιχειρήσεις στην εταιρεία από κάποιον που συνδέεται ελάχιστα με την επωνυμία σας.
Η Ofertia κατάφερε να αυξήσει τους επαναλαμβανόμενους χρήστες της κατά 39% χρησιμοποιώντας ειδοποιήσεις push προσφέροντας εξατομικευμένες προσφορές. Δεν είναι οι μόνοι. Μπορείτε να το χρησιμοποιήσετε για έναν ιστότοπο eCommerce με μεγάλη επιτυχία:
Υπάρχουν πολλοί τρόποι για να επανενεργοποιήσετε τους συνδρομητές σας.
Picture this:
- A user visits your site. Sees a subtle opt-in. Clicks “Allow.”
- Instantly gets a welcome notification with a discount or the next step.
- Leaves your site…
- Later that day, they see a reminder: “Still thinking about it?”
- They click, come back, and buy.
That’s a basic push funnel — and you didn’t lift a finger once it was live.
Now, imagine layering in segmentation and automated campaigns. That’s when it gets fun. Using dynamic segments, you can figure out a lot about your subscribers and send them personalized content that they’ll love.
Στον πίνακα ελέγχου του PushEngage, μεταβείτε στην ενότητα Τμηματοποίηση και δημιουργήστε ένα νέο Τμήμα:
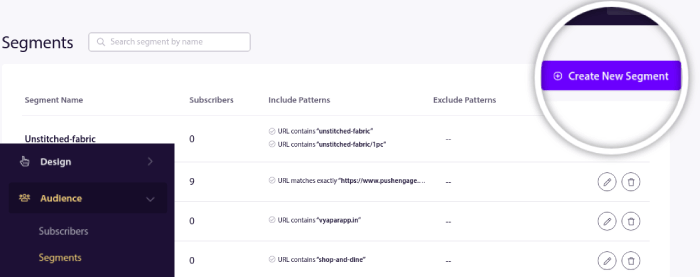
Αυτό σας επιτρέπει να δημιουργείτε τμήματα βάσει συμπεριφοράς και προτύπων περιήγησης. Μπορείτε πραγματικά να ρυθμίσετε μια ακολουθία λειτουργιών AND/OR που καθορίζουν πότε ορισμένα τμήματα λαμβάνουν αυτοματοποιημένες ειδοποιήσεις push.
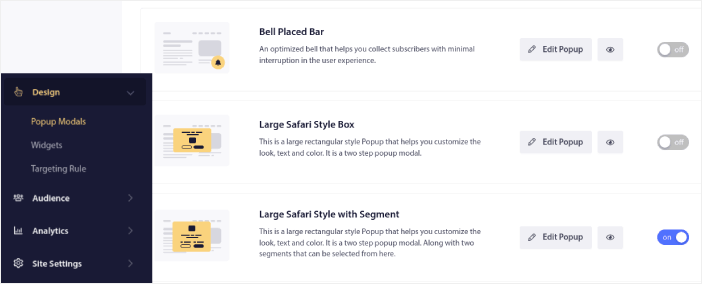
Μπορείτε ακόμη και να τμηματοποιήσετε τους χρήστες σας όταν εγγράφονται για ειδοποιήσεις push. Μεταβείτε στην ενότητα Σχεδίαση » Αναδυόμενα Παράθυρα και επιλέξτε το Μεγάλο στυλ Safari με Τμήμα.
Αν χρειάζεστε ακόμη περισσότερους τρόπους για να τμηματοποιήσετε τους χρήστες σας, μπορείτε να δημιουργήσετε προσαρμοσμένα τμήματα βάσει ενεργειών χρηστών χρησιμοποιώντας το PushEngage Javascript API.
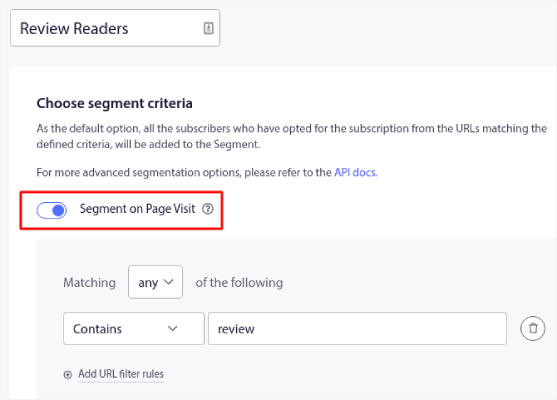
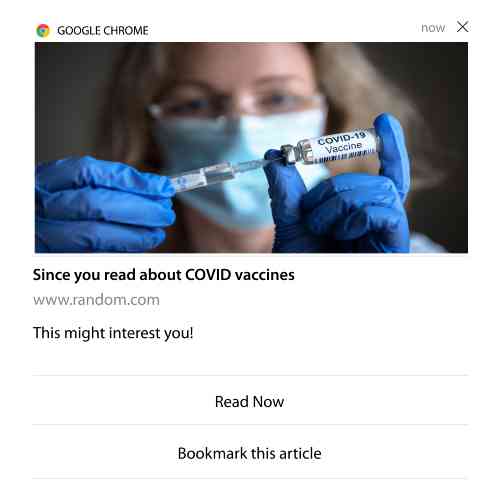
#6. Page Visit Web Push Notification Campaign
Οι ενεργοποιήσεις επίσκεψης σελίδας είναι μια επέκταση των τμημάτων ειδοποιήσεων push. Το μόνο που έχετε να κάνετε είναι να δημιουργήσετε ένα τμήμα όταν ένας επισκέπτης ιστότοπου περιηγείται σε μια διεύθυνση URL με μια συγκεκριμένη φράση ή μοτίβο.
Στη συνέχεια, απλώς μεταβείτε στην ενότητα Κοινό » Τμήματα και ορίστε το κοινό σας σε ένα συγκεκριμένο τμήμα:
Αυτό σας επιτρέπει να δημιουργείτε πραγματικά εξατομικευμένες και αυτοματοποιημένες ειδοποιήσεις push.
Και το καλύτερο είναι ότι μπορείτε να δημιουργήσετε προσαρμοσμένα τμήματα στο PushEngage μέσα σε λίγα λεπτά.
#7. Αυτοματοποιημένες Ειδοποιήσεις Push από Click-Through
Δεν μπορείτε να δημιουργήσετε ειδοποιήσεις push που ενεργοποιούνται όταν οι συνδρομητές σας κάνουν κλικ σε μια παραδοθείσα ειδοποίηση χρησιμοποιώντας το PushEngage.
Αλλά υπάρχει μια πολύ έξυπνη λύση.
You can create a segment based on the URL that a particular notification leads to. Every time someone lands on this URL, they get added to the segment, and you can use this segment to send targeted notifications.
Οι καμπάνιες κλικ ειδοποιήσεων push είναι ουσιαστικά μια επέκταση της τυπικής τμηματοποίησης κοινού για καμπάνιες στάγματος.
Δείτε αυτό το σεμινάριο για το πώς να δημιουργήσετε ένα κουμπί click-to-subscribe.
#8. Επαναλαμβανόμενες Αυτοματοποιημένες Ειδοποιήσεις Push
Φανταστείτε ότι έχετε…
- Μια εβδομαδιαία προσφορά για μια υπαίθρια αγορά·
- Ή μια προσφορά Σαββατοκύριακου;
- Ή μια εκκαθάριση αποθεμάτων;
- Ή μια μηνιαία προσφορά αστραπή.
Πόσο άβολο θα ήταν να πρέπει να δημιουργείτε ειδοποιήσεις push για κάθε συμβάν χειροκίνητα;
Ευτυχώς, μπορείτε να ορίσετε επαναλαμβανόμενες ειδοποιήσεις με το PushEngage.
Οι επαναλαμβανόμενες ειδοποιήσεις είναι προγραμματισμένες και αυτοματοποιημένες ειδοποιήσεις push για ένα επαναλαμβανόμενο συμβάν. Μπορείτε να τις ρυθμίσετε μία φορά, να καθορίσετε ένα πρόγραμμα και τελειώσατε.
Αυτός είναι μόνο ένας από τους τρόπους με τους οποίους το MyDeal χρησιμοποιεί ειδοποιήσεις push. Φροντίστε να διαβάσετε την πλήρη μελέτη περίπτωσης!
Μεταβείτε στο Campaign και προσθέστε μια αυτοματοποιημένη ειδοποίηση στον πίνακα ελέγχου του PushEngage. Στη συνέχεια, κάντε κύλιση προς τα κάτω στην ενότητα προγραμματισμού και μεταβείτε στην καρτέλα Send/Schedule:
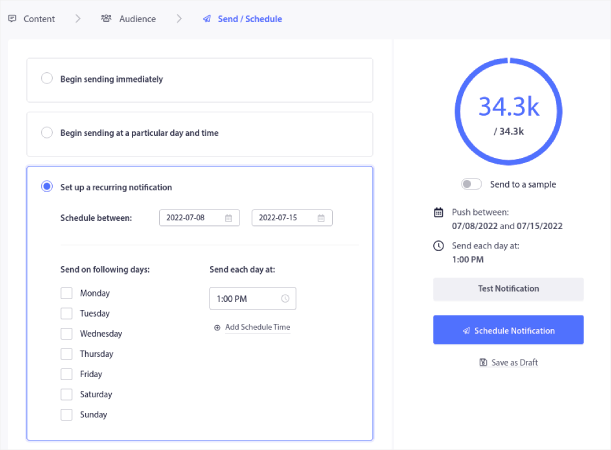
Απλώς ρυθμίστε την ώρα και τελειώσατε!
#9. Ειδοποιήσεις Ζώνης Ώρας Συνδρομητή
Subscriber timezone notifications are exactly what they sound like. You send automated push notifications to your subscribers in their time zone.
Γιατί είναι τόσο μεγάλο θέμα;
Οι ειδοποιήσεις ζώνης ώρας συνδρομητή έχουν υψηλότερα ποσοστά ανοίγματος. Συνήθως, οποιαδήποτε ειδοποίηση push παραδίδεται ακόμα κι αν ο συνδρομητής σας είναι εκτός σύνδεσης. Αυτές οι ειδοποιήσεις συσσωρεύονται και αγνοούνται όταν ο συνδρομητής σας συνδεθεί τελικά.
On the other hand, a subscriber time zone web push notification campaign will get delivered when you KNOW your subscriber is most likely online.
Επαγγελματική Συμβουλή: Χρησιμοποιήστε A/B testing για να βρείτε την ιδανική ώρα για να στείλετε στους συνδρομητές σας μια ειδοποίηση push.
Οι ειδοποιήσεις ζώνης ώρας συνδρομητή αισθάνονται πολύ πιο εξατομικευμένες. Και αν είστε έξυπνοι, μπορείτε να τις συνδυάσετε με δεδομένα γεωγραφικής τοποθεσίας για να εξατομικεύσετε τις ειδοποιήσεις σας ακόμη περισσότερο. Αυτό ακριβώς έκανε η Phooto όταν χρησιμοποίησε τοπικές γλώσσες για να εκτοξεύσει τα ποσοστά ανοίγματός της.
Ας ρυθμίσουμε τώρα τις ειδοποιήσεις ζώνης ώρας συνδρομητή στο PushEngage.
Όταν δημιουργείτε μια νέα ειδοποίηση, μεταβείτε στις επιλογές προγραμματισμού και κάντε κλικ στο πλαίσιο ελέγχου που λέει Send Notifications in Subscriber Timezone:
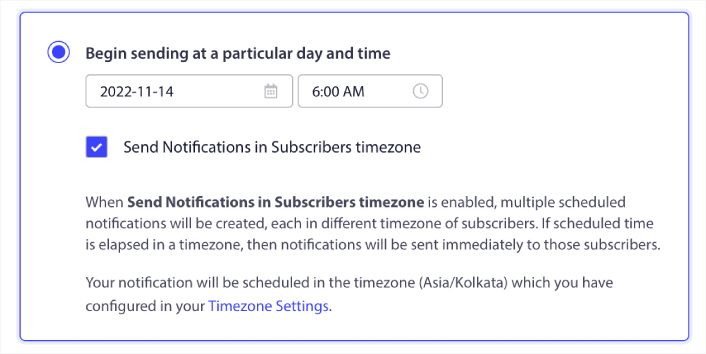
Αυτό είναι όλο! Θα πρέπει να κάνετε το ίδιο και για τις καμπάνιες σταγόνας σας, αλλά τα αποτελέσματα αξίζουν την προσπάθεια του κλικ ενός κουμπιού για κάθε καμπάνια.
Start with 1–2 messages per week. Ramp up once you see what’s working.
Here’s a simple cadence to start with:
- Week 1: Welcome message + 1 product or content push
- Week 2: Reminder or discount follow-up
- Week 3: New drop, blog post, or feature highlight
If users stop clicking, pull back. If they keep clicking? Double down.
Επαγγελματική Συμβουλή: Οι δύο τελευταίες τακτικές αφορούσαν τον προγραμματισμό ειδοποιήσεων push. Αλλά αυτές οι δύο δεν είναι οι μόνες μέθοδοι για τον προγραμματισμό αυτοματοποιημένων ειδοποιήσεων push. Δείτε το άρθρο μας σχετικά με το πώς να προγραμματίσετε ειδοποιήσεις push για περισσότερα επικά κόλπα.
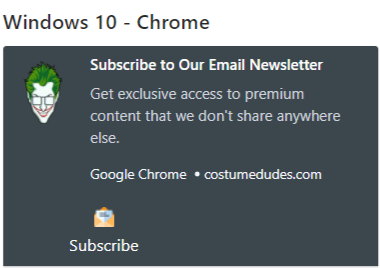
#10. Ειδοποιήσεις Εγγραφής Email
Email marketing has long been the best way to generate and nurture leads. The best part about automated push notifications is that you can generate more email subscribers using them.
It’s really simple to set up, and using a combination of email and web push notification campaigns is way more effective than using one or the other.
Το μόνο που έχετε να κάνετε είναι να στείλετε μια ειδοποίηση ενεργοποίησης που ζητά από τον χρήστη να επιλέξει ειδοποιήσεις email.
Απλώς δημιουργήστε ένα προσαρμοσμένο κουμπί παρότρυνσης για ενέργεια (CTA) και εισαγάγετε έναν σύνδεσμο εγγραφής ως διεύθυνση URL του κουμπιού. Αυτό είναι πραγματικά το μόνο που χρειάζεστε. Αν δεν είστε σίγουροι πώς να αποκτήσετε ένα κουμπί εγγραφής, απλώς ακολουθήστε.
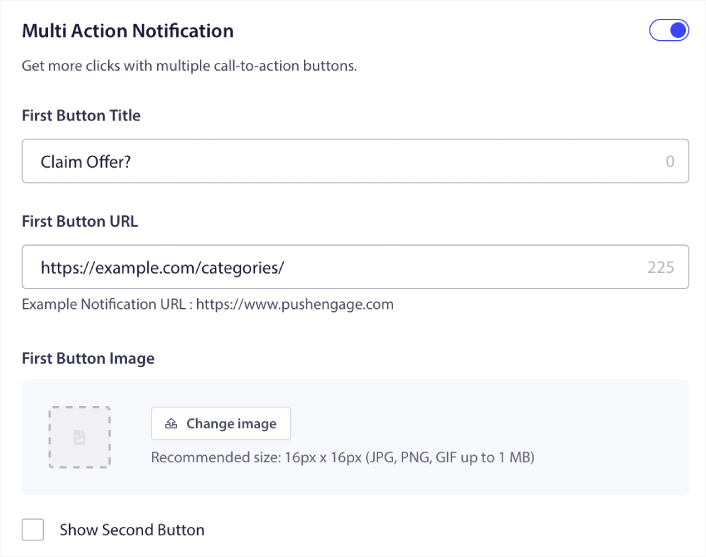
Σε οποιαδήποτε ειδοποίηση, μπορείτε να κάνετε κύλιση προς τα κάτω και να ενεργοποιήσετε τα κουμπιά Πολλαπλών Ενεργειών:
Η διεύθυνση URL πρέπει να είναι ένας σύνδεσμος προς μια φόρμα εγγραφής email. Μπορείτε να δημιουργήσετε μία χρησιμοποιώντας σχεδόν οποιονδήποτε πάροχο υπηρεσιών email, όπως το Drip. Το μόνο που έχετε να κάνετε είναι να κάνετε κλικ στις επιλογές κοινής χρήσης για τη φόρμα εγγραφής και να αντιγράψετε αυτήν τη διεύθυνση URL. Στη συνέχεια, επικολλήστε την στη διεύθυνση URL του κουμπιού για την ειδοποίηση push σας.
Δείτε το σεμινάριό μας για τα κουμπιά πολλαπλών ενεργειών για περισσότερες λεπτομέρειες. Μπορείτε ακόμη και να προσθέσετε ένα εικονίδιο email στο κουμπί σας για να είναι πολύ σαφές ότι ζητάτε από τους χρήστες σας να εγγραφούν στις ειδοποιήσεις email σας:
Συμβουλή Επαγγελματία: Μπορείτε να χρησιμοποιήσετε την ίδια ιδέα για να αναπτύξετε και το κανάλι σας στο YouTube. Απλώς προσθέστε το «?sub_confirmation=1» στο τέλος της διεύθυνσης URL του καναλιού σας και επικολλήστε το στη διεύθυνση URL του κουμπιού ειδοποίησης push.
Κάθε φορά που κάποιος κάνει κλικ στο κουμπί εγγραφής στην ειδοποίηση push σας, θα ανακατευθύνεται στο κανάλι σας στο YouTube και θα του ζητηθεί να εγγραφεί σε αυτό.
Segmentation Ideas You Can Steal
Segments are a really great way to send targeted push campaigns. And it should be a big part of your push notification marketing strategy. But how do you get started? What kinds of segments should you be creating?
Για αρχή, δεν θα πρέπει να εστιάζετε στη δημιουργία μόνο ενός τύπου τμήματος. Θα σας καθοδηγήσουμε στους διαφορετικούς τύπους τμηματοποίησης που έχουμε βρει ότι είναι οι πιο αποτελεσματικοί.
Here are a few high-impact segments worth setting up:
- Engaged shoppers: People who clicked 2+ notifications in the past week
- Cart abandoners: People who visited a product but didn’t purchase
- Category fans: Users who keep checking one product category (e.g., “Sneakerheads”)
- Geo-targeted: Tailor messages based on country or city
The more specific you get, the more clicks you’ll earn. If you’re an advanced marketer, you should craft segments the way you would for an email campaign with different segmentation models:
- Geographic segments
- Behavioral segments
- Occasion-based segments
- Cultural segments
- Demographic segments
- Psychographic segments
Dynamic segments let you talk to subscribers like real people… not just traffic stats.
And if you’d like to further personalize your messaging, you can use audience groups.
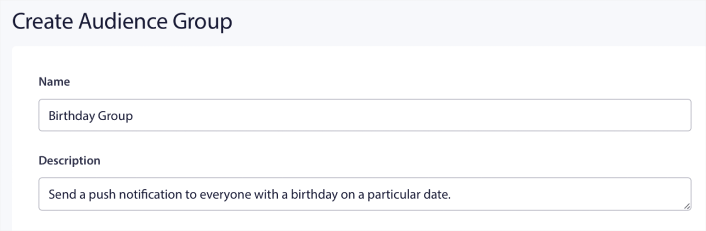
How to Create a Push Notifications Audience Group
To get started, head over to your PushEngage dashboard and go to Audience » Audience Groups and click the Create New Audience Group button:

Πριν μπορέσετε να χρησιμοποιήσετε τις Ομάδες Κοινού σας για να στείλετε στοχευμένες εκπομπές push, θα χρειαστεί να δημιουργήσετε μια Ομάδα Κοινού με κανόνες για τη δημιουργία αυτής της ομάδας. Μπορείτε να ξεκινήσετε με ένα όνομα και μια περιγραφή για την Ομάδα Κοινού σας.
Δημιουργήστε ένα Κριτήριο Επιλογής
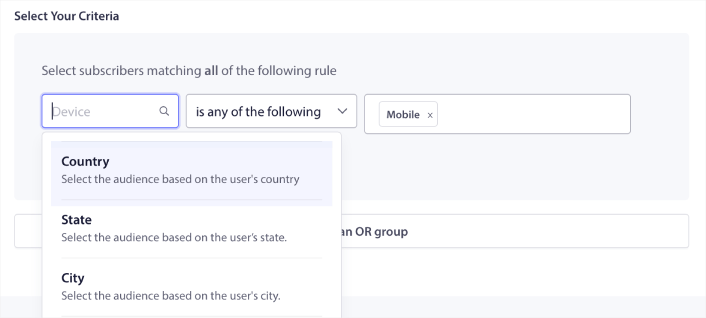
Next, create a selection criterion to filter and target the right audience:
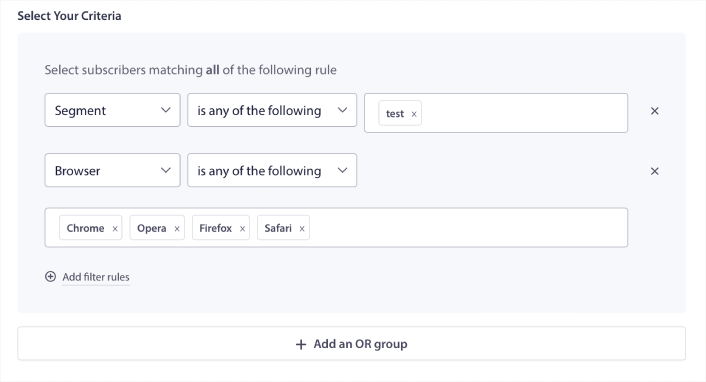
You can click Add filter rules to select subscribers who match ALL the filter rules or, you can click Add an OR group to create a filter where the subscribers meet at least one of the selection criteria.
Η συμπεριφορά χρήστη είναι ο πιο θεμελιώδης τρόπος στόχευσης των συνδρομητών σας στις ειδοποιήσεις push. Όπως είπαμε και πριν, τα τμήματα συνδρομητών συνήθως ομαδοποιούν επισκέπτες που τους αρέσει να περιηγούνται σε παρόμοιο περιεχόμενο. Αλλά ακόμη και μέσα σε αυτήν την ομάδα συνδρομητών που αγαπούν το ίδιο περιεχόμενο, υπάρχουν μικρές εξατομικεύσεις που μπορείτε να κάνετε.
Ακόμη πιο συγκεκριμένα, μπορείτε να συνδυάσετε πολλαπλά τμήματα συνδρομητών για να τους στείλετε ένα κοινό, σχετικό μήνυμα.
Φιλτράρισμα με βάση το Τμήμα Συνδρομητή
If you haven’t already, you should start segmenting your push notification subscribers right away. Otherwise, this filter simply won’t work. But if you already have segments, then you can select multiple segments as the base for your audience group.

Μετά από αυτό, μπορείτε να προσθέσετε άλλα φίλτρα για να βελτιώσετε τη στόχευσή σας.
Φιλτράρισμα με βάση το Χαρακτηριστικό Συνδρομητή
While attributes are mostly for drip push notifications, you can use them for push broadcasts as well. Now, push notification attributes are mostly useful for eCommerce sites. But you can also use them to send personalized push notifications if you have a Customer Relationship Management (CRM) tool.
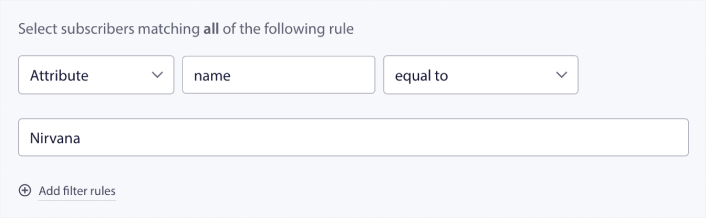
Τα χαρακτηριστικά μπορούν να περιέχουν προσωπικές πληροφορίες όπως ονόματα συνδρομητών, ημερομηνία γέννησης, οποιαδήποτε άλλη πληροφορία που θα αποθηκεύατε στο CRM σας για εξατομικευμένες καμπάνιες μάρκετινγκ.
Φιλτράρισμα με βάση τη Συσκευή και το Πρόγραμμα Περιήγησης του Συνδρομητή
Σε πολλές περιπτώσεις, είναι κρίσιμο να γνωρίζετε πώς οι συνδρομητές σας λαμβάνουν τα μηνύματά σας.
There’s a really great story about Michael Jackson. Every time he recorded a song, he’d listen to it on a radio. Not his million-dollar recording suite in top audio quality, but a cheap radio like most of his audience would later on. If he liked how the song sounded even on the cheapest device on the market, he’d sign off on releasing the song.
No wonder Billie Jean went Platinum 29 times!
For your push notifications, it’s no different.
Filter By Subscriber Browser
Different browsers have different character limits for push notifications. So, when you send a push broadcast you need to be wary of these limits. The cool thing is that you can save different audience groups to retarget different browsers. You don’t need to create segments each time.

Filter By Subscriber Device
There’s a difference in the types of rich push notifications you can send to iOS, Android, and Windows devices. So, not every campaign you send out will look the same on all devices. In fact, many push notification types won’t even show up on all devices. Different devices also have different screen sizes. So, you may want to optimize how your push notifications look before sending them.
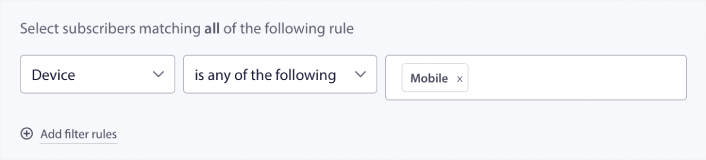
But now that you can filter your audience by their device, that shouldn’t be a problem anymore.
How to Filter By Geolocation
You can also filter by geolocation to personalize your campaigns further. The filter allows you to select an audience group by country, city, and state:
Phooto used geolocation to send push notifications in local languages. And it helped them skyrocket their engagement rates quickly. Read the full case study.
How to Filter By Engagement Metrics
One of the best things about Audience Groups is that it can help you create retargeting campaigns using push notifications. You can filter your audience by:
- Ημερομηνία Συνδρομής
- Last Sent Date
- Last Click Date
- Last View Date
Using these metrics can help you retarget subscribers with low engagement rates or sell to subscribers with high engagement rates.
Or, you can filter the audience by:
- Total Send Count
- Total View Count
- Total Click Count
These numbers can help you find subscribers who get the least messages from you so that you can find better ways to personalize notifications. You can also find the subscribers who interact with your push notifications most often.
Pro Tip: Combine two or more filters to find the best ways to re-engage with your subscribers. For instance, subscribers with a high Total View Count and high Total Click Count will give you subscribers who have been engaging with you for a while. These are loyal subscribers who deserve a reward.
How to Filter By Identifiers
Identifiers are how PushEngage identifies your subscribers. Since PushEngage is GDPR compliant by default, our software never stores any personally identifying data for any of your subscribers. Instead, we assign each subscriber a profile ID and a subscriber hash.
Keep in mind, you’ll be using profile IDs and subscriber hashes mostly as part of advanced campaigns. In other words, you’ll need to use the PushEngage API to create custom campaigns that use these identifiers.
Τα αναγνωριστικά είναι εκπληκτικά για την αποστολή ειδοποιήσεων push συναλλαγών όπως αυτή:
They’re great for custom eCommerce push notifications. So, we don’t really recommend using them for anything besides testing push broadcasts from the dashboard.
What to Do After You Set Up Web Push Notification Campaigns
Launching a web push notification campaign won’t guarantee success. As with any marketing tool, you need to test and improve your messaging and your segments.
Don’t get lost in the weeds. Focus on three numbers:
- Click-through rate (CTR): Are people engaging?
- Opt-in rate: Is your prompt working?
- Unsubscribes: Are you sending too much?
Bonus if you’re tracking revenue per send — but even without it, CTR and opt-in rate give you a fast feedback loop. Unfortunately, you can’t A/B test automated notifications directly. But these resources will help you get on the fast track:
- Πώς να Εγκαταστήσετε ένα Plugin WordPress για Ειδοποιήσεις Ιστού στον Ιστότοπό σας
- Πώς να Κάνετε A/B Testing Ειδοποιήσεων Push (Καλύτερες Πρακτικές)
- 7 Βέλτιστες πρακτικές ειδοποιήσεων push για άμεση επισκεψιμότητα
- 21 Καλύτερα Plugins WordPress για eCommerce το 2022 (Δωρεάν και Επί πληρωμή)
- 7 Καλύτερα Plugins WordPress για Ειδήσεις το 2022 (Συγκριτικά)
Also, PushEngage comes with its fair share of integrations. You can even set up some custom triggers using Zapier. These are fairly advanced campaigns, and we recommend setting them up only once you’re familiar with our other built-in automation.
You should also know that the PushEngage Javascript API is very flexible, and you can set up custom triggers for pretty much any action on your website.
Μόλις περάσετε από όλους αυτούς τους πόρους, θα συνειδητοποιήσετε ότι το PushEngage είναι το λογισμικό ειδοποιήσεων push #1 στην αγορά.
Έτσι, αν δεν το έχετε κάνει ήδη, ξεκινήστε με το PushEngage σήμερα!


