
Looking for a way to create a video popup in WordPress?
Videos can skyrocket the engagement rates on your site. While you can technically embed a video directly on your WordPress site, there are some drawbacks to that idea:
- If someone wants to make the video larger, they’ll click the ‘See on YouTube‘ button and exit your site.
- Embedded videos create an HTTPS connection from your site to the video hosting site to fetch a video preview. This can slow down your site a lot.
- You can’t trigger the video based on some user action with video embeds like you can with a popup. since there’s no way to control how the video is shown, the conversions from an embedded video will be lower than a popup.
- Typically, you can’t use an embedded video to collect leads unless you place it directly above a form. Placing an optin form like that can seem quite unnatural because visitors usually expect more content right after the video.
A video popup can resolve most of these issues without a hitch.
In this article, we’re going to set up a video popup on your WordPress site in less than 10 minutes.
Ας ξεκινήσουμε.
What You Need to Know Before You Start
We recommend using OptinMonster to create your popups.
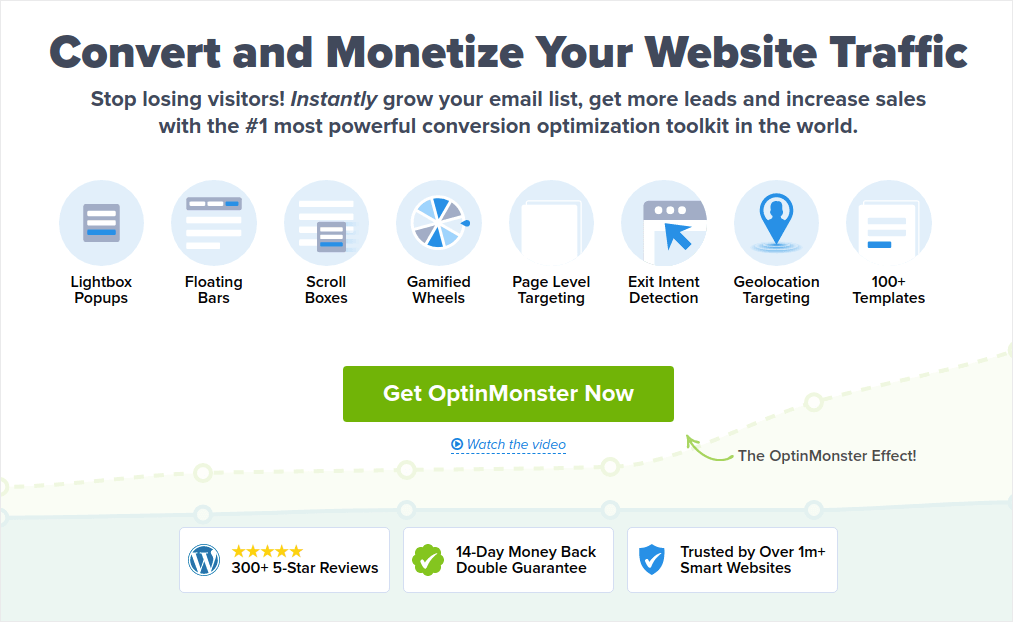
OptinMonster is the #1 conversion toolkit in the world and we’ve used it ourselves. OptinMonster makes it super simple to create powerful popups that convert. And you’ll never have to use any coding at all.
We even wrote a full review of OptinMonster.
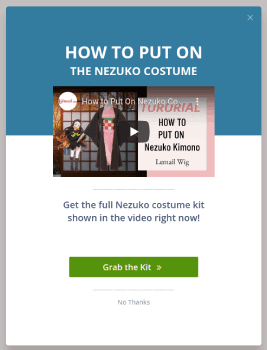
You can check that out, or get started with your campaign right now. All you have to do is sign up for OptinMonster and follow along with the rest of this article. If you follow along with this tutorial, you’ll be able to create a video popup in WordPress like this one:
How to Create a Video Popup
Now that you have a basic understanding of how a video popup works, let’s get into creating a video popup.
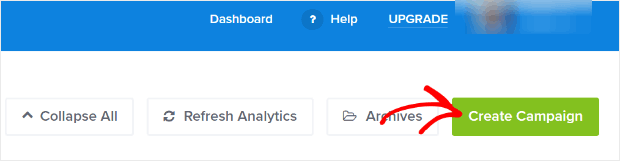
Step #1. Create Your Campaign
Now, it’s time to create your first campaign. Head over to your OptinMonster dashboard and click on Create Campaign:
We recommend getting started with the super high-converting lightbox popup:
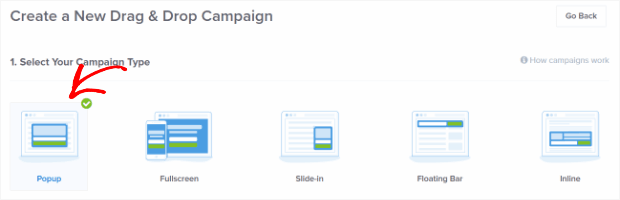
Then, choose a campaign template. We’re going with the Simple campaign type for this tutorial but you can use any template you want to create a video popup for your WordPress site:

The Simple campaign template has very few elements. So, you can easily add elements to the optin without cluttering it.
Now, give your campaign a name. The campaign name is mainly for you and you’ll likely create a whole bunch of these popups with different targeting options. So, give the campaign a meaningful name so that you can manage your campaigns easily.
Also, depending on your plan, you can also use OptinMonster on multiple sites. So, select the website where you want to display your campaign as well.
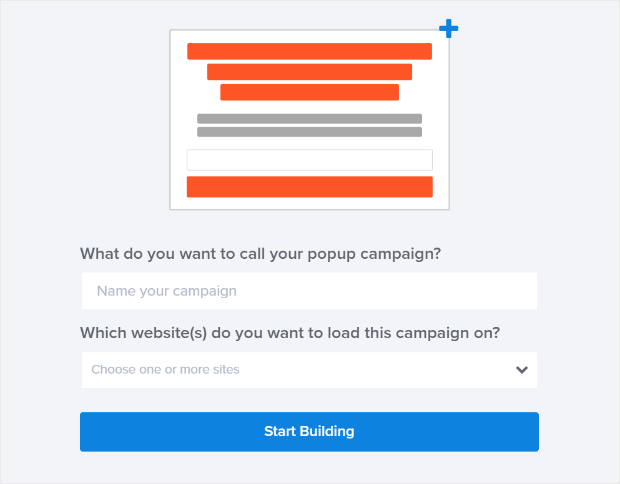
Press Start Building when you’re done.
Step #2: Get Your Video Embed URL
Next, you’ll want to get the URL for the video you want to embed. We’re going to use YouTube in this tutorial, but OptinMonster also works with other video hosting platforms such as Vimeo and Wistia.
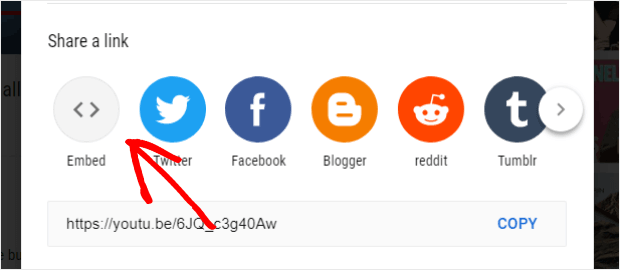
For this tutorial, we’re using a YouTube video on push notifications powered by PushEngage. Click on the Share button:

Then, click on the Embed button:
You’ll see a preview of the code snippet:
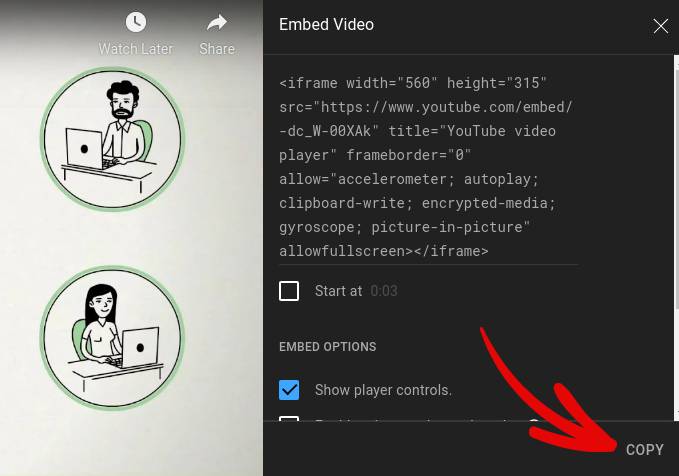
Copy only the video embed link instead of the full code:
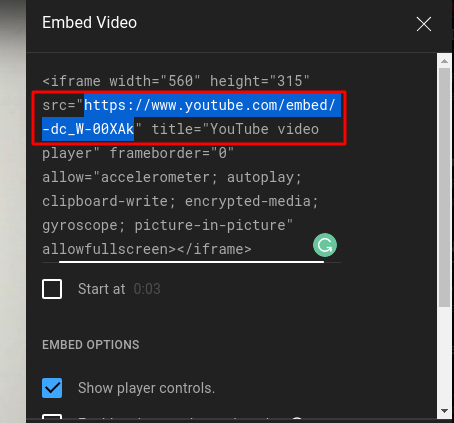
Save this video embed link because you’ll need it for your campaign in the next step.
Step #3: Embed the Video in Your Campaign
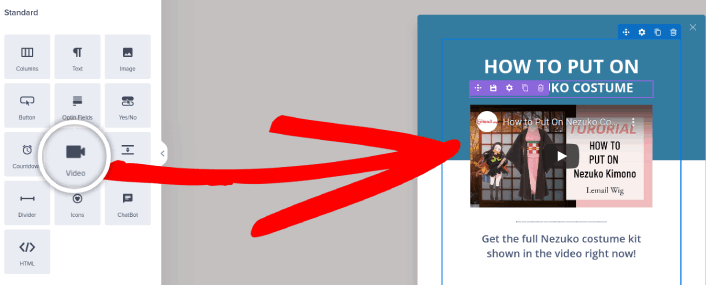
Return to the OptinMonster campaign builder. From the Design view of the campaign builder drag and drop an Video block into your campaign design where you would like the popup to show up.
Click directly on the video in the live preview to bring up the editing tools. Enter the embed URL for the video in the Hosted Video URL box:
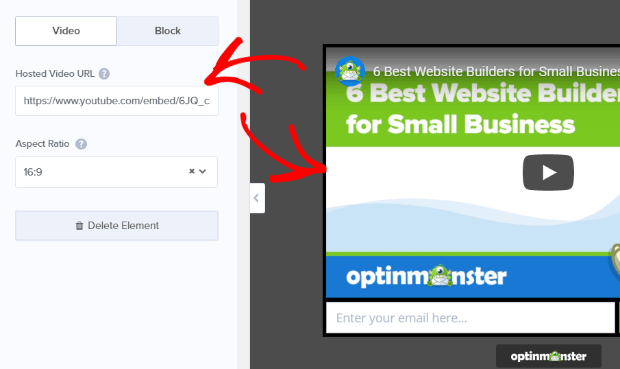
The campaign preview will update to show the updated YouTube lightbox video popup campaign. Be sure to save your campaign by clicking on the Save button in the upper right-hand corner of the screen.

Βήμα #4: Προσθέστε ένα Κουμπί Κλικ για Εγγραφή στο Αναδυόμενο Παράθυρό σας
Οι ειδοποιήσεις push σας βοηθούν να αυξήσετε την επισκεψιμότητα του ιστότοπού σας και την αλληλεπίδραση σε αυτόματο πιλότο. Και αν διαχειρίζεστε ένα online κατάστημα, το PushEngage σας βοηθά επίσης να αυξήσετε τις πωλήσεις σας, βοηθώντας σας να δημιουργήσετε αυτοματοποιημένες ειδοποιήσεις push eCommerce.
Μπορείτε να ξεκινήσετε δωρεάν, αλλά αν σοβαρά θέλετε να αναπτύξετε την επιχείρησή σας, θα πρέπει να αγοράσετε ένα επί πληρωμή πρόγραμμα. Επίσης, πριν αγοράσετε οποιαδήποτε υπηρεσία ειδοποιήσεων push, θα πρέπει να δείτε αυτόν τον οδηγό για το κόστος ειδοποιήσεων push.
Ακολουθεί μια γρήγορη επισκόπηση του τι παίρνετε με το PushEngage:
- Αυτοματοποιημένες καμπάνιες υψηλής μετατροπής
- Πολλαπλές επιλογές στόχευσης και προγραμματισμού καμπάνιας
- Παρακολούθηση στόχων και προηγμένη ανάλυση
- Έξυπνες δοκιμές A/B
- Ένας Αφοσιωμένος Διαχειριστής Επιτυχίας
Θα δείτε ότι η PushEngage είναι μακράν η καλύτερη επιλογή αν θέλετε να αυξήσετε την επισκεψιμότητα, την αφοσίωση και τις πωλήσεις για την επιχείρησή σας. Και αν έχετε περιορισμένο προϋπολογισμό, μπορείτε πάντα να γίνετε λίγο δημιουργικοί με τις ειδοποιήσεις push σας.
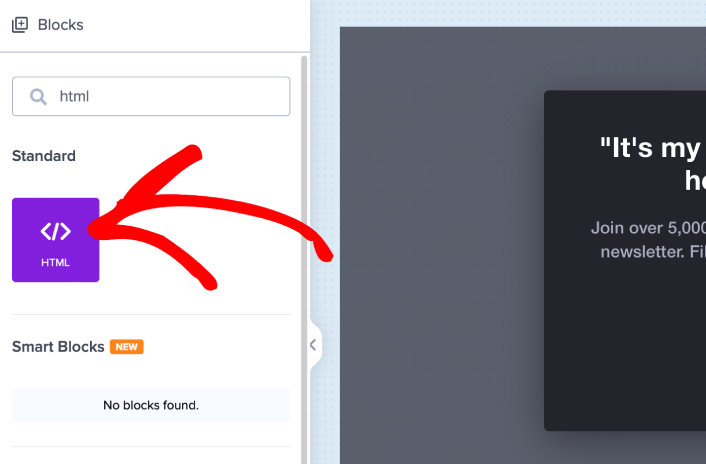
Πρώτα, προσθέστε ένα μπλοκ HTML στο αναδυόμενο παράθυρό σας από την πλαϊνή μπάρα στο OptinMonster.
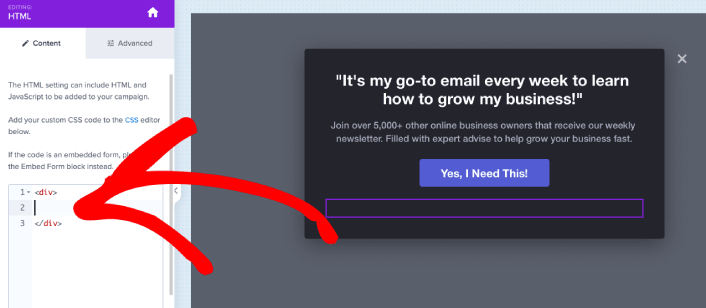
Εδώ θα προσθέσουμε τον κώδικα για τη συλλογή συνδρομητών ειδοποιήσεων push. Πρώτα, επικολλήστε τον παρακάτω κώδικα για να δημιουργήσετε ένα κλικ κουμπί:
<button onclick="subscribeOnClickButton()" style="border: none; width: 100%; padding-left: 15%; padding-right:15%; text-align: center; display: inline-block; color: white;">Get Updates via Push Notifications</button>Επικολλήστε τον κώδικα εκεί που λέει ότι μπορείτε να προσθέσετε HTML:
Φυσικά, μπορείτε να πειραματιστείτε με τα στυλ για να το κάνετε να φαίνεται πιο ελκυστικό. Στη συνέχεια, θα κάνουμε το κουμπί να συλλέγει συνδρομητές ειδοποιήσεων push όταν κάνετε κλικ.
Μεταβείτε στην αρχική σελίδα του PushEngage και κάντε κλικ στο κουμπί Έναρξη:

Στη συνέχεια, θα θέλετε να επιλέξετε το δωρεάν πρόγραμμα για να δοκιμάσετε το PushEngage ή να επιλέξετε ένα επί πληρωμή πρόγραμμα αν είστε σοβαροί σχετικά με την ανάπτυξη της επιχείρησής σας. Τα επί πληρωμή προγράμματα έρχονται με περισσότερες επιλογές καμπάνιας και τη δυνατότητα δημιουργίας ακόμη μεγαλύτερων λιστών συνδρομητών.
Στον πίνακα ελέγχου του PushEngage, μεταβείτε στις Ρυθμίσεις Ιστότοπου » Λεπτομέρειες Ιστότοπου και κάντε κλικ στο κουμπί Κάντε κλικ εδώ για οδηγίες εγκατάστασης. Κάτω από το πεδίο Οποιοσδήποτε Ιστότοπος, θα λάβετε τον κωδικό εγκατάστασής σας:

ΠΡΟΕΙΔΟΠΟΙΗΣΗ: Πρέπει να αντιγράψετε τον κωδικό που λαμβάνετε από τον πίνακα ελέγχου σας. Ο κωδικός είναι μοναδικός για κάθε χρήστη του PushEngage. Δεν θα μπορείτε να αντιγράψετε τον κωδικό στην εικόνα και να συλλέξετε συνδρομητές ειδοποιήσεων push.
Μόλις έχετε τον κωδικό στον πίνακα ελέγχου του PushEngage, πάρτε το δεύτερο script και προσθέστε του επιπλέον κώδικα. Ο τελικός σας κώδικας θα πρέπει να μοιάζει κάπως έτσι:
<script src="https://clientcdn.pushengage.com/core/02a6e92667ae2279fcba8932356c1d93.js" async></script>
<script> window._peq = window._peq || [];
function subscribeOnClickButton(){
window._peq.push(['subscribe',{}.pe,function(res){
console.log(res);
}]);
}
</script>
Προσθέστε αυτόν τον κώδικα στο μπλοκ HTML στο OptinMonster ακριβώς μετά τον κώδικα για το κουμπί σας και ανάμεσα στο μπλοκ κώδικα <div></div> και τελειώσατε!
Step #5. Set Display Rules for Your Video Popup
Next, you’ll want to specify when visitors should see your video popup campaign.
To do that, go to the Display Rules tab.
Check out the Default Display Rule for any campaign:
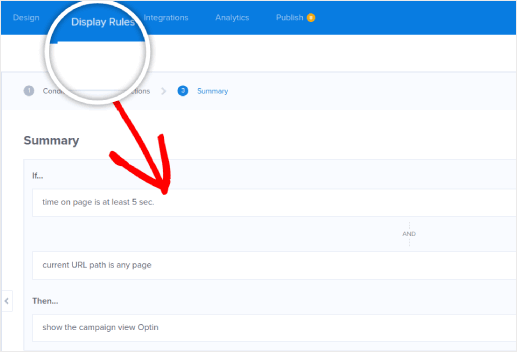
This means that even if you forget to set a custom display rule, visitors will see your video popup after spending at least 5 seconds on your site.
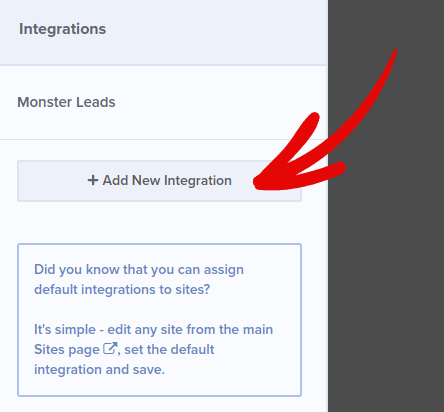
Step #6. Add Your Email Service Integration
Click Add New Integration from the Integrations tab and add your Email Service Provider. Just choose your email service provider from the Email Provider dropdown.
We recommend using ConstantContact for your email campaigns. ConstantContact offers multiple email automation campaigns that can help you engage and sell to your email list on autopilot.
Step #7. Publish Your Campaign
Every campaign on OptinMonster is Paused by default. So, we’re going to publish your campaign so that your site visitors can see the popup when they land on your site.
Head back to the OptinMonster dashboard. Go to the Publish tab from the top menu to see the Publish Options. Then, set the status to Publish and select the website platform:
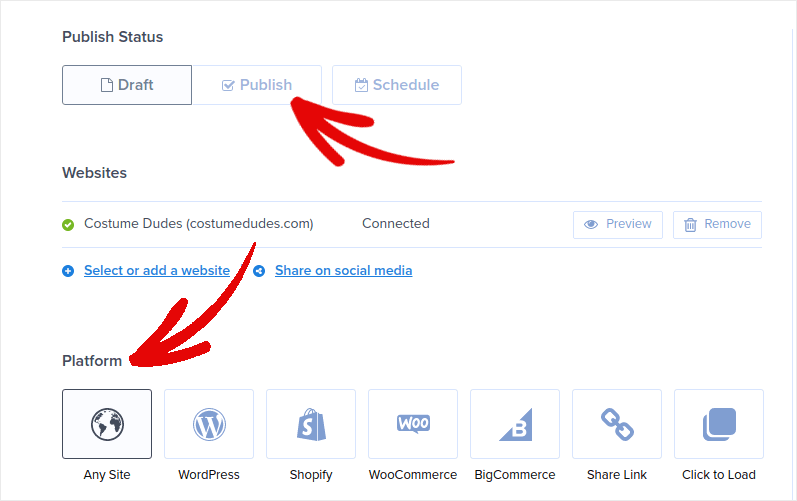
If you’re running a WordPress site, the OptinMonster plugin handles the rest of the setup automatically. Just remember to hit Save when you’re done. When you go back to your site, you will see the video popup you just created.
What to do After You Create a Video Popup in WordPress
Αυτό ήταν για αυτό το θέμα, φίλοι!
Creating video popups for your WordPress site is a super effective way to convert your traffic into email subscribers and genuine business leads. the only challenge you have after setting up a video popup is to grow your site traffic.
Και αν ψάχνετε για έναν προσιτό τρόπο να αυξήσετε την επισκεψιμότητά σας, σας προτείνουμε να χρησιμοποιήσετε ειδοποιήσεις push. Οι ειδοποιήσεις push μπορούν να σας βοηθήσουν να προσελκύσετε περισσότερη επαναλαμβανόμενη επισκεψιμότητα και αλληλεπίδραση με τον ιστότοπο. Μπορείτε επίσης να δημιουργήσετε αυτοματοποιημένες καμπάνιες ειδοποιήσεων push που παράγουν πωλήσεις.
Δεν πειστήκατε; Ελέγξτε αυτούς τους πόρους:
- 7 Έξυπνες Στρατηγικές για την Ενίσχυση της Αφοσίωσης Πελατών
- Είναι Αποτελεσματικές οι Ειδοποιήσεις Push; 7 Στατιστικά + 3 Συμβουλές Ειδικών
- Πώς να Ρυθμίσετε Ειδοποιήσεις Push για Εγκαταλελειμμένα Καλάθια (Εύκολο Οδηγός)
- Πώς να προσθέσετε ένα πρόσθετο WordPress για ειδοποιήσεις ιστού στον ιστότοπό σας
Συνιστούμε τη χρήση του PushEngage για τη δημιουργία των καμπανιών ειδοποιήσεων push. Το PushEngage είναι το #1 λογισμικό ειδοποιήσεων push στον κόσμο. Έτσι, αν δεν το έχετε κάνει ήδη, ξεκινήστε με το PushEngage σήμερα!


