
Looking for a way to add push notifications to the AMP version of your site? Adding AMP push notifications can be a little technical. But we’re going to help you do it the easy way.
AMP or Accelerated Mobile Pages are essentially a mobile version of your site. So, if you’re not setting up web push on your AMP site, then you’re going to lose a bunch of subscribers because a huge part of your audience will use mobile devices to visit your site.
In this article, we’re going to use PushEngage to install AMP push notifications because it’s way easier than doing things manually.
Ας ξεκινήσουμε.
How to Install AMP Push Notifications
Installing AMP push notifications is a really quick and easy process. Just follow these steps and by the end of this article, you should be able to send push campaigns from your site like this one:

Looks good, doesn’t it? Let’s dive in.
Βήμα #1: Ρυθμίστε τον Λογαριασμό σας PushEngage
Μεταβείτε στην αρχική σελίδα του PushEngage και κάντε κλικ στο κουμπί Ξεκινήστε:

Μπορείτε να επιλέξετε το δωρεάν πρόγραμμα για να δοκιμάσετε το PushEngage, ή να επιλέξετε ένα επί πληρωμή πρόγραμμα αν είστε σοβαροί σχετικά με την ανάπτυξη της επιχείρησής σας. Τα επί πληρωμή προγράμματα έρχονται με περισσότερες επιλογές καμπάνιας και τη δυνατότητα δημιουργίας ακόμα μεγαλύτερων λιστών συνδρομητών.
Μόλις εγγραφείτε στον λογαριασμό σας PushEngage, κατευθυνθείτε στον πίνακα ελέγχου PushEngage και πηγαίνετε στο Ρυθμίσεις Ιστοτόπου » Λεπτομέρειες Ιστοτόπου:

Μπορείτε να ορίσετε το λογότυπό σας, το όνομα του ιστοτόπου και τη διεύθυνση URL του ιστοτόπου εδώ. Είναι πραγματικά σημαντικό να τακτοποιήσετε αυτά τα πράγματα τώρα, ώστε να μπορείτε να δοκιμάσετε ολόκληρη τη ρύθμισή σας αργότερα.
Step #2: Get the AMP Push Notifications Installation Code
To install web push on your AMP site, you’ll need to get an installation code. In your Site Settings screen, scroll down and click on the Click Here For Setup Instruction button:

Head over to the AMP tab to get installation settings.
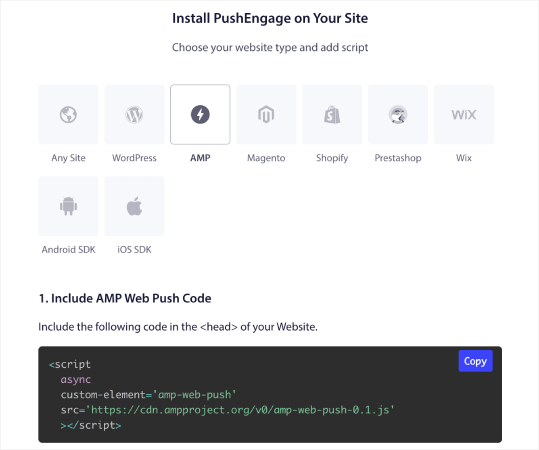
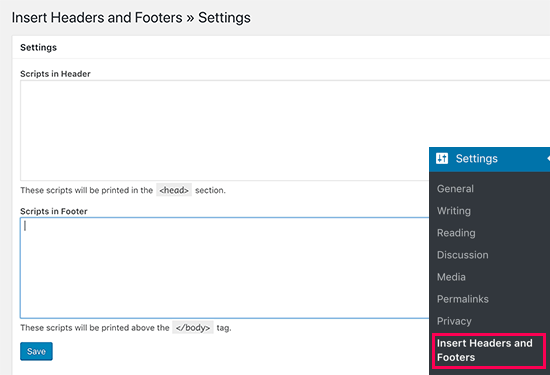
Copy this code. You’ll need to paste this code in the HTML <head> of your site. If you’re running a WordPress site with an AMP version, the simplest way to do this is to use the Insert Headers and Footers plugin. It’s a free plugin where you can paste in the AMP installation code without having to go into the actual HTML of your site:
Step #3: Install Service Worker on Your AMP Site
Next, download the package file that includes the service worker.

Αυτό περιλαμβάνει:
- service-worker.js
- amp-helper-frame.html
- amp-permission-dialog.html
Unzip the package and place these files in the root folder of your server. This part is super important. If you skip this step, your site won’t be able to collect push subscribers.
Pro Tip: If you’re not sure what the root folder is and how you can upload files there, you should check out this article on the WordPress File and Directory Structure. It’s a really simple guide for beginners and you get a lot of insight into how WordPress works.
Step #4: Add the AMP Push HTML Code to Your Site
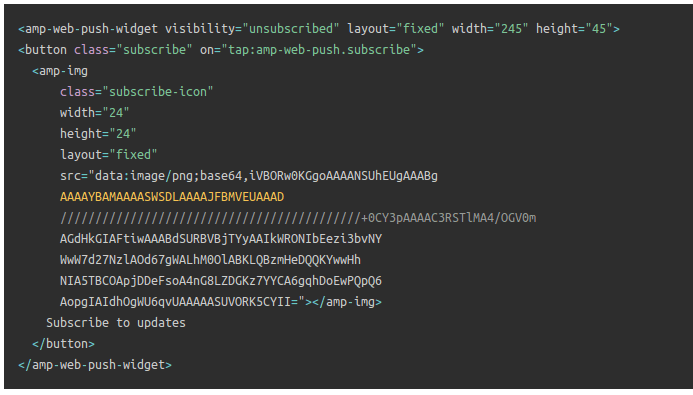
Next, add the HTML code to enable a subscribe on click button and a button to unsubscribe from push campaigns.
This code enables the service worker file you uploaded and allows your site to display subscribe and unsubscribe buttons. To collect subscribers, you need to give your visitors a simple way to subscribe to your push campaigns. The unsubscribe button will give your active subscribers a way to opt out if they’re not interested in your content. Both are pretty important.
Add the `Subscribe to updates’ button where you want it to show up on your site:
And add an ‘Unsubscribe from updates’ button:
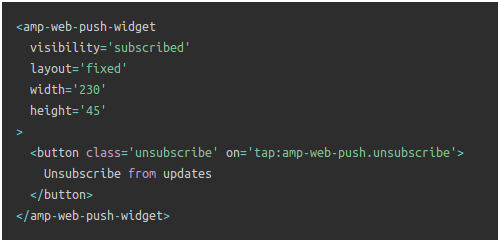
The Unsubscribe button is going to be a simple ‘tap to unsubscribe’ button. You get a lot more customization options for the non-AMP version of your site on both mobile and desktop devices. So, we recommend that you add AMP CSS to your <body> section.
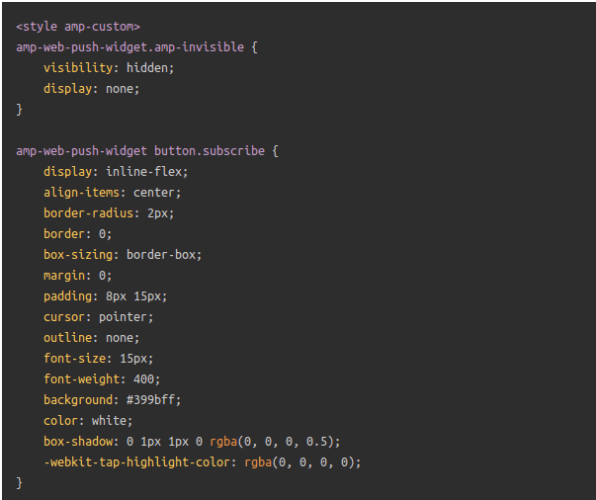
This code snippet is meant to customize the look and feel of both Subscribe and Unsubscribe buttons. If you’d like to play around with these styles, go for it. Just make sure that you don’t change the AMP HTML tags that the code is styling.
And that’s it. You’re done.
Step #5: Configuring the PushEngage Opt-In
Τώρα, επιστρέψτε στον πίνακα ελέγχου PushEngage. Πηγαίνετε στο Σχεδίαση » Αναδυόμενα Παράθυρα και επιλέξτε την επιλογή εγγραφής της επιλογής σας:
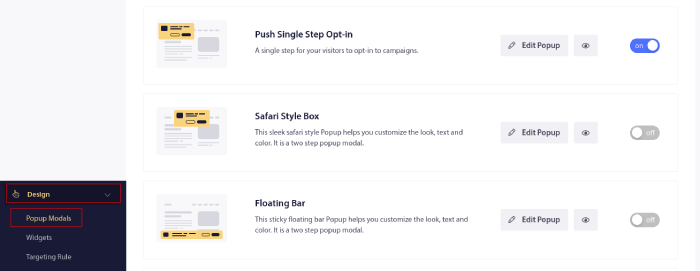
Η ιδέα εδώ είναι να δώσετε στους επισκέπτες σας έναν ισχυρό λόγο για να εγγραφούν. Εάν χρειάζεστε βοήθεια με αυτό, ελέγξτε το άρθρο μας σχετικά με το πώς να δημιουργήσετε μια προσαρμοσμένη φόρμα εγγραφής για ειδοποιήσεις push.
Και αν θέλετε κάποια πρότυπα για να ξεκινήσετε, θα πρέπει να δείτε αυτό το άρθρο σχετικά με πρότυπα εγγραφής ειδοποιήσεων push με υψηλές μετατροπές.
BONUS Step: Create a Welcome Campaign
Μόλις ολοκληρώσετε τη ρύθμιση της προαιρετικής συμμετοχής, ο ιστότοπός σας μπορεί να συλλέγει συνδρομητές.
But how do you know if your push campaigns are working properly?
We recommend that you create a welcome push notification to test if your setup went smoothly. A welcome notification is a web push notification you send a new subscriber to confirm their subscription and welcome them on board.
Μεταβείτε στον πίνακα ελέγχου PushEngage και πηγαίνετε στο Campaign » Drip Autoresponders και κάντε κλικ στο Create New Drip Autoresponder:

Στη συνέχεια, δώστε ένα όνομα στην καμπάνια σας (προτείνουμε κάτι σαν Welcome Drip) και κάτω από το Content, επιλέξτε την επιλογή που λέει, “Send notification immediately after user subscribes“):

Σε αυτό το σημείο, μπορείτε να κάνετε κλικ στο βέλος δίπλα στην ειδοποίηση για να επεξεργαστείτε το περιεχόμενο της ειδοποίησής σας. Εάν έχετε πρόγραμμα Premium ή Enterprise με το PushEngage, θα μπορείτε να προσθέσετε περισσότερες από μία ειδοποιήσεις για να δημιουργήσετε μια σειρά αυτοματοποιημένων μηνυμάτων καλωσορίσματος. Απλώς κάντε κλικ στο Add New Notification και επεξεργαστείτε το περιεχόμενο.
Μόλις τελειώσετε, κάντε κλικ στο Drip Settings και επιλέξτε την επιλογή αποστολής της καμπάνιας καλωσορίσματός σας σε όλους τους συνδρομητές:

Then, scroll down to set your own UTM parameters to track the push campaigns:

Και όταν τελειώσετε, κάντε κύλιση προς τα πάνω και κάντε κλικ στο κουμπί Activate Autoresponder:

Και αυτό ήταν όλο!
You have successfully set up AMP web push notifications on your website. It’s time to head back to your PushEngage dashboard and start creating your push campaigns.
What to do After You Add AMP Push Notifications to Your Site
Αυτό ήταν για αυτό το θέμα, φίλοι!
If you’re new to push campaigns, you should follow a full-blown push notification testing process before you go live. It’ll help you troubleshoot common issues before your visitors see them and start complaining about a broken user experience.
Θα πρέπει επίσης να ελέγξετε μερικές ακόμη αυτοματοποιημένες καμπάνιες ειδοποιήσεων push, όπως:
Συνιστούμε να επικοινωνήσετε με τους Υπεύθυνους Επιτυχίας Πελατών μας εάν κολλήσετε σε οτιδήποτε από αυτά. Είμαστε περισσότερο από ευτυχείς να σας βοηθήσουμε με οποιοδήποτε πρόβλημα.
Και αν δεν το έχετε κάνει ήδη, προχωρήστε και δοκιμάστε το PushEngage. Το PushEngage είναι η #1 υπηρεσία ειδοποιήσεων push στον κόσμο. Έτσι, αν σοβαρά θέλετε να αναπτύξετε την επιχείρησή σας, το PushEngage είναι η σωστή επιλογή για εσάς.


Thanks for this tips & information. Its very easy to understand.
good explanation