Looking for a guide to create waterfall push campaigns?
Waterfall notifications are gaining a lot of popularity these days. For a long time, you could only send waterfall email campaigns. But now, you can recreate the same effective campaigns and use the targeting options in push notification software to send waterfall push notifications.
But how do you get started? Do you need experience with waterfall campaigns? Do you need any experience setting up push notification campaigns?
In this article, we’re going to help you create waterfall push campaigns using an example. We’ll also answer all your questions about waterfall push notifications.
Ακούγεται καλό; Ας βουτήξουμε.
What Are Waterfall Push Campaigns?
A waterfall push campaign is a type of ad campaign for mobile devices. It works like this: you send push notifications to a group of people, but not all at once. Instead, you send the notification first to the people who are most likely to engage with the notification and take the action you want them to take.
If those people don’t respond, you move on to the next group of people, and so on.
The idea is to get as many people as possible to engage with the notification while spending the least amount of money. It’s called a “waterfall” because it’s like a series of steps that the network goes through, targeting different groups of people at each step.
Let me explain.
With any business your run, you’ll see a group of subscribers who are extremely engaged. They buy anything you sell, happily offer testimonials and reviews, and refer new customers to you.
And then again, you’ll see subscribers who simply aren’t interested in anything about your business.
Push notification campaigns come with detailed analytics. So, you can see both groups pretty clearly in your subscriber list. And the cool thing is that you can create Audience Groups in PushEngage to retarget both types of subscribers.
Then, you can create targeting options for your push notifications to retarget specific behavior on each notification you send. Once we get into our example, you’ll see more clearly how behavior targeting impacts a waterfall push campaign. For now, you should know that all push waterfall campaigns have two core components:
- A set of push notifications with a common goal
- Audience groups to retarget different types of subscribers
Let’s check out why waterfall push campaigns are so effective next.
Why Send Waterfall Push Campaigns?
There are several advantages of using waterfall push campaigns to grow your brand:
- Efficient use of advertising budget: By targeting the most valuable users first, and then moving down the priority list, a waterfall push campaign can help to maximize the return on investment (ROI) for your advertising spend. This ensures that your advertising budget is being used as effectively as possible.
- Higher engagement rates: By targeting users who are more likely to engage with the ad, you increase the chances of getting a higher click-through rate and conversion rate, which can lead to increased revenue.
- Customizable targeting: With a waterfall push campaign, you can create different segments of users based on their demographics, behavior, and other factors. This allows you to tailor your messaging to each group and increase the likelihood of success.
- Real-time optimization: With a waterfall push campaign, you can track the performance of each segment in real-time and adjust your targeting strategy accordingly. This ensures that you are always optimizing for the best possible results.
Overall, waterfall push campaigns can be an effective way to reach your target audience and drive engagement and conversions, while minimizing wasted ad spend.
How to Send Waterfall Push Notifications
Now that we know what a waterfall push campaign is and why you should create them, let’s take a look at a real example with step-by-step instructions to create one.
Before you get started with sending waterfall push notifications, you need to select a push notification service. We recommend using PushEngage.
Βήμα #1: Δημιουργήστε έναν Δωρεάν Λογαριασμό PushEngage
Μεταβείτε στο PushEngage και κάντε κλικ στο Ξεκινήστε Δωρεάν Τώρα:

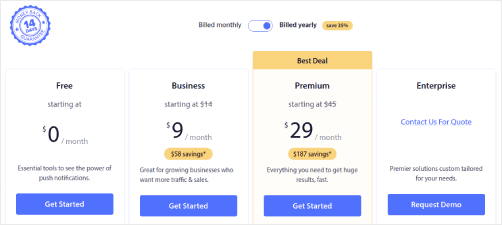
Μπορείτε να ξεκινήσετε με το δωρεάν πρόγραμμα. Αλλά αν ψάχνετε για τις πιο ισχυρές ειδοποιήσεις προγράμματος περιήγησης, θα πρέπει να επιλέξετε ένα επί πληρωμή πρόγραμμα με βάση τις ανάγκες της επιχείρησής σας:
Μόλις γνωρίζετε ποιο πρόγραμμα θέλετε, κάντε κλικ στο Ξεκινήστε για να δημιουργήσετε τον λογαριασμό σας στο PushEngage.
Βήμα #2: Εγγραφείτε στο PushEngage
Τώρα, είναι ώρα να δημιουργήσετε τον λογαριασμό σας στο PushEngage. Ξεκινήστε κάνοντας εγγραφή με μια διεύθυνση email ή ένα αναγνωριστικό Gmail:

Στη συνέχεια, συμπληρώστε τα στοιχεία του λογαριασμού σας:

Και προσθέστε τα στοιχεία της πιστωτικής σας κάρτας για να αγοράσετε το πρόγραμμά σας:

Εάν επιλέξατε τον δωρεάν λογαριασμό, τότε η πιστωτική σας κάρτα δεν θα χρεωθεί ποτέ χρήματα μέχρι να επιλέξετε να αναβαθμίσετε το πρόγραμμά σας. Και τώρα, είστε έτοιμοι να αποκτήσετε πρόσβαση στον πίνακα ελέγχου του PushEngage. Απλώς κάντε κλικ στο Ολοκλήρωση Εγγραφής και Άμεση Πρόσβαση.
Εάν έχετε χρησιμοποιήσει το OneSignal ή το PushAlert στο παρελθόν, θα δείτε ότι το PushEngage σας προσφέρει μια πολύ πιο καθαρή εμπειρία από τον πίνακα ελέγχου. Ο πίνακας ελέγχου του OneSignal δεν είναι σχεδιασμένος για προηγμένες καμπάνιες. Για αυτό, θα χρειαστείτε το API περισσότερο από το plugin του OneSignal.
Βήμα #3: Εγκαταστήστε το Plugin Ειδοποιήσεων Web για WordPress
Έχετε ολοκληρώσει τη δημιουργία του λογαριασμού σας. Λοιπόν, μεταβείτε στον πίνακα ελέγχου του PushEngage και ακολουθήστε:

Κάντε κλικ στο Ρυθμίσεις Ιστοτόπου » Λεπτομέρειες Ιστοτόπου και κάντε κλικ στο κουμπί Κάντε Κλικ Εδώ για Οδηγίες Εγκατάστασης:

Κάντε κλικ στην καρτέλα WordPress και κάντε κλικ στο κουμπί Εγκατάσταση Plugin WordPress PushEngage για να εγκαταστήσετε το plugin στον ιστότοπό σας.

Ορίστε το ενδιαφέρον μέρος: Όταν δημιουργήσατε τον λογαριασμό σας στο PushEngage, συγχρονίσατε ήδη τον ιστότοπό σας με τον λογαριασμό σας στο PushEngage. Επομένως, κάντε κλικ στον σύνδεσμο εγκατάστασης στον πίνακα ελέγχου του PushEngage για να εγκαταστήσετε αυτόματα το πρόσθετο PushEngage WordPress στον ιστότοπό σας.
Βήμα #4: Συνδέστε τον Ιστότοπό σας WordPress με το PushEngage
Όταν ολοκληρώσετε την εγκατάσταση και ενεργοποίηση του plugin WordPress PushEngage, θα δείτε τον οδηγό ρύθμισης του PushEngage:

Ο οδηγός είναι αρκετά απλός. Εάν είστε νέος χρήστης, κάντε κλικ στο Νέος; Διεκδικήστε τον Δωρεάν Λογαριασμό σας. Και εάν έχετε ήδη εγγραφεί, κάντε κλικ στο Συνδέστε τον Υπάρχοντα Λογαριασμό σας.
Στη συνέχεια, μπορείτε να επιλέξετε τον ιστότοπό σας από το αναπτυσσόμενο μενού Επιλογή Ιστοτόπου στην ενότητα Σύνδεση καταχωρημένου ιστοτόπου εάν έχετε ήδη καταχωρήσει έναν ιστότοπο κατά την εγγραφή:

Εναλλακτικά, μπορείτε να κάνετε κλικ στο Εγγραφή νέας τοποθεσίας για να προσθέσετε μια νέα τοποθεσία εάν έχετε ένα Premium pricing plan ή ανώτερο. Στο επόμενο βήμα, ο οδηγός εγκατάστασης θα σας ζητήσει να εγκαταστήσετε άλλα απαραίτητα πρόσθετα WordPress.

Εάν ακολουθήσατε κάθε βήμα σωστά, θα δείτε αυτό το μήνυμα επιτυχίας από τον οδηγό:

You are now ready to create campaigns.
Step #5: Create Waterfall Push Campaigns
Finally, it’s time for our example. To show you a real use case for waterfall push campaigns, we’re going to take the example of Black Friday promotions. Our objective is to maximize the conversions on our Black Friday offer.
To retarget our subscribers based on their behavior, we’re going to send a broadcast to all our subscribers. Then, based on their engagement levels, we’re going to create different Audience Groups for retargeting.
How to Send Your Notification to All Subscribers
We want the maximum reach for 3 notifications:
- Early Black Friday Announcement
- Black Friday Flash Sale
- Cyber Monday Sale
So, we’re sending those 3 notifications to everyone. In the Audience tab, select Send to All Subscribers:

How to Retarget Subscribers Who Didn’t Click the Broadcast to Everyone
If you’re not sending the notification to all subscribers, you’ll need to create an Audience Group. For instance, if you want to target the subscribers who didn’t click on the broadcast to everyone, you’ll need to create a new Audience Group.
In your WordPress dashboard, go to Audience » Audience Groups and click Create New Audience Group:

To target subscribers who didn’t click the last notification, you’ll need to filter by Last click date:
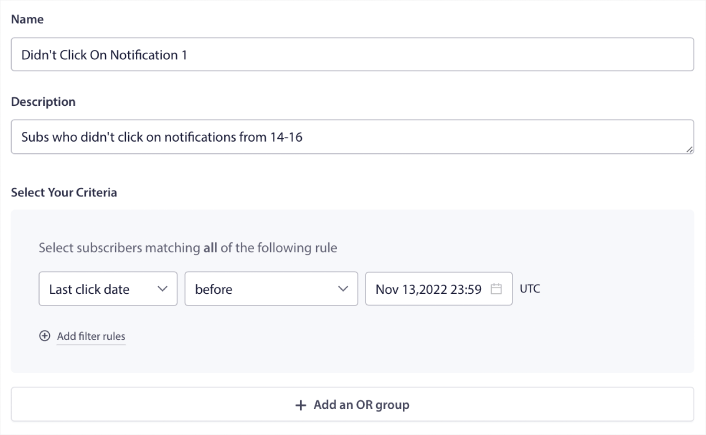
Filter by last click date before the date you sent your previous notification. So, if you sent the last push notification on 14th November, filter for subscribers who clicked on notifications only before 13th November at midnight.
NOTE: Unlike an email campaign, you can’t actually filter by click rate on the last notification. The closest approximation is to filter for clicks in a date range.
When you’re done, click on Save Notification.
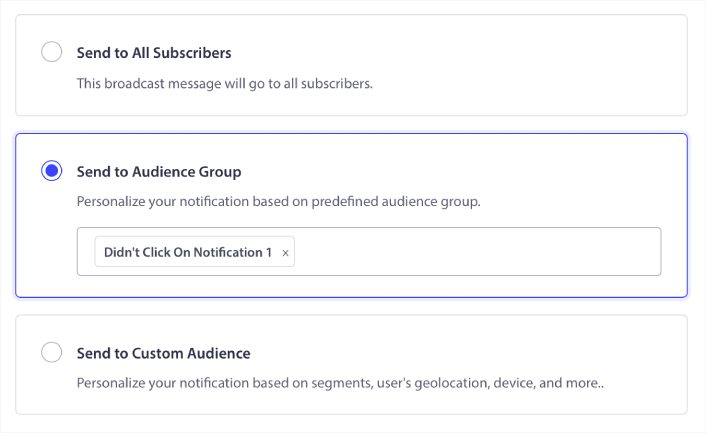
Then, head back to your push notification broadcast and select Send to Audience Group. From the dropdown, select your Group:
How to Retarget Subscribers Who Clicked the Broadcast to Everyone
Εάν θέλετε να στοχεύσετε συνδρομητές που έκαναν κλικ στην τελευταία σας ειδοποίηση, μπορείτε να δημιουργήσετε μια άλλη Ομάδα Κοινού.
Filter your subscribers by Last click date after the date you sent your previous notification AND before the date you want to send your next notification:
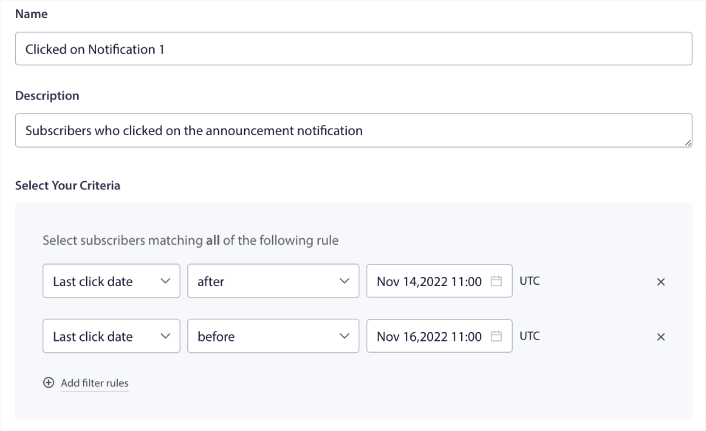
You can add AND criteria to your filter by clicking on Add filter rules. A filter like this is great for cross-selling push notifications.
The outcome of these Audience Groups is more granular targeting. So, each time, you can send different offers to improve your conversion rates.
What to do After You Create Waterfall Push Campaigns
One of the most important things to remember about waterfall push campaigns is that you can only use this methodology on broadcast push notifications. Drip campaigns in push notifications don’t have targeting options that granular yet.
So, make sure to A/B test your push notifications. We also suggest that you take some time to read our articles and learn how to supercharge your automated push notifications. Start with our article on push notification best practices.
Εάν είστε νέοι στις ειδοποιήσεις push, θα πρέπει να ακολουθήσετε μια πλήρη διαδικασία δοκιμής ειδοποιήσεων push πριν δημοσιεύσετε. Θα σας βοηθήσει να αντιμετωπίσετε κοινά προβλήματα πριν τα δουν οι επισκέπτες σας και αρχίσουν να παραπονιούνται για μια χαλασμένη εμπειρία χρήστη. Και σίγουρα θα πρέπει να ρυθμίσετε το Google Analytics για να παρακολουθείτε τις ειδοποιήσεις push.
Επαναστόχευση ειδοποιήσεων push για να στοχεύσετε τους συνδρομητές που έκαναν κλικ σε αυτές ή όχι. Ενημερώστε μας πώς λειτουργεί αυτό για εσάς. Εν τω μεταξύ, ελέγξτε αυτούς τους πόρους:
- Πώς να αυξήσετε τα κλικ στις ειδοποιήσεις push σας με την περιέργεια
- Πώς να εξατομικεύσετε κάθε ειδοποίηση push
- Πώς να ξεχωρίσετε με πλούσια μέσα στις ειδοποιήσεις push σας
- Πώς να επανενεργοποιήσετε αδρανείς συνδρομητές push
- Πώς να χρησιμοποιήσετε τις ειδοποιήσεις push για να κρατάτε τους πελάτες ενήμερους
- Πώς να χρησιμοποιήσετε emojis στις ειδοποιήσεις push σας για υψηλότερα ποσοστά κλικ
- Πώς να αυξήσετε τις μετατροπές δημιουργώντας αίσθηση επείγοντος
And if you haven’t already, get started with PushEngage.


