Looking for a guide to creating drip campaigns to boost your sales?
Marketing is incomplete today without automation. Sure, you can collect subscribers and send out push notifications and emails. What then? Keep selling them on your business with every newsletter and hope that your subscribers convert?
There’s no way to:
- Personalize your campaigns
- Get new customers on autopilot
- Retain existing customers with your content
- Upsell or cross-sell products
- Recover lost sales
Unless… you use drip campaigns that convert.
In this article, we’ll show you how to set up drip campaigns and make the most of them. The best part? You don’t need any previous experience.
Ακούγεται καλό; Ας βουτήξουμε.
What Are Drip Campaigns?
Think of drip campaigns like setting up a bunch of emails or even push notifications to be sent out automatically, sort of like a sprinkler system for your garden. Instead of watering plants, you’re sending out messages to people who are interested in what you’ve got to say or sell.
Δείτε πώς λειτουργεί:
- It’s not magic, it’s automated: Once you set it up, these messages keep going out on their own. You don’t have to keep sending them manually.
- You can talk to the right people: You can send different messages to different groups of people. For example, someone who just signed up might get a friendly “hello” message, while someone else who’s been around for a while might get special deals or updates.
- It’s personal: These messages can use the person’s name or talk about things they’ve shown interest in. It makes them feel like you’re really talking to them, not just sending the same thing to everyone.
- Timing is everything: The messages are sent at times that make the most sense – like right after someone signs up or looks at something on your site.
- Each message has a job: Every email or notification is meant to do something specific, like help people get to know your product better or remind them about something they looked at but didn’t buy.
- You can see how it’s doing: You can check out things like how many people open the messages or click on links inside them. This helps you know if your messages are working well.
Drip campaigns aren’t just for emails – they work app push notifications and web push notifications as well. They’re great for keeping in touch with people who are interested in your stuff, without overwhelming them. It’s a smart way to keep people engaged and interested in what you’re doing.
Types of Drip Campaigns
Let’s dive into the different types of drip campaigns. Just like ice cream comes in all sorts of varieties, drip campaigns have different types too. Each kind is tailored for a specific purpose or audience. Here are some of the most common ones:
- Welcome Series: This is like saying “Hi!” to someone new. When someone signs up for your emails or notifications, you send them a few friendly messages to introduce them to your brand or service. It’s like rolling out the red carpet for your new guests.
- Onboarding Campaigns: Think of this as a helpful guide. When someone buys a product or signs up for a service, these messages walk them through how to use it, offer helpful tips, or show them things they might not know about. It’s like giving a tour to someone new in town.
- Abandoned Cart Reminders: Ever put something in your online shopping cart and then forget about it? These campaigns are little nudges to remind people about stuff they were interested in but didn’t buy. It’s like a gentle tap on the shoulder saying, “Hey, did you forget about this?”
- Re-engagement Campaigns: These are for reaching out to people who used to interact with your brand but haven’t in a while. It’s like calling up an old friend and saying, “Hey, let’s catch up!” You might offer them a special deal or just remind them about your brand.
- Educational Content: Here, the goal is to teach your audience something valuable related to your product or industry. It’s like a mini-course, delivered in small, digestible messages. Think of it as a series of fun and informative lessons.
- Product Updates: Got something new or improved? This type of campaign keeps your audience in the loop about new features, products, or services. It’s like showing off your latest gadget to friends.
- Event Invites: Hosting a webinar, workshop, or another event? These campaigns are all about getting people excited and signed up for your events. It’s like sending out cool invitations to a party.
- Seasonal Campaigns: These are tied to specific times of the year, like holidays, seasons, or special events. It’s like decorating your store for Christmas or having a summer sale.
Each type of drip campaign has its own charm and purpose. By matching the right type of campaign with your audience and goals, you can create meaningful connections and keep your audience engaged in a way that feels natural and not too sales-y.
How to Create Push Notification Drip Campaigns
Installing push notifications to a website isn’t difficult. But it does have a few steps and you’ll want to follow along with this guide step-by-step.
Μην πηγαίνετε μπροστά στο χρόνο σε καμία περίπτωση και θα είστε εντάξει.
Before you create a welcome push notification campaign, you need to select a push notification service. A push notification service is a software that allows you to create push campaigns without any coding.
We recommend using PushEngage.

Το PushEngage είναι το #1 plugin ειδοποιήσεων push στον κόσμο.
Οι ειδοποιήσεις push σας βοηθούν να αυξήσετε την επισκεψιμότητα του ιστότοπού σας και την αλληλεπίδραση σε αυτόματο πιλότο. Και αν διαχειρίζεστε ένα online κατάστημα, το PushEngage σας βοηθά επίσης να αυξήσετε τις πωλήσεις σας, βοηθώντας σας να δημιουργήσετε αυτοματοποιημένες ειδοποιήσεις push eCommerce.
Μπορείτε να ξεκινήσετε δωρεάν, αλλά αν σοβαρά θέλετε να αναπτύξετε την επιχείρησή σας, θα πρέπει να αγοράσετε ένα επί πληρωμή πρόγραμμα. Επίσης, πριν αγοράσετε οποιαδήποτε υπηρεσία ειδοποιήσεων push, θα πρέπει να δείτε αυτόν τον οδηγό για το κόστος ειδοποιήσεων push.
Ακολουθεί μια γρήγορη επισκόπηση του τι παίρνετε με το PushEngage:
- Αυτοματοποιημένες καμπάνιες υψηλής μετατροπής
- Πολλαπλές επιλογές στόχευσης και προγραμματισμού καμπάνιας
- Παρακολούθηση στόχων και προηγμένη ανάλυση
- Έξυπνες δοκιμές A/B
- Ένας Αφοσιωμένος Διαχειριστής Επιτυχίας
Θα δείτε ότι η PushEngage είναι μακράν η καλύτερη επιλογή αν θέλετε να αυξήσετε την επισκεψιμότητα, την αφοσίωση και τις πωλήσεις για την επιχείρησή σας. Και αν έχετε περιορισμένο προϋπολογισμό, μπορείτε πάντα να γίνετε λίγο δημιουργικοί με τις ειδοποιήσεις push σας.
NOTE: If you’re running a WordPress site, you should install and activate the PushEngage WordPress plugin.
Πάμε!
Βήμα #1: Δημιουργήστε έναν Δωρεάν Λογαριασμό PushEngage
Μεταβείτε στο PushEngage και κάντε κλικ στο Ξεκινήστε Δωρεάν Τώρα:
You can get started with the free plan. But if you’re looking to send targeted push notifications, you should select the Growth Plan. Once you know which plan you want, click on Get Started to create your PushEngage account.
Βήμα #2: Εγγραφείτε στο PushEngage
Τώρα, είναι ώρα να δημιουργήσετε τον λογαριασμό σας στο PushEngage. Ξεκινήστε κάνοντας εγγραφή με μια διεύθυνση email ή ένα αναγνωριστικό Gmail:

Στη συνέχεια, συμπληρώστε τα στοιχεία του λογαριασμού σας:

Και προσθέστε τα στοιχεία της πιστωτικής σας κάρτας για να αγοράσετε το πρόγραμμά σας:

Εάν επιλέξατε τον δωρεάν λογαριασμό, τότε η πιστωτική σας κάρτα δεν θα χρεωθεί ποτέ χρήματα μέχρι να επιλέξετε να αναβαθμίσετε το πρόγραμμά σας. Και τώρα, είστε έτοιμοι να αποκτήσετε πρόσβαση στον πίνακα ελέγχου του PushEngage. Απλώς κάντε κλικ στο Ολοκλήρωση Εγγραφής και Άμεση Πρόσβαση.
Εάν έχετε χρησιμοποιήσει το OneSignal ή το PushAlert στο παρελθόν, θα δείτε ότι το PushEngage σας προσφέρει μια πολύ πιο καθαρή εμπειρία από τον πίνακα ελέγχου. Ο πίνακας ελέγχου του OneSignal δεν είναι σχεδιασμένος για προηγμένες καμπάνιες. Για αυτό, θα χρειαστείτε το API περισσότερο από το plugin του OneSignal.
Βήμα #3: Εγκαταστήστε το Plugin Ειδοποιήσεων Web για WordPress
NOTE: If you’re not running a WordPress site, you should check out our installation guides to get started.
Ολοκληρώσατε τη δημιουργία του λογαριασμού σας. Έτσι, μεταβείτε στον πίνακα ελέγχου του PushEngage και ακολουθήστε τα εξής βήματα:

Κάντε κλικ στο Ρυθμίσεις Ιστότοπου » Λεπτομέρειες Ιστότοπου και κάντε κλικ στο κουμπί Κάντε Κλικ Εδώ Για Οδηγίες Εγκατάστασης:

Κάντε κλικ στην καρτέλα WordPress και κάντε κλικ στο κουμπί Εγκατάσταση Πρόσθετου PushEngage WordPress για να εγκαταστήσετε το πρόσθετο στον ιστότοπό σας.

Εδώ είναι το ενδιαφέρον: Όταν δημιουργήσατε τον λογαριασμό σας στο PushEngage, συγχρονίσατε ήδη τον ιστότοπό σας με τον λογαριασμό σας στο PushEngage. Έτσι, κάντε κλικ στον σύνδεσμο εγκατάστασης στον πίνακα ελέγχου του PushEngage για να εγκαταστήσετε αυτόματα το πρόσθετο PushEngage WordPress στον ιστότοπό σας.
Βήμα #4: Συνδέστε τον Ιστότοπό σας WordPress με το PushEngage
Όταν ολοκληρώσετε την εγκατάσταση και ενεργοποίηση του plugin WordPress PushEngage, θα δείτε τον οδηγό ρύθμισης του PushEngage:

Ο οδηγός είναι αρκετά απλός. Εάν είστε νέος χρήστης, κάντε κλικ στο Νέος; Διεκδικήστε τον Δωρεάν Λογαριασμό σας. Και αν έχετε ήδη εγγραφεί, κάντε κλικ στο Σύνδεση του Υπάρχοντος Λογαριασμού σας.
Στη συνέχεια, μπορείτε να επιλέξετε τον ιστότοπό σας από το αναπτυσσόμενο μενού Επιλογή Ιστότοπου κάτω από το Σύνδεση εγγεγραμμένου ιστότοπου εάν έχετε ήδη καταχωρήσει έναν ιστότοπο κατά την εγγραφή:

Εναλλακτικά, μπορείτε να κάνετε κλικ στο Εγγραφή νέου ιστότοπου για να προσθέσετε έναν νέο ιστότοπο εάν έχετε πακέτο τιμολόγησης Premium ή υψηλότερο. Στο επόμενο βήμα, ο οδηγός γνωριμίας θα σας ζητήσει να εγκαταστήσετε άλλα απαραίτητα πρόσθετα WordPress.

Εάν ακολουθήσατε κάθε βήμα σωστά, θα δείτε αυτό το μήνυμα επιτυχίας από τον οδηγό:

Είστε τώρα έτοιμοι να δημιουργήσετε καμπάνιες και αναδυόμενα παράθυρα ειδοποιήσεων push.
Step #4: Send Personalized Drip Campaigns
Before you create a campaign, you should set up segments and audience groups to send personalized push messages.
Τίποτα δεν ξεπερνά το επίπεδο εξατομίκευσης που μπορείτε να πετύχετε δημιουργώντας τμήματα και ομάδες κοινού για τους συνδρομητές σας στις ειδοποιήσεις push. Μεταβείτε στο PushEngage » Audience και ξεκινήστε αμέσως τη δημιουργία τμημάτων και ομάδων κοινού.
Στην καρτέλα Segments (Τμήματα), μπορείτε να δημιουργήσετε νέα τμήματα ή να επεξεργαστείτε υπάρχοντα:

Και αν χρειάζεστε ακόμη βαθύτερη εξατομίκευση, δημιουργήστε μια ομάδα κοινού στην καρτέλα Audience Groups (Ομάδες Κοινού):

Αν είστε νέοι στα τμήματα ειδοποιήσεων push και στις εξατομικευμένες ειδοποιήσεις push, θα πρέπει να διαβάσετε το άρθρο μας σχετικά με το πώς να δημιουργήσετε τμήματα και την ανακοίνωσή μας σχετικά με την προηγμένη ομαδοποίηση κοινού.
Step #5: Create Your Drip Push Notifications Campaign
Go to PushEngage dashboard and head over to Campaign » Drip Autoresponders and click on Create New Drip Autoresponder:

Then, name your campaign (we suggest something like Welcome Drip), and under Content, select the option that says, “Send notification immediately after user subscribes“):

Σε αυτό το σημείο, μπορείτε να κάνετε κλικ στο βέλος δίπλα στην ειδοποίηση για να επεξεργαστείτε το περιεχόμενο της ειδοποίησής σας.
If you have a Premium or Enterprise plan with PushEngage, you’ll be able to add more than one notification to create a sequence of automated welcome messages. Just click on Add New Notification and edit the content.
Once you’re done, click on Drip Settings and select the option to send your welcome campaign to all subscribers:

Then, scroll down to set your own UTM parameters to track the push notifications:

And when you’re done, scroll back up and click the Activate Autoresponder button:

Και τελειώσατε!
How to Create Email Drip Campaigns
Setting up those nifty automated drip campaigns in WordPress? You can do that easily with an email marketing tool. Follow along with the rest of this guide and you’re all set!
Step #1: Select an Email Drip Service
We suggest giving Constant Contact a whirl. It’s like the superstar of email marketing services. Super user-friendly and it comes with a cool drag-and-drop feature for crafting emails.

Το Constant Contact είναι η καλύτερη υπηρεσία email marketing για τη ρύθμιση αυτοματοποιημένων απαντήσεων για την επιχείρησή σας. Είναι εξαιρετικά εύκολο στη χρήση και προσφέρει άπειρες δυνατότητες αυτοματισμού για τη βελτίωση των καμπανιών email σας.
Ορίστε τι κάνει το Constant Contact μια τόσο εξαιρετική επιλογή για τη δημιουργία καμπανιών email marketing:
- Εύκολο πρόγραμμα δημιουργίας drag and drop για τη δημιουργία email
- Εκατοντάδες προ-σχεδιασμένα πρότυπα email
- Μηνύματα καλωσορίσματος, προσφορές γενεθλίων και αυτοματοποιημένες απαντήσεις για εγκαταλελειμμένα καλάθια
- Εργαλεία δημιουργίας λίστας και φόρμες εγγραφής για την αύξηση του κοινού σας
- Δοκιμές A/B για στοχευμένα email
- Ενσωματώσεις με CRM και υπηρεσίες τρίτων
- Εξαιρετική υποστήριξη μέσω live chat και τηλεφώνου
Για να μην αναφέρουμε, το Constant Contact διαθέτει ένα plugin φόρμας για το WordPress που μπορείτε να χρησιμοποιήσετε για τη δημιουργία δυνητικών πελατών. Μπορείτε επίσης να καλλιεργήσετε και να κλείσετε τους δυνητικούς πελάτες σας με αυτόματους απαντητές.
But hey, this isn’t the only game in town. Most of the big email marketing services, like Brevo (you might know it as Sendinblue), HubSpot, and others, they’ve got this drip email magic too.
With a few clicks, you can get those automated emails rolling out to your subscribers. Plus, Constant Contact plays nice with WordPress plugins like WPForms and OptinMonster. And if you’re into eCommerce, using WooCommerce or Shopify, it’s got you covered for reaching out to new customers or reminding folks about those items they left in their carts.
Ready to give it a go? Pop over to the Constant Contact website, sign up, and guess what? You get to try it out with a 60-day free trial. It’s like test driving a car but for email marketing. This way, you can see if it’s the right fit before you decide to go for a paid plan.
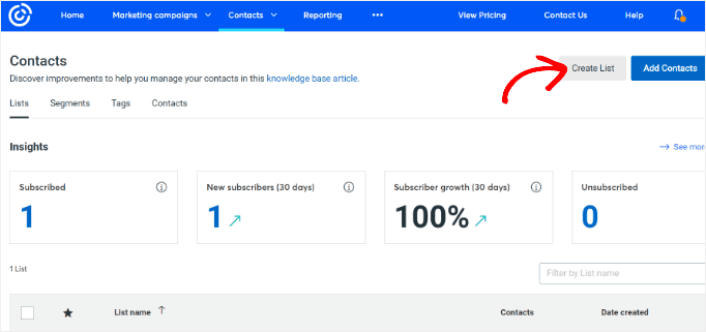
Step #2: Create an Email List
After creating an account, you can visit the Constant Contact dashboard to create a contact list.
Constant Contact will have already created a default list for you. However, you can create your own list by going to the Contacts tab in the top menu and then clicking the Create List button.
You can connect your WordPress newsletter form with Constant Contact and start building an email list. You should also check out our blog post on how to add a WordPress blog subscription widget.
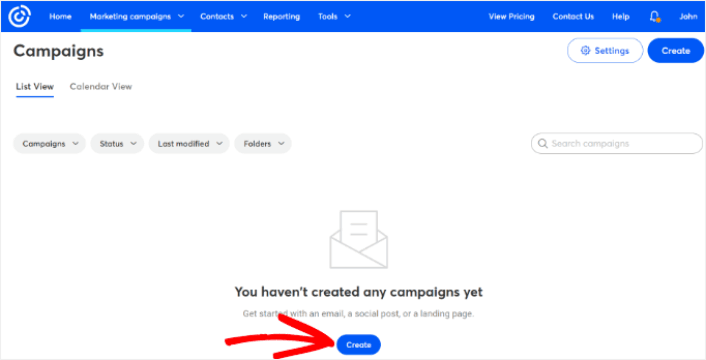
Step #3: Create Marketing Drip Campaigns
Now that you’ve added subscribers to your Constant Contact list, the next step is to create an automated drip campaign. Head over to the Marketing Campaigns tab and then click the Create button.
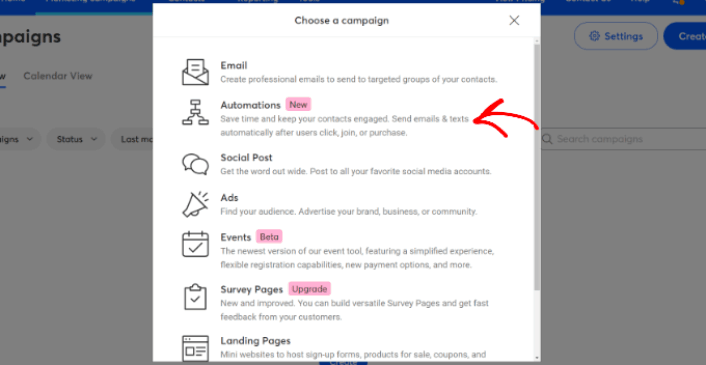
Constant Contact will show you multiple options for creating a campaign. Go ahead and select the Automations campaign.
From here, you can choose from several pre-built campaign templates to set up a drip campaign. You can create a Custom Automation to start from scratch, or you can quickly get started using any of the campaign templates.
For this tutorial, we will select the Create custom path template to get started. Select the Subscribes for email option and then click the Next button.
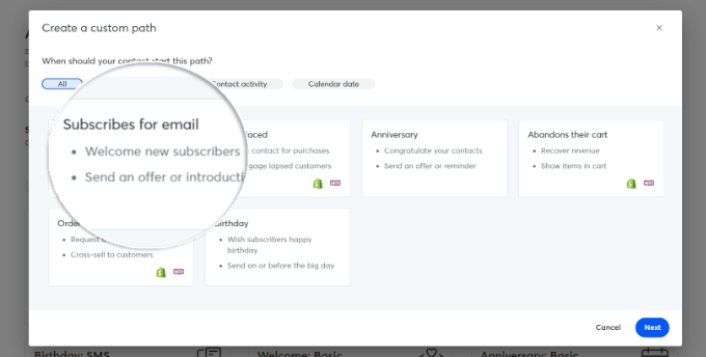
Give your custom path a name and you’re done! This template will trigger a drip campaign any time someone new subscribes to your email list. So, it’s perfect for a welcome campaign. If you’re looking to create an onboarding campaign, you can use tags to put them on a separate drip campaign.
Step #4: Create a Campaign Flow
However, you can simply drag actions and rules from the menu on the left onto the path. For instance, you add different actions like sending an email or sending an SMS to your workflow.
There are also different rules that help you customize your automation. You can add a time delay and specify when the next email should be sent. Similarly, there is a conditional split option that lets you set up Yes and No conditions and split the path.
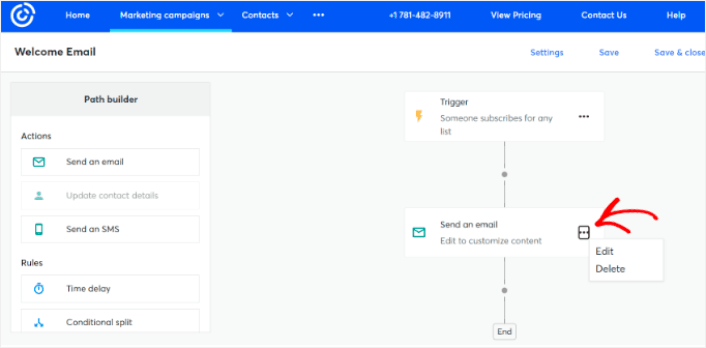
Tweaking your automated workflow is a breeze too. Just spot the three dots icon and give it a click. Choose Edit to make changes. Say you want to change up the Send an email action.
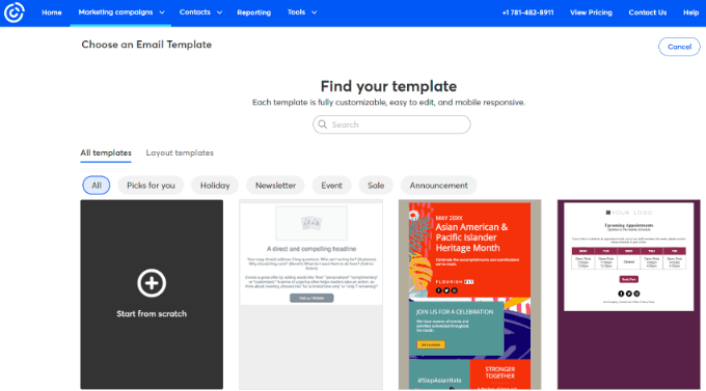
Once you do that, a popup window shows up. Here’s where you can either whip up a brand new email or use one you’ve already made.
Since it’s your first time setting up this workflow, go ahead and pick Create a new email. Put in a cool name for your email, then hit Continue. And just like that, you’re on your way to customizing your email workflow!
Step #5: Creating Your Email Campaign
You can search for a template based on the occasion or use a blank template to create an email from scratch.
Once you select a template, the email editor will launch.
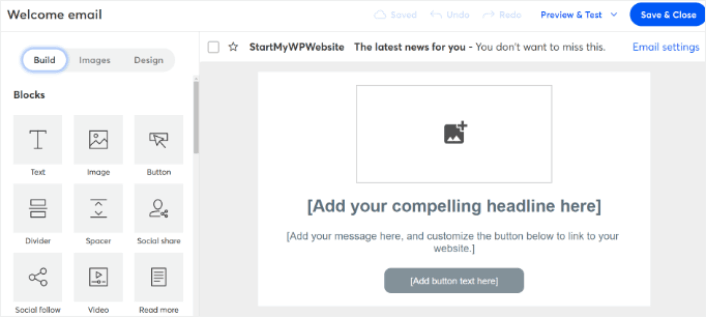
When you are done, hit the Save & Close button at the top. This will take you back to the Path Builder in Constant Contact. Go ahead and finish your automation path by adding as many actions and rules to your path and editing each one of them.
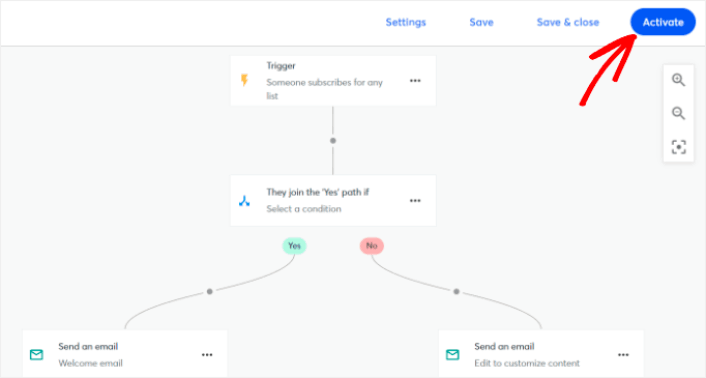
After creating an automated workflow, you can simply click the Activate button at the top. And you’re done!
What to do After You Create a Drip Campaign
Αυτό ήταν για αυτό το θέμα, φίλοι!
Αν βρήκατε αυτό το άρθρο χρήσιμο, φροντίστε να αφήσετε ένα σχόλιο παρακάτω.
Getting started with drip campaigns can seem intimidating. But if you keep an eye on goal tracking and analytics, you should be fine. More importantly, you’ll make a lot more profit with the help of push notification campaigns. Here are a few cool resources to get you started:
- Πώς να χρησιμοποιήσετε ειδοποιήσεις push επανα στόχευσης για να διπλασιάσετε τα έσοδά σας
- Πώς να ταξινομήσετε τις ειδοποιήσεις push και να βρείτε επιτυχημένες καμπάνιες
- Πώς να καθαρίσετε τις λίστες συνδρομητών ειδοποιήσεων push (Εύκολο)
- Πώς να στέλνετε αυτόματα ειδοποιήσεις push RSS
- Πώς να χρησιμοποιείτε ειδοποιήσεις push για την προώθηση ενός ειδησεογραφικού ιστότοπου
- Πώς να χρησιμοποιείτε ειδοποιήσεις push cross-selling για να διπλασιάσετε τις πωλήσεις σας
- Πώς να χρησιμοποιείτε ειδοποιήσεις push εγκατάλειψης περιήγησης (4 βήματα)
Αν είστε νέοι στις ειδοποιήσεις push, θα πρέπει να δοκιμάσετε το PushEngage. Το PushEngage είναι το #1 λογισμικό ειδοποιήσεων push στην αγορά. Και οι καμπάνιες σας θα είναι σε ασφαλή χέρια.
Λοιπόν, αν δεν το έχετε κάνει ήδη, ξεκινήστε με το PushEngage σήμερα!


