
Looking for a guide on how to create a FAQ page for your WordPress site?
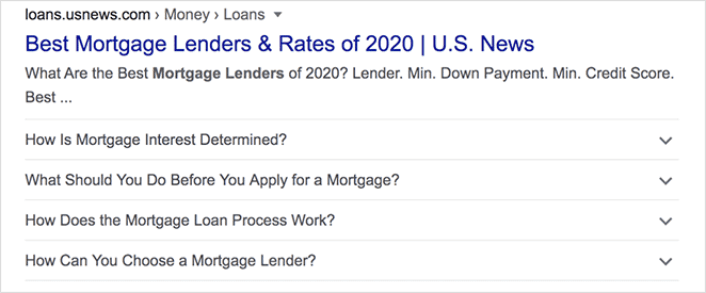
FAQ pages can address sales objections in potential customers. At the same time, it can bring in search traffic straight from Google’s “People Also Ask” featured snippets.
The coolest part is that you can use a FAQ page as a landing page that redirects visitors to product and sales pages.
In this article, we’re going to show you how to create a FAQ page for your WordPress site the easy way. Then, we’ll show you how to optimize your page to generate a ton of search traffic.
The best part? It’s perfectly fine if you’ve never done this before. This article is meant for complete beginners.
Ας ξεκινήσουμε.
What the Best FAQ Pages Have in Common
Before we jump into our tutorial on how to create a FAQ page, here’s a checklist that will come in handy when you’re writing the content for your FAQ page:
- Does the FAQ page have a clear structure that’s easy to navigate?
- Are the answers clear and concise?
- Are there links to more comprehensive guides when needed?
- Does the business update the FAQ pages as it grows?
- Is it easy to search and find queries?
- Does the FAQ page include a search bar for users to find answers quickly?
- Is there a call to action for users to buy the product or service?
If you’re just getting started with FAQ pages yourself, you should also consider all these factors before you create one. And if you already have a FAQ page, you should consider updating it so that it follows these best practices. Also, you can check out our list of epic FAQ pages from six-figure businesses.
How to Create a FAQ Page in WordPress
Now that you know what kinds of FAQ pages work well, it’s time to create your own FAQ page. The easiest way to add a FAQ page to your WordPress site is with a drag-and-drop page builder plugin. We did a breakdown of the most powerful landing page builders and compared the best in the world.
Our recommendation is that you use SeedProd.

SeedProd is the best website builder for WordPress. It lets you create WordPress themes, landing pages, and flexible layouts for your WordPress site without code.
If you need the quick version of why you should use SeedProd, here it is:
- SeedProd works with any WordPress theme. There’s no messy transition and if you switch themes, you won’t break your landing pages completely.
- The designs are mobile-friendly and you actually get a mobile preview of your page. Seeing as most people use the internet from mobile devices rather than PCs, this is pretty important.
- Το SeedProd υπερηφανεύεται για την αστραπιαία ταχύτητα και την ελαφρότητά του. Έτσι, δεν θα κάνει τον ιστότοπό σας να φορτώνει αργά. Και σίγουρα δεν θα καταναλώσει πολλούς πόρους του διακομιστή σας.
For a more detailed look at the features, you should check out our review of SeedProd. With this plugin, you can quickly launch your FAQ pages. The best part is that you can customize your entire page in the visual editor. This saves a lot of time and money you’d otherwise have spent on custom development.
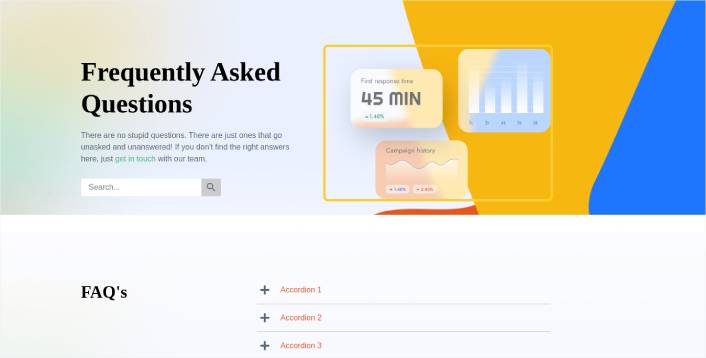
If you follow every step in this tutorial, you should be able to create a FAQ page just like this one:
Step #1: Install the SeedProd Plugin on Your Site
Πρώτα, θα θέλετε να αποκτήσετε το plugin SeedProd Pro και να το ενεργοποιήσετε. Αν δεν είστε σίγουροι πώς να το κάνετε, διαβάστε αυτό το άρθρο για το πώς να εγκαταστήσετε ένα plugin WordPress. Στη συνέχεια, μεταβείτε στο SeedProd » Ρυθμίσεις στον πίνακα ελέγχου του WordPress και ενεργοποιήστε την έκδοση Pro:

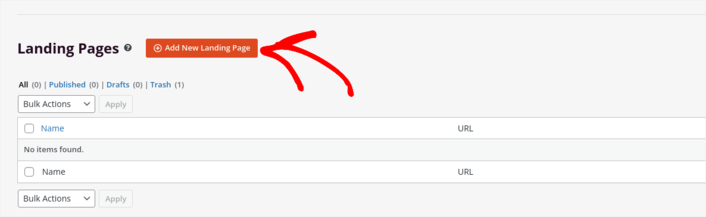
Στη συνέχεια, μεταβείτε στο SeedProd » Σελίδες για μια επισκόπηση του πίνακα ελέγχου σελίδων προορισμού του SeedProd. Εδώ μπορείτε να δείτε τους διαφορετικούς τύπους σελίδων προορισμού που μπορείτε να δημιουργήσετε χρησιμοποιώντας το SeedProd:

Keep in mind that these are all special pages with pre-built functionality and design templates. For an FAQ page, you don’t want to use ANY of these special landing pages. Instead, you’re going to create a custom landing page.
Scroll further down and click the Add New Landing Page button to get started:
Step #2: Create a FAQ Page with SeedProd
After clicking the Add New Landing Page button, you’ll see SeedProd’s library of landing page templates. These are professionally designed landing page templates that are completely responsive.
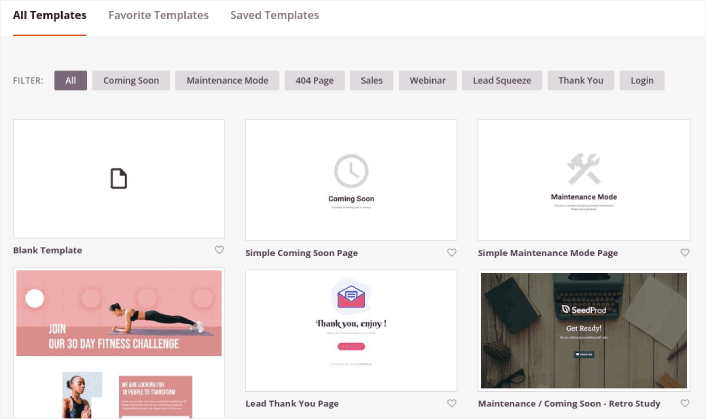
Next, you can select one of these templates to help you get started. Remember, the template is just a starting point. you can customize everything about the page later on. For now, find a template that you think will fit:
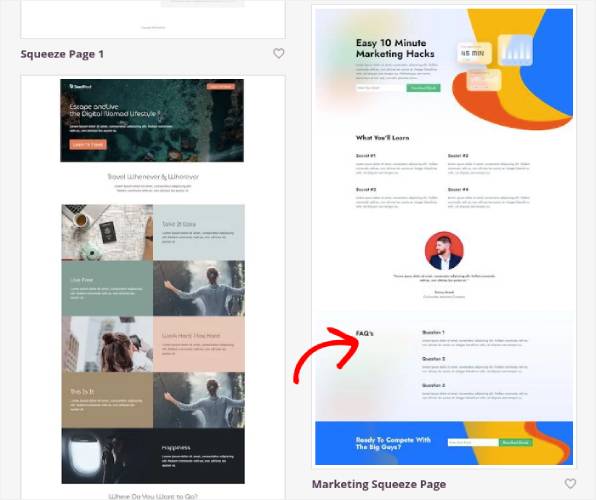
We’re using the Marketing Squeeze Page template for this tutorial because it already has a FAQ section in it. But you can select any template you like. The template is mostly a place to start your page design.
If you find an exact match for your page, that’s great. For instance, in our podcast landing page tutorial, we found an exact template built especially for podcast landing pages. If you don’t find an exact match, it’s still perfectly fine because we’re going to customize our page anyway.
Step #3: Customize the FAQ Page Template
SeedProd’s visual builder allows you to customize your landing page using drag-and-drop content blocks.
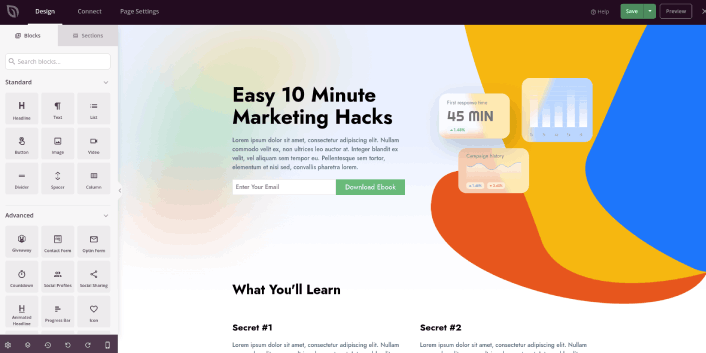
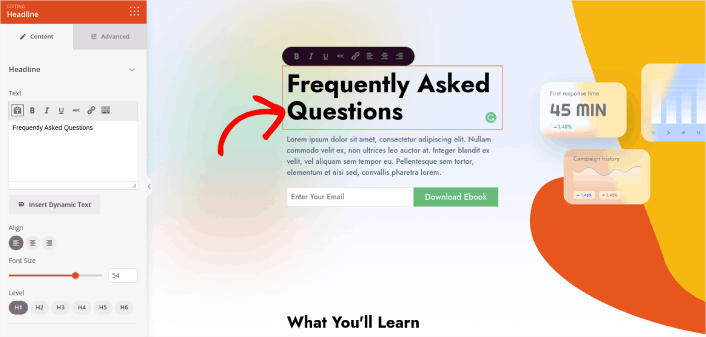
The first thing you should do is edit the headline for the page. You want it to be super clear and to the point. Just click on the headline in the preview and start editing it:
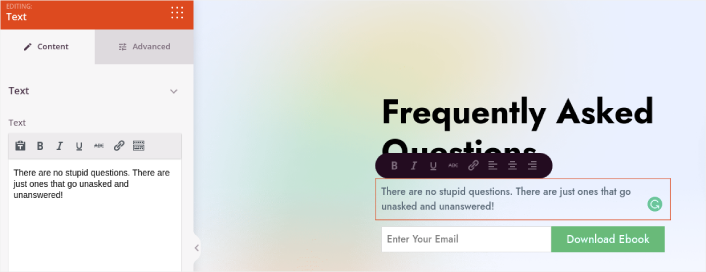
Next, add a little body copy in the exact same way:
In the template, you can see a call to action (CTA) that says Download Ebook. Of course, for an FAQ page, you don’t necessarily want to collect leads in the first 10 seconds. So, you can click on the email optin and delete it. Instead, we highly recommend using a search bar in the hero section.
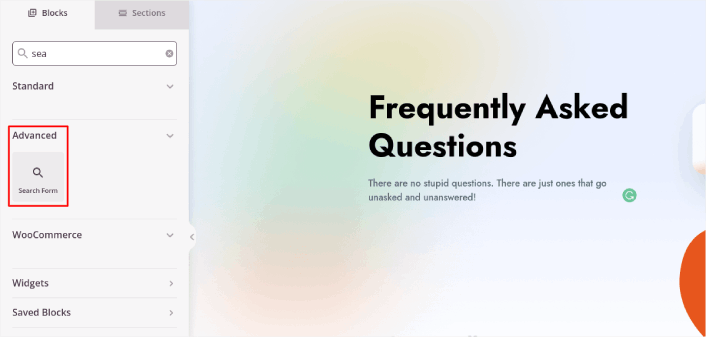
Just drag and drop the Search Form content block from the sidebar on the left onto your page preview section:
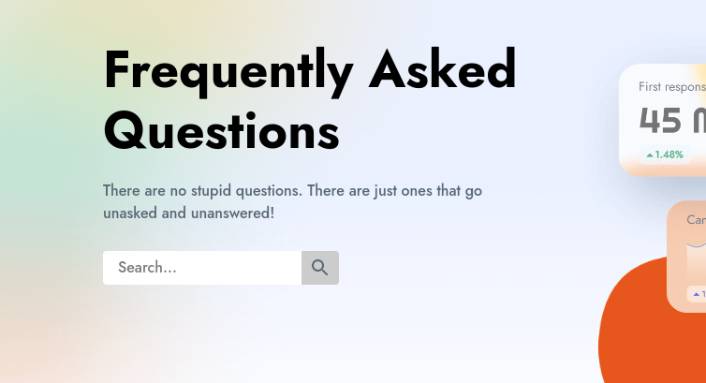
Θα πρέπει να μοιάζει κάπως έτσι:
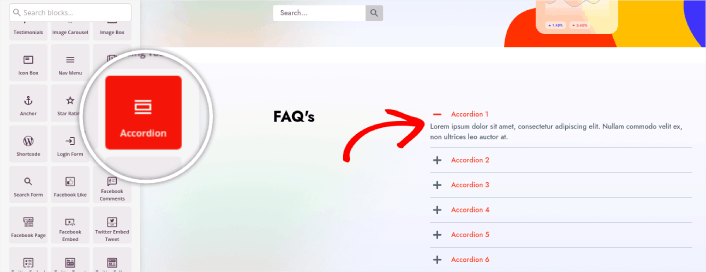
You can get rid of all the other blocks in the hero section and keep only the FAQs section. In the FAQs section, you’ll see a simple Q&A format with normal headers and paragraphs. You can keep this if you like the style. But we recommend using the Accordion module for your FAQ section:
After that, all you have to do is fill out the content. And there you have it!
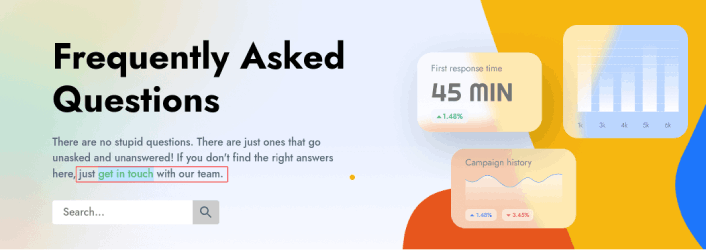
Your basic FAQ page is done. If you want to supercharge it, you can also add a few tweaks to it. For instance, you can create a link to the contact page in the body copy of your hero section.
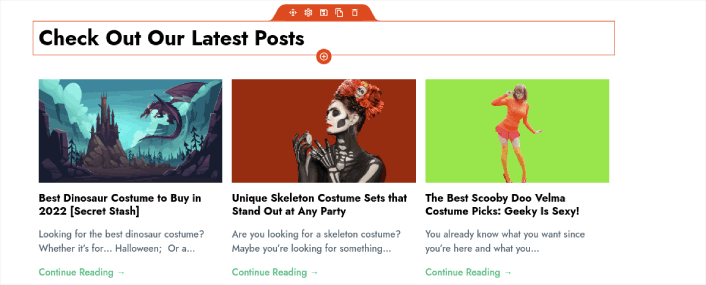
You can also add a blog section below the FAQs to redirect visitors to your latest posts using the Post block:
Finally, modify the CTA section at the bottom to collect email leads if that’s one of your marketing objectives:

You can do a lot more in terms of design and all from drag-and-drop content blocks. Once you’re happy with the overall look and feel of your FAQ page, it’s time to connect your email marketing service.
Step #4: Connect Your Email Marketing Service
After you’re done designing your FAQ page, click the Connect tab at the top of your page builder, and select your email marketing provider to collect leads on your site.

Στη συνέχεια, κάντε κλικ στην καρτέλα Ρυθμίσεις Σελίδας στο επάνω μέρος της οθόνης σας.

Εδώ, μπορείτε να προσθέσετε ένα πρόσθετο SEO και ένα πρόσθετο Google Analytics στη σελίδα προορισμού σας. Μπορείτε ακόμη και να ρυθμίσετε προσαρμοσμένους κωδικούς παρακολούθησης, όπως ένα Facebook Pixel ή ένα Pinterest pixel, για να παρακολουθείτε την απόδοση των διαφημίσεων.
Συνιστούμε τη χρήση του All in One SEO ως πρόσθετο SEO για WordPress.

Αν χρησιμοποιείτε το AIOSEO μαζί με το SeedProd, μπορείτε απλά να μεταβείτε στις Ρυθμίσεις Σελίδας » SEO » Schema και να ρυθμίσετε το σχήμα FAQ στη σελίδα:
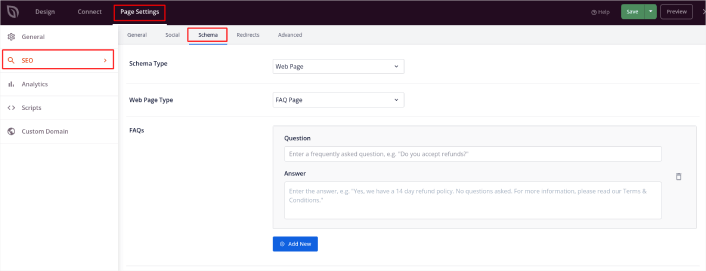
Ορίστε τον Τύπο Σχήματος σε Ιστοσελίδα και τον Τύπο Ιστοσελίδας σε Σελίδα FAQ. Στη συνέχεια, απλώς επικολλήστε τις Συχνές Ερωτήσεις σας στα πεδία FAQ παρακάτω.
Step #5: Publish Your Landing Page
Now let’s go ahead and publish your design. To do this, click the dropdown arrow next to the save button and click Publish. You can then click the See Live Page button to see how it looks.
And you’re done! If you followed every step, your FAQ page should look something like this:
Bonus Step: Add a Click to Subscribe Button to Your FAQ Page
You can also add a click to subscribe button to collect push notification subscribers. Push notifications are a great way to increase your repeat traffic, get more engagement and even sell official merch if you have some.
In SeedProd, just drag and drop the Custom HTML module from the sidebar.
We’ve put the subscribe button directly underneath the email signup form in the first fold.

But you can insert the button anywhere you like.
For this part, you need some experience with HTML and CSS. Or, you can copy this code and paste it into your Custom HTML block:
<button onclick="subscribeOnClickButton()" style="border: none; padding-left: 5%; padding-right:5%; text-align: center; display: inline-block; color: blue;">Get Updates via Push Notifications</button>That’s a standard button in HTML with very little styling. The only fancy bit is the onclick function in the code. It basically means that your visitors can click on the button to subscribe to something. Now, we need to give the button some extra code to allow your visitors to subscribe to push notifications.
Μεταβείτε στην αρχική σελίδα του PushEngage και κάντε κλικ στο κουμπί Έναρξη:

Στη συνέχεια, θα θέλετε να επιλέξετε το δωρεάν πρόγραμμα για να δοκιμάσετε το PushEngage ή να επιλέξετε ένα επί πληρωμή πρόγραμμα αν είστε σοβαροί σχετικά με την ανάπτυξη της επιχείρησής σας. Τα επί πληρωμή προγράμματα έρχονται με περισσότερες επιλογές καμπάνιας και τη δυνατότητα δημιουργίας ακόμη μεγαλύτερων λιστών συνδρομητών.
Στον πίνακα ελέγχου του PushEngage, μεταβείτε στις Ρυθμίσεις Ιστότοπου » Λεπτομέρειες Ιστότοπου και κάντε κλικ στο κουμπί Κάντε κλικ εδώ για οδηγίες εγκατάστασης. Κάτω από το πεδίο Οποιοσδήποτε Ιστότοπος, θα λάβετε τον κωδικό εγκατάστασής σας:

ΠΡΟΕΙΔΟΠΟΙΗΣΗ: Πρέπει να αντιγράψετε τον κωδικό που λαμβάνετε από τον πίνακα ελέγχου σας. Ο κωδικός είναι μοναδικός για κάθε χρήστη του PushEngage. Δεν θα μπορείτε να αντιγράψετε τον κωδικό στην εικόνα και να συλλέξετε συνδρομητές ειδοποιήσεων push.
Μόλις έχετε τον κωδικό στον πίνακα ελέγχου του PushEngage, προσθέστε αυτό το απόσπασμα στον κώδικά σας:
<script> window._peq = window._peq || [];</script> <script>
function subscribeOnClickButton(){
window._peq.push(['subscribe',{}.pe,function(res){
if(res.statuscode==1)
{
// Code to return response
console.log(res);
}
}]);
}
</script>
Ο τελικός σας κώδικας θα πρέπει να μοιάζει κάπως έτσι:
<script src="https://clientcdn.pushengage.com/core/02a6e92667ae2279fcba8932356c1d93.js" async></script>
<script> window._peq = window._peq || [];</script> <script>
function subscribeOnClickButton(){
window._peq.push(['subscribe',{}.pe,function(res){
if(res.statuscode==1)
{
// Code to return response
console.log(res);
}
}]);
}
</script>
You’ll want to add this code to the HTML block in your landing page after the code for the button. It should look something like this:

Feel free to customize the styles for the button any way you please. When you’re done customizing your FAQ page, go ahead and hit the Save button.
What to Do Once You Know How to Create a FAQ Page
You just learned how to create a FAQ page that looks awesome and converts really well. The only challenge you have left is to send traffic to it.
Και αν ψάχνετε για έναν προσιτό τρόπο να αυξήσετε την επισκεψιμότητά σας, σας προτείνουμε να χρησιμοποιήσετε ειδοποιήσεις push. Οι ειδοποιήσεις push μπορούν να σας βοηθήσουν να προσελκύσετε περισσότερη επαναλαμβανόμενη επισκεψιμότητα και αλληλεπίδραση με τον ιστότοπο. Μπορείτε επίσης να δημιουργήσετε αυτοματοποιημένες καμπάνιες ειδοποιήσεων push που παράγουν πωλήσεις.
Δεν πειστήκατε; Ελέγξτε αυτούς τους πόρους:
- 7 Έξυπνες Στρατηγικές για την Ενίσχυση της Αφοσίωσης Πελατών
- Είναι Αποτελεσματικές οι Ειδοποιήσεις Push; 7 Στατιστικά + 3 Συμβουλές Ειδικών
- Πώς να Ρυθμίσετε Ειδοποιήσεις Push για Εγκαταλελειμμένα Καλάθια (Εύκολο Οδηγός)
- Πώς να προσθέσετε ένα πρόσθετο WordPress για ειδοποιήσεις ιστού στον ιστότοπό σας
Συνιστούμε τη χρήση του PushEngage για τη δημιουργία των καμπανιών ειδοποιήσεων push. Το PushEngage είναι το #1 λογισμικό ειδοποιήσεων push στον κόσμο. Έτσι, αν δεν το έχετε κάνει ήδη, ξεκινήστε με το PushEngage σήμερα!


