
Looking for a quick and easy way to create a contact form in WordPress?
WordPress has a lot of plugins and themes that you can use. The biggest challenge in creating a contact form in WordPress is actually compatibility. How do you create a contact form that doesn’t break because of plugin conflicts or your theme’s default settings?
What’s even the point of using WordPress if you have to site and code contact forms in HTML and CSS? On top of that, you’d have to manually code a way to connect your form to an email service provider.
And then, you’d have to resolve any email delivery issues.
Don’t worry. There’s a much simpler way that works with any theme and there’s zero coding involved.
In this article, we’re going to give you a WordPress contact form plugin that resolves all these issues right out of the box. We’ll even show you how to create your very first contact form using that plugin. And it will take you less than 10 minutes to create a form.
Ας ξεκινήσουμε.
Why You Should Create a Contact Form on Your WordPress Site
Before we get started with building your contact form, let’s talk about why you would want a contact form on your WordPress site in the first place. Isn’t it much easier to have a button that opens up Outlook and allows your web visitors to email you directly?
Short answer: NO!
But this is a perfectly reasonable question to ask. You’re probably thinking that it takes way too long to code a contact form and then put it up manually across all your money-making pages.
And you’re right. It does take a long time to create a contact form manually using code. But we’re not going to use any code in this article.
Besides, a contact form is way better than displaying your email in public. A well-designed contact form:
- Protects your inbox from spam: Spam bots scrape “mailto” tags on your site to automatically collect email addresses to spam. Having a contact form with Captcha protection can prevent that.
- Gathers data in a consistent, readable pattern: When you leave it up to your prospects to email you, they will often leave out crucial information that you may need. So, there’s no consistency in the data you gather. But you can design your contact form to gather all the important data you need and then email the response to you in a structured, readable way.
- Automates onboarding processes: You can actually create contact forms that redirect to a different page when someone submits their form. This is a great way to inform your leads and prospects about the next steps in their onboarding journey.
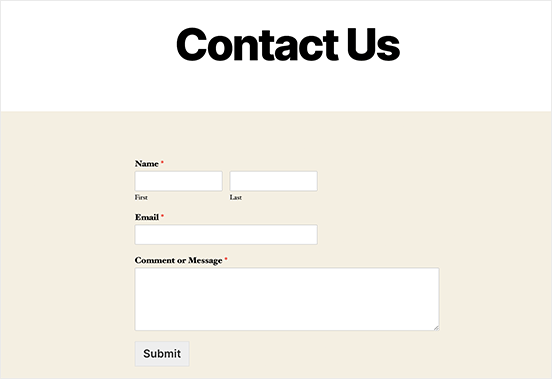
Here’s a quick look at the form that we’re going to create in this article:
We’re going to do it all using one of the best WordPress form plugins in the world.
Ας ξεκινήσουμε.
How to Add Contact Form in WordPress
The first thing you need to do is choose a WordPress contact form plugin.
Of course, a quick Google search will show you that there are way too many contact form plugins to choose from. So, we went ahead and found the best plugin for you.
We recommend using WPForms to create contact forms on your WordPress site.
WPForms is the #1 WordPress form builder plugin with over 3 million users. You get a drag and drop form builder, which means that you can create WordPress forms with incredible features in a matter of minutes.
You can also use WPForms Lite, which is the free version of WPForms. So, if you’re looking for a free form builder to get started with, you can use the Lite version. Later, when you need more powerful features for your forms, you can upgrade to the paid plans.
Step 1: Install WPForms on Your Site
Let’s start by installing WPForms on your site. Head over to the site and click on Get Started to sign up for the plugin. Then, head over to your WPForms dashboard and go to Downloads to get your plugin:
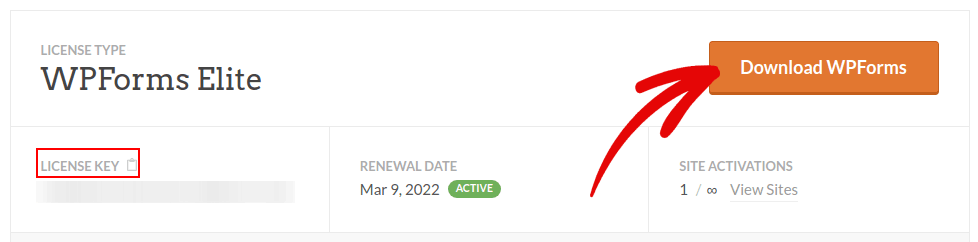
Στη συνέχεια, εγκαταστήστε και ενεργοποιήστε το plugin στον ιστότοπό σας. Και αντιγράψτε το κλειδί άδειας χρήσης σας στην ίδια καρτέλα.
NOTE: If you need more step-by-step instructions, you should check out this article on how to install WordPress plugins.
Τέλος, μεταβείτε στον πίνακα ελέγχου του WordPress και πηγαίνετε στο WPForms » Ρυθμίσεις και επικολλήστε το Κλειδί Άδειας Χρήσης σας:
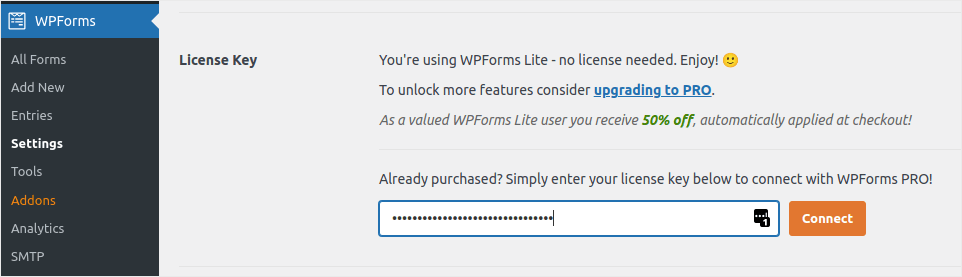
When you’re done, click Connect. And you’re done!
Step 2: Create a Contact Form in WordPress
Τώρα που το WPForms είναι εγκατεστημένο και ενεργοποιημένο, είναι ώρα να δημιουργήσετε την πρώτη σας φόρμα. Μεταβείτε στο WPForms » Προσθήκη Νέας:

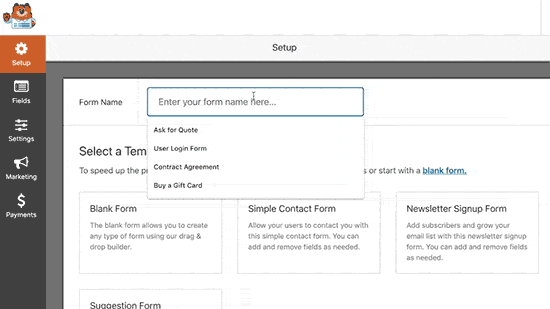
Αυτό θα ανοίξει τον κατασκευαστή φορμών drag and drop του WPForms.
Για να δημιουργήσετε μια νέα φόρμα, δώστε της ένα όνομα και επιλέξτε το πρότυπο φόρμας σας:
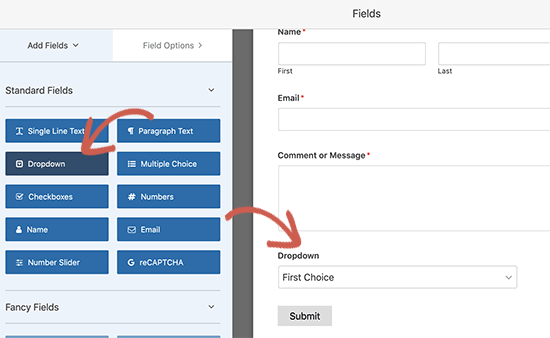
And that’s it! if you want to add or edit the fields in your contact form, you can do so from the sidebar. Darg and drop form fields to add new ones and click on the existing fields to edit them:
Όταν τελειώσετε, πατήστε Αποθήκευση.
Step 3: Configure Notifications and Confirmations
Στη συνέχεια, θα θέλετε να ρυθμίσετε τις ειδοποιήσεις και τις επιβεβαιώσεις.
Οι ειδοποιήσεις είναι email που λαμβάνετε όταν κάποιος συμπληρώνει τη φόρμα. Οι επιβεβαιώσεις προορίζονται να ειδοποιήσουν τον χρήστη ότι έχει συμπληρώσει επιτυχώς τη φόρμα. Συνήθως, αυτό είναι ένα μήνυμα "Ευχαριστούμε", αλλά μπορείτε επίσης να ανακατευθύνετε τους χρήστες σας σε μια ειδική σελίδα.
Μεταβείτε στις Ρυθμίσεις » Επιβεβαιώσεις για να διαμορφώσετε τις ρυθμίσεις επιβεβαίωσης:

Και στη συνέχεια στο ίδιο μενού, μεταβείτε στις Ειδοποιήσεις για να διαμορφώσετε τα μηνύματα ειδοποίησης:

Εξ ορισμού, οι ειδοποιήσεις αποστέλλονται στο email διαχειριστή του WordPress. Έτσι, αν θέλετε τα email να αποστέλλονται κάπου αλλού, όπως στο email του Επικεφαλής Πωλήσεών σας, μπορείτε να το κάνετε ακριβώς εδώ.
Step 4: Add Your WordPress Contact Form
You’re done configuring your WordPress contact form at this point. So, let’s go ahead and add it to a page. There are 3 basic methods to add a WPForms contact form to your WordPress site. We’re going to take a look at each.
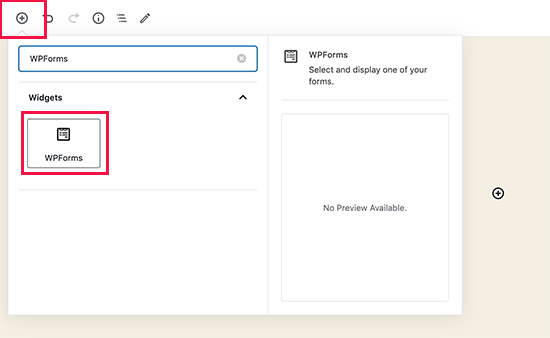
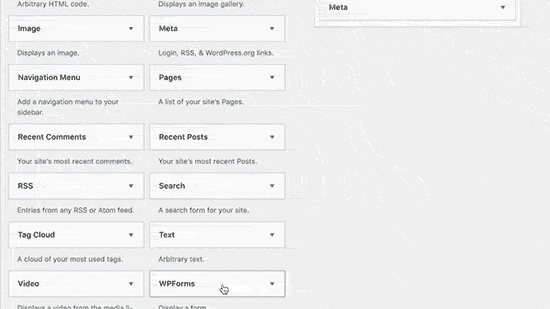
Method#1: Add the Form Using the Block Editor
Head over to whichever page you want to add your contact form and add a new WPForms block:
Then, select your newly created form using the dropdown menu:
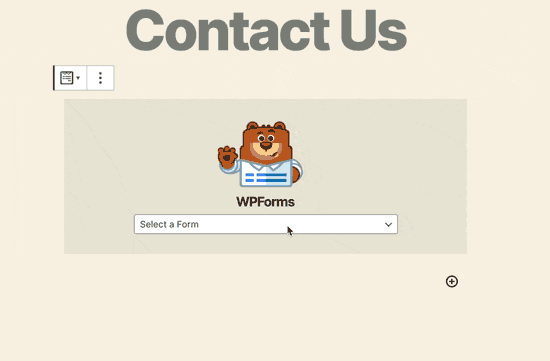
And you should see your contact form get inserted automatically into your page.
Just hit Save and Publish to see your WordPress form in action.
Method #2: Add Your Contact Form Using WPForms Shortcodes
WPForms also generates a shortcode for each WordPress contact form. You can copy the contact form shortcode by visiting WPForms » All Forms:
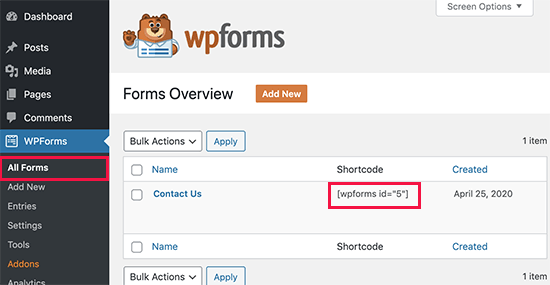
And then, paste the shortcode in any post or page you want. It’s that simple.
If you’re new to shortcodes, you should check out this article on how to add a shortcode on WordPress sites.
Method #3: Add Your Contact Form in the Sidebars
The sidebar is one of the most underused features in most WordPress sites. We highly recommend inserting a contact form in your site’s sidebars. Head over to Appearance » Widgets in your WordPress dashboard and add the WPForms widget to your sidebar:
Και τελειώσατε!
How to Track Your WordPress Form Conversions
Once you’re done creating your form and adding it to different pages, you should also set up a good way to track and measure conversions. We recommend using MonsterInsights to track your form analytics.

MonsterInsights is the #1 Google Analytics plugin and we love the software.
The plugin is super easy to set up and you can track your form conversion analytics using MonsterInsights reports:
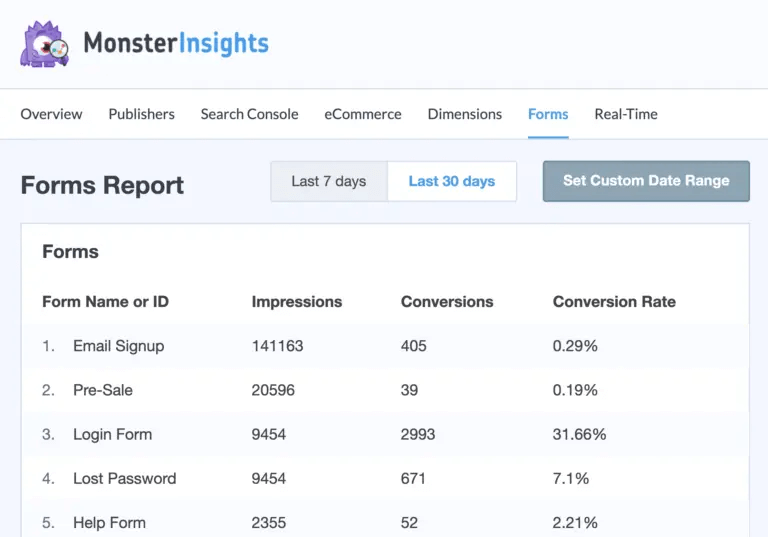
And it integrates seamlessly with WPForms.
Συνοψίζοντας
Αυτό ήταν για αυτό το θέμα, φίλοι!
By now, you’ve created your first WordPress contact form and set up conversion analytics for it.
Now, all that’s left is generating traffic to your site so that your contact forms can get to work. A simple way to do that is to start using push notifications. Sending push notifications is a great way to generate repeat traffic for your site. If that’s something you’re interested in, you should check out these articles as well:
- Κόστος Ειδοποιήσεων Push: Είναι Πραγματικά Δωρεάν; (Ανάλυση Τιμών)
- Πώς να αυξήσετε την επισκεψιμότητα στο WordPress Blog σας (9 εύκολοι τρόποι)
- Πώς να Αυξήσετε το Ποσοστό Συγκατάθεσης για Ειδοποιήσεις Push στο Web (7 Τρόποι)
We recommend using PushEngage to send your push notifications. PushEngage is the #1 push notification software in the world. So, if you haven’t already, get started with PushEngage today.


