
Looking for a way to enable a single-step optin on your site to collect push notification subscribers?
Push notifications can be a really great tool to generate engagement, repeat traffic, and sales. It’s also a very affordable marketing tool that’s perfect for growing small businesses.
But before you create send push notifications, you must first create an optin to collect a subscriber list from website visitors.
In this article, we’re going to set up a single-step optin for your site in less than 10 minutes. We’re going to use PushEngage for this article to show you how to get started with push notifications. PushEngage is the #1 push notifications software in the world. So, your campaigns will be in safe hands.
Ας ξεκινήσουμε.
How to Enable Push Single Step Opt-in On Your Site
IMPORTANT: Before you get started, there are a couple of quick things to take care of. To install a single-step optin for push notifications, you must have:
- An HTTPS Website (a website with an SSL certificate)
- Access to the root directory in your hosting service
All good? Let’s get started!
Βήμα #1: Ρυθμίστε τον Λογαριασμό σας PushEngage
Μεταβείτε στην αρχική σελίδα του PushEngage και κάντε κλικ στο κουμπί Έναρξη:

You can try out PushEngage for free. If you’re running a small blog that needs repeat traffic and engagement, that’s probably good enough. But if you’re serious about sales, you should get the Enterprise package and unlock the automated campaigns.
Μόλις εγγραφείτε στον λογαριασμό σας PushEngage, κατευθυνθείτε στον πίνακα ελέγχου PushEngage και πηγαίνετε στο Ρυθμίσεις Ιστοτόπου » Λεπτομέρειες Ιστοτόπου:

Here, you get to update the basic details of your site. You can set your logo, site name, and site URL. It’s really important to sort this stuff out right now so that you can test your entire setup later.
Step #2: Install PushEngage On Your Site
In the same tab, scroll down and click on the button that says Click Here For Setup Instruction:

Depending on the platform on which your site was built, the installation process will vary. Check out our installation guides to finish this process. If you’re using a CMS to build your site, most of the installation process will be done by the PushEngage plugin for that platform. For a custom site, you’ll need to download the Service Worker package.
After you click on the Click Here For Setup Instruction, click on Download Service Worker File:
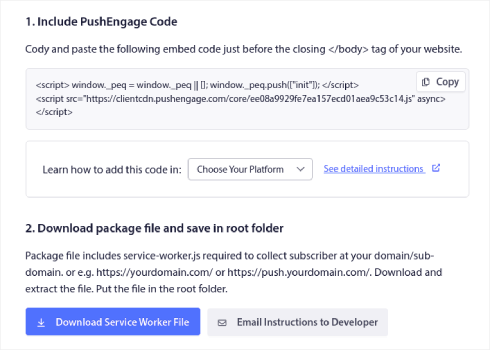
Then, upload the zip file to the root directory of your website in the public_html folder.
Once you have added the file here make sure it is accessible. Go to https://yoursite.com/service-worker.js and check if it’s a valid URL (replace yoursite.com with the URL to your site).
Here’s the PushEngage service-worker.js file URL for example: https://www.pushengage.com/service-worker.js.
Step #3: Create Your Single-Step Push Notification Optin
Στον πίνακα ελέγχου του PushEngage, μεταβείτε στο Σχεδίαση » Αναδυόμενα Παράθυρα για να δείτε τη λίστα με τους διαφορετικούς τύπους εγγραφής:
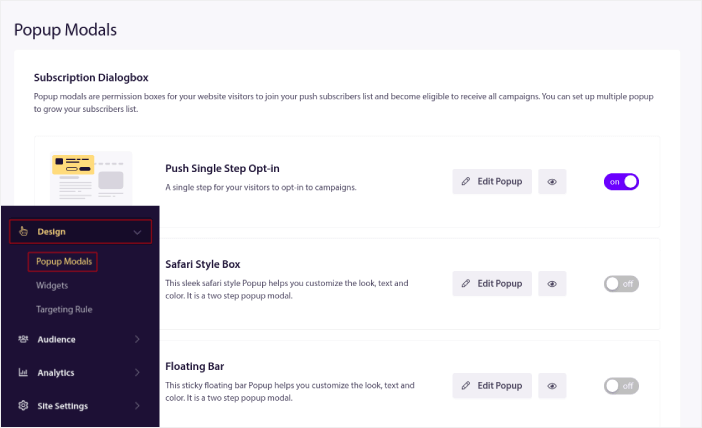
Από αυτήν τη λίστα, μεταβείτε στο Εγγραφή Ειδοποίησης Push Μιας Βήματος και κάντε κλικ στο διακόπτη για να ενεργοποιήσετε την εγγραφή:
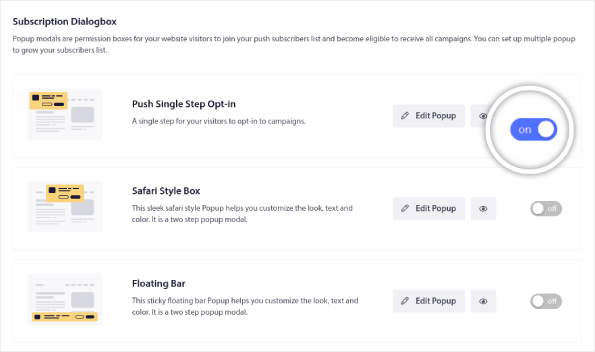
Στη συνέχεια, κάντε κλικ στο κουμπί Επεξεργασία Αναδυόμενου Παραθύρου για να προσαρμόσετε την εγγραφή:
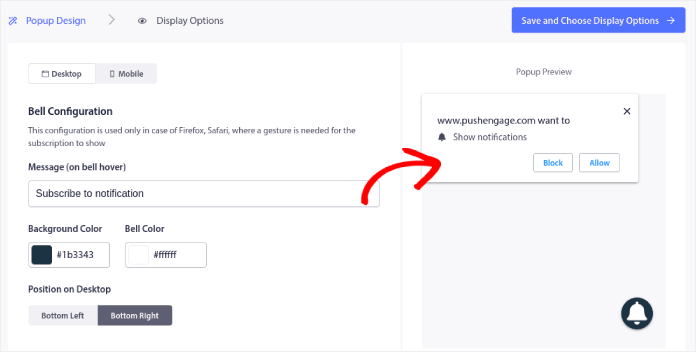
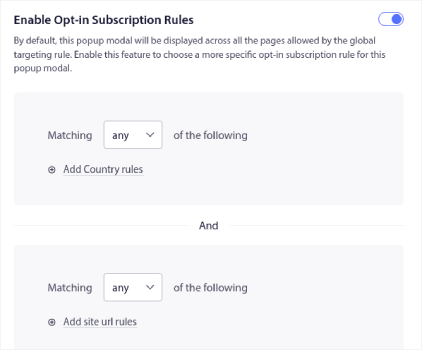
Μπορείτε επίσης να επιλέξετε πού θα εμφανίζεται το αναδυόμενο παράθυρό σας στον ιστότοπό σας. Κάντε κλικ στο Ενεργοποίηση Κανόνων Εγγραφής Ειδοποιήσεων:
Αν θέλετε η εγγραφή σας να είναι πραγματικά εμφανής, μπορείτε να χρησιμοποιήσετε μια επικάλυψη εγγραφής για να θολώσετε το υπόλοιπο του ιστότοπου μέχρι ο επισκέπτης σας να εγγραφεί στις ειδοποιήσεις σας ή να κλείσει το αναδυόμενο παράθυρο. Κάντε κλικ στο Ενεργοποίηση Επικάλυψης Εγγραφής:
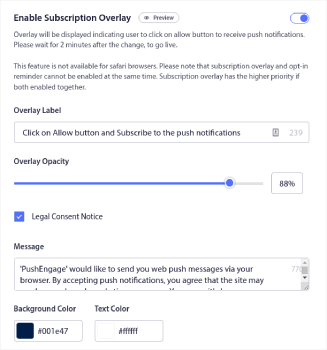
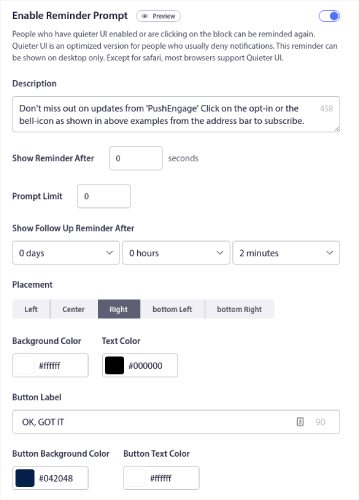
You can customize your overlay so that it fits your brand and looks awesome on your site. Finally, you can also enable reminder prompts for visitors who have QuieterUI mode activated on their browser:
When you’re done, click on Save and Choose Display Options.
Στις Επιλογές Εμφάνισης, μπορείτε να ρυθμίσετε πότε θα εμφανιστεί το optin σας αφού ένας επισκέπτης προσγειωθεί στον ιστότοπό σας:
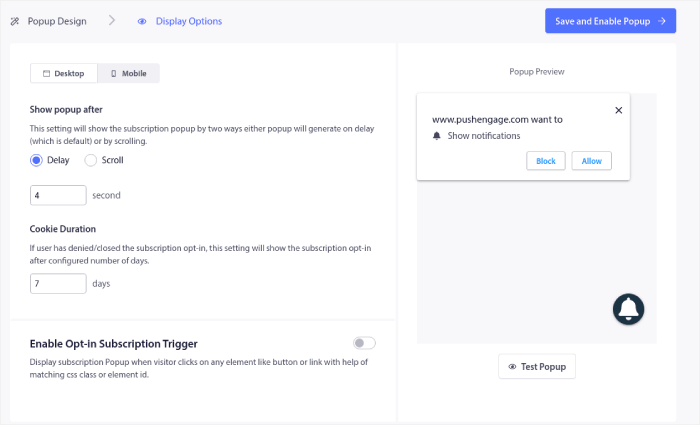
Μπορείτε να ορίσετε μια χρονική καθυστέρηση μετά την οποία θα εμφανιστεί το αναδυόμενο παράθυρο. Εναλλακτικά, μπορείτε να ρυθμίσετε το optin να εμφανίζεται αφού οι επισκέπτες του ιστότοπού σας κάνουν κύλιση σε ένα συγκεκριμένο ποσοστό της ιστοσελίδας.
Αν θέλετε να δημιουργήσετε ένα κουμπί κλικ για εγγραφή, μπορείτε επίσης να Ενεργοποιήσετε το Ερέθισμα Εγγραφής Optin. Όταν τελειώσετε, κάντε κλικ στο Αποθήκευση και Ενεργοποίηση Popup.
Και τελειώσατε!
Συνοψίζοντας
Αυτό ήταν για αυτό το θέμα, φίλοι!
Μόλις προσθέσατε μια ειδοποίηση push ενός βήματος στον ιστότοπό σας σε λιγότερο από 10 λεπτά!
Δείτε πώς να δημιουργήσετε αυτοματοποιημένες καμπάνιες ειδοποιήσεων push επίσης. Οι περισσότερες καμπάνιες push είναι απλές και αποτελεσματικές. Επομένως, συνιστούμε τη δημιουργία πολλαπλών καμπανιών για τον ιστότοπό σας. Ακολουθούν μερικές εξαιρετικές για να ξεκινήσετε:
- Πώς να στέλνετε αυτόματα ειδοποιήσεις push RSS
- Πώς να Ρυθμίσετε Ειδοποιήσεις Push Εγκατάλειψης Καλαθιού Χρησιμοποιώντας το GTM
- Πώς να Προγραμματίσετε Ειδοποιήσεις Push με τον Εύκολο Τρόπο [Οδηγός 5 Λεπτών]
Και αν δεν το έχετε κάνει ήδη, ξεκινήστε με το PushEngage. Το PushEngage είναι το λογισμικό ειδοποιήσεων push #1 στον κόσμο. Έτσι, οι καμπάνιες σας είναι σε ασφαλή χέρια.


