
Looking for a tutorial on how to create an expense approval form in WordPress?
An expense approval form is a superb tool to streamline and monitor company expenditures. But, you might wonder, how do you craft one? Is it worth designing an expense form from the ground up?
The straightforward scoop? Probably not. You can whip up a WordPress expense approval form with a form plugin in significantly less time than starting from zero. And if you’re no tech whiz, leaning on a plugin is will likely be much kinder on your wallet too.
But hold on! The plugin universe is vast. So, which one should you choose?
In this article, we’re going to show you step by step how to create your own expense approval form in WordPress. The best part? You’ll be done in 10 minutes and you don’t need to write a single line of code.
Ας ξεκινήσουμε.
Why You Need an Expense Approval Form in WordPress
Incorporating an expense approval form into your WordPress website streamlines the way you manage, monitor, and authorize company expenditures. It becomes an essential tool for maintaining financial discipline and transparency in your organization.
Το PushEngage είναι το #1 plugin ειδοποιήσεων push στον κόσμο. Κατεβάστε το δωρεάν!
Through a clear format like, “What’s the purpose of this expense?” or “Attach your expense receipt here”, you can maintain a consistent record of every penny spent. Expense forms can categorize expenses based on their nature like travel, supplies, or entertainment, ensuring clarity in documentation.
Often, expense approval forms also allow a section for notes or clarifications. This section provides valuable context to approvers, making sure there are no ambiguities when it’s decision time.
By routinely processing expenses through this system, you’re creating a clear financial trail. This periodic review ensures that expenses align with company policies and budgets. Plus, it’s a quick way to spot any irregularities or misuse.
The insights you gather can lead to tangible policy improvements. Over time, you might spot patterns – maybe your team frequently overspends in one area or there are recurrent unjustified expenses. This can guide policy updates or staff training.
To integrate an expense approval form into your WordPress platform, you can use specific plugins or incorporate forms from external finance tools. Ensure your form is straightforward, intuitive, and easily accessible to those who need it.
In essence, expense approval forms in WordPress help synchronize company spending with financial guidelines, ensuring budget adherence and fiscal responsibility.
How to Create an Expense Approval Form in WordPress
Now that you know why you should be creating your expense approval form, it’s time to start building one for your site. To create your expense approval form, we’re going to use a super popular form builder plugin for WordPress called WPForms.
Ας ξεκινήσουμε.
Βήμα #1: Δημιουργία Νέας Φόρμας WordPress
Το πρώτο πράγμα που θα χρειαστεί να κάνετε είναι να εγκαταστήσετε και να ενεργοποιήσετε το WPForms.

Το WPForms είναι το #1 plugin δημιουργίας φορμών WordPress στον κόσμο. Αν δεν είστε σίγουροι πώς να εγκαταστήσετε το WPForms, θα πρέπει να δείτε αυτόν τον οδηγό βήμα προς βήμα για το πώς να εγκαταστήσετε ένα plugin στο WordPress.
Στη συνέχεια, μεταβείτε στον πίνακα ελέγχου του WPForms και πηγαίνετε στο Λήψεις για να λάβετε το plugin σας:
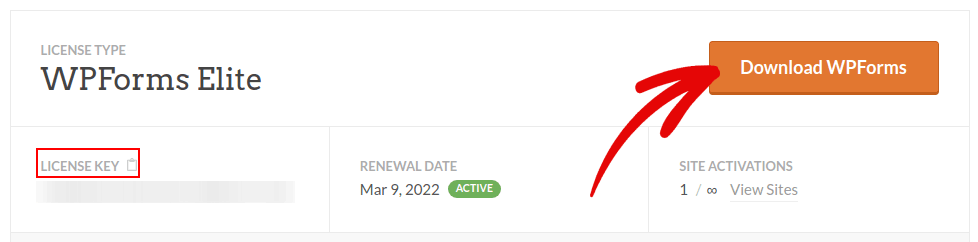
Στη συνέχεια, εγκαταστήστε και ενεργοποιήστε το plugin στον ιστότοπό σας. Και αντιγράψτε το κλειδί άδειας χρήσης σας στην ίδια καρτέλα.
Τέλος, μεταβείτε στον πίνακα ελέγχου του WordPress και πηγαίνετε στο WPForms » Ρυθμίσεις και επικολλήστε το Κλειδί Άδειας Χρήσης σας:
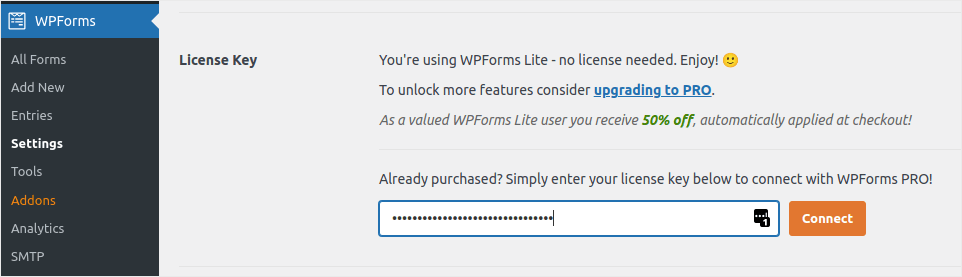
Όταν τελειώσετε, κάντε κλικ στο Σύνδεση.
Step #2: Add the Right WPForms Addons
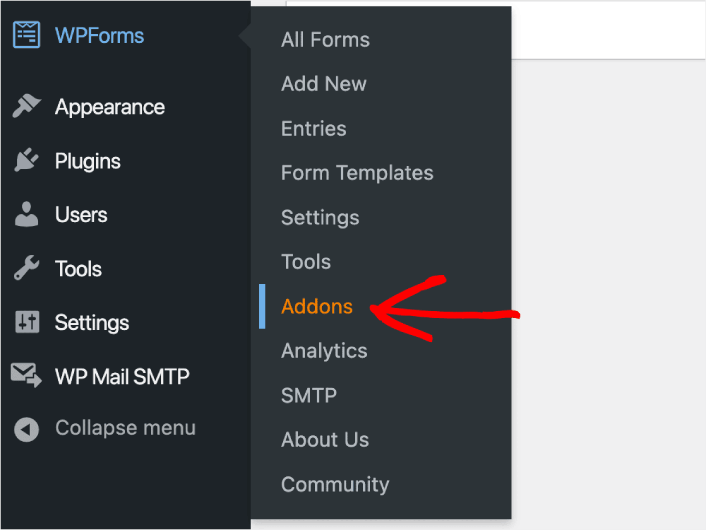
Από τον πίνακα ελέγχου του WordPress, μεταβείτε στο WPForms » Πρόσθετα.
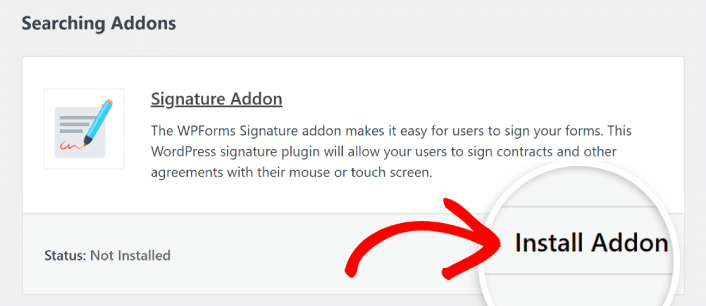
Now, search for the Save and Resume Addon by typing its name in the Search Addons field. Next, click on Install Addon.
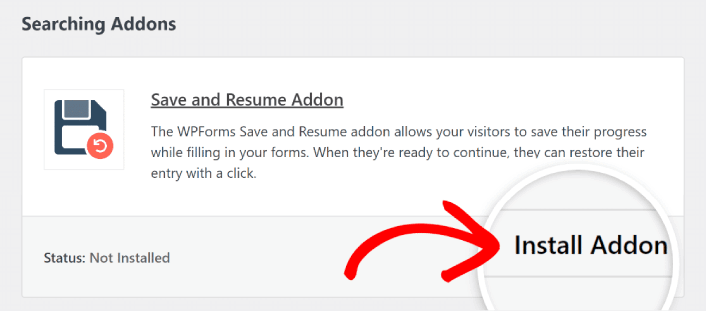
After the addon has been installed successfully, press the same button again to Activate it. And do the same thing for the Signature Addon.
Τώρα που το WPForms είναι εγκατεστημένο και ενεργοποιημένο, είναι ώρα να δημιουργήσετε την πρώτη σας φόρμα. Μεταβείτε στο WPForms » Προσθήκη Νέας:

Αυτό θα ανοίξει τον κατασκευαστή φορμών drag and drop του WPForms.
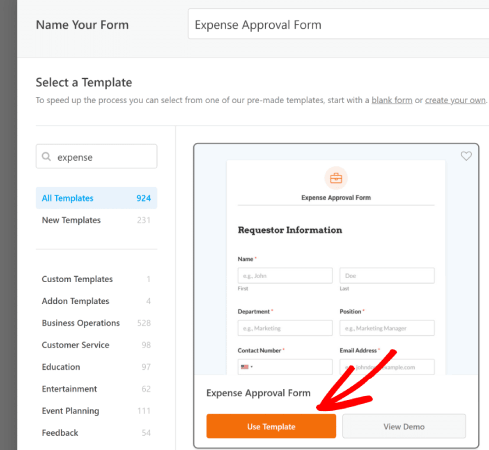
Step #3: Select Expense Approval Form Template
Για να δημιουργήσετε μια νέα φόρμα, δώστε της ένα όνομα και επιλέξτε το πρότυπο φόρμας σας:
Με το WPForms, παίρνετε έναν τόνο προ-σχεδιασμένων προτύπων φορμών που μπορείτε απλά να εισαγάγετε με ένα κλικ και στη συνέχεια να προσαρμόσετε όπως θέλετε. Για μια πιο κοντινή ματιά στην πλήρη λίστα χαρακτηριστικών, θα πρέπει να δείτε την κριτική μας για το WPForms.
Step #4: Customize Your Expense Form
Στη συνέχεια, θα μεταφερθείτε στον κατασκευαστή φορμών με το πρότυπό σας φορτωμένο.
Μπορείτε να χρησιμοποιήσετε το πρότυπο απευθείας για να συλλέξετε σχόλια από τους πελάτες σας. Αλλά είστε ελεύθεροι να κάνετε αλλαγές σε αυτό το πρότυπο αν θέλετε να προσθέσετε επιπλέον πεδία για να συλλέξετε περισσότερες λεπτομέρειες και πληροφορίες από τους πελάτες σας.
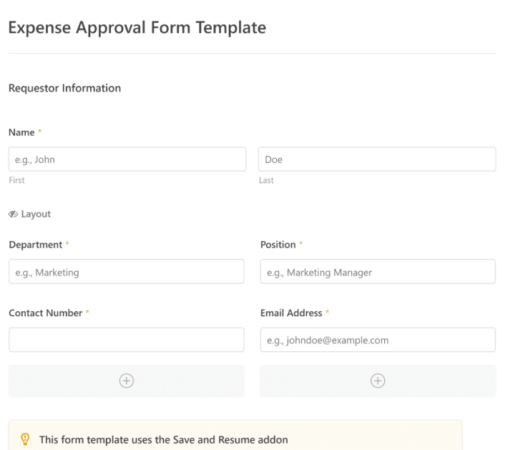
You’ll notice that this template is built with fields that automate capturing the requestor’s information, expense details, and approval via Signature.
If required, you can use WPForms’ intuitive form builder to easily add, modify, and arrange fields to tailor the form to your liking.
Μπορείτε επίσης να κάνετε τις φόρμες να φαίνονται υπέροχες ακολουθώντας τα βήματα στην ανάρτησή μας για το πώς να δημιουργήσετε μια φόρμα πολλαπλών βημάτων στο WordPress. Είναι ένας εξαιρετικός τρόπος για να βελτιώσετε την εμπειρία χρήστη και να μειώσετε τα ποσοστά εγκατάλειψης καλαθιού. Αλλά θα μείνουμε σε μία σελίδα για αυτό το σεμινάριο.
Step #4: Enable Save and Resume Settings
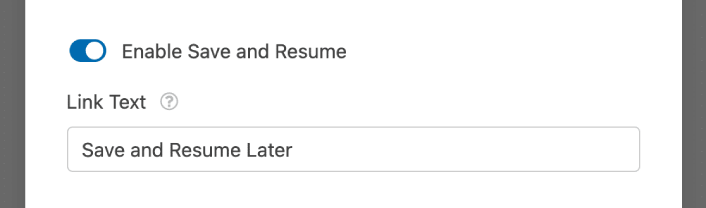
First, you’ll want to add the Save and Resume feature to your expense approval form. Go to Settings » Save and Resume from the form builder. To turn on save and resume functionality, toggle on the Enable Save and Resume option.
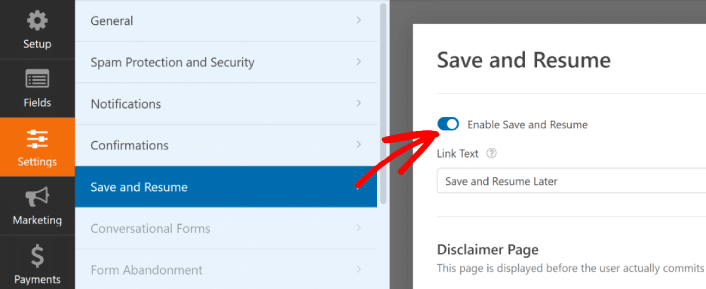
To begin, you can personalize the wording on the link that users will click to save their progress in your form.
You can change the text in the supplied field. By default, it says Save and Resume Later, but you can change it to anything you like.
This link will show up at the bottom of your form, next to the button labeled Submit.
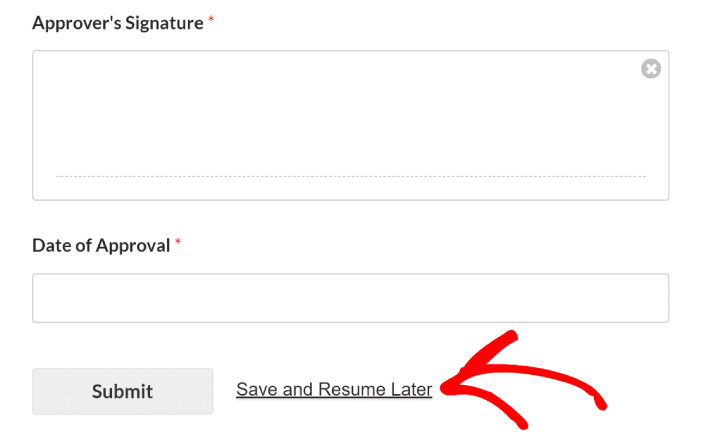
NOTE: The resume URLs will stop working after 30 days. So, make sure to add a disclaimer on your form that mentions this fact.
Step #5: Configure Your WordPress Expense Approval Form Settings
Στη συνέχεια, θα θέλετε να ρυθμίσετε τις ειδοποιήσεις και τις επιβεβαιώσεις.
Οι ειδοποιήσεις είναι email που λαμβάνετε όταν κάποιος συμπληρώνει τη φόρμα. Οι επιβεβαιώσεις προορίζονται να ειδοποιήσουν τον χρήστη ότι έχει συμπληρώσει επιτυχώς τη φόρμα. Συνήθως, αυτό είναι ένα μήνυμα "Ευχαριστούμε", αλλά μπορείτε επίσης να ανακατευθύνετε τους χρήστες σας σε μια ειδική σελίδα.
Μεταβείτε στις Ρυθμίσεις » Επιβεβαιώσεις για να διαμορφώσετε τις ρυθμίσεις επιβεβαίωσης:

Και στη συνέχεια στο ίδιο μενού, μεταβείτε στις Ειδοποιήσεις για να διαμορφώσετε τα μηνύματα ειδοποίησης:

Εξ ορισμού, οι ειδοποιήσεις αποστέλλονται στο email διαχειριστή του WordPress. Έτσι, αν θέλετε τα email να αποστέλλονται κάπου αλλού, όπως στο email του Επικεφαλής Πωλήσεών σας, μπορείτε να το κάνετε ακριβώς εδώ.
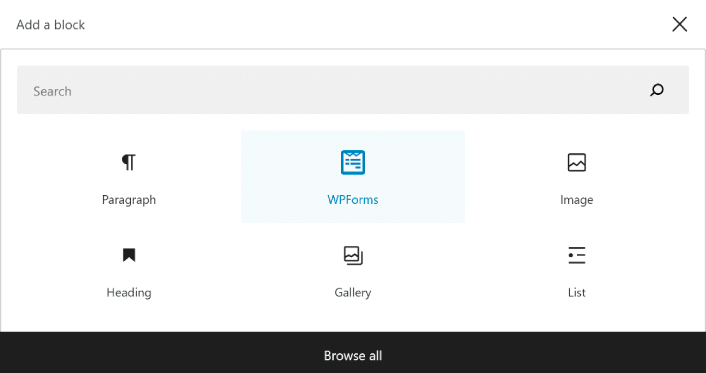
Step #6: Add the Expense Approval Form to Your Site
You can add the expense approval form on your site using the WPForms Gutenberg block:
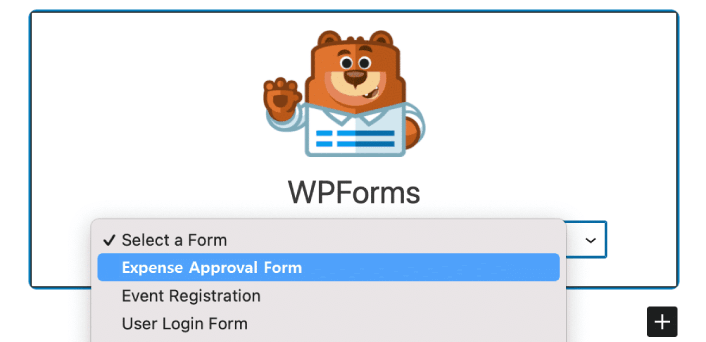
All you need to do is select your expense approval form.
If you’re satisfied with the way your form looks, hit the Update or Publish button, and your form will go live.

Και τελειώσατε!
How to Promote Your Expense Approval Form
Αυτό ήταν για αυτό το θέμα, φίλοι!
By now, you’ve learned how to create expense approval form in WordPress. Next, you should set up form abandonment tracking to reduce your form abandonment rates.
Μετά από αυτό, το μόνο που απομένει είναι η δημιουργία κίνησης στον ιστότοπό σας, ώστε η φόρμα σας να αρχίσει να λειτουργεί και να αρχίσει να μετατρέπει. Ένας απλός τρόπος για να το κάνετε αυτό είναι να αρχίσετε να χρησιμοποιείτε ειδοποιήσεις push. Η αποστολή ειδοποιήσεων push είναι ένας εξαιρετικός τρόπος για να δημιουργήσετε επαναλαμβανόμενη κίνηση στον ιστότοπό σας. Αν αυτό είναι κάτι που σας ενδιαφέρει, θα πρέπει επίσης να δείτε αυτά τα άρθρα:
- Κόστος Ειδοποιήσεων Push: Είναι Πραγματικά Δωρεάν; (Ανάλυση Τιμών)
- Πώς να αυξήσετε την επισκεψιμότητα στο WordPress Blog σας (9 εύκολοι τρόποι)
- Πώς να Αυξήσετε το Ποσοστό Συγκατάθεσης για Ειδοποιήσεις Push στο Web (7 Τρόποι)
- Πώς να προσθέσετε ένα πρόσθετο WordPress για ειδοποιήσεις ιστού στον ιστότοπό σας
Συνιστούμε τη χρήση του PushEngage για την αποστολή των ειδοποιήσεων push σας. Το PushEngage είναι το #1 λογισμικό ειδοποιήσεων push στον κόσμο. Έτσι, αν δεν το έχετε κάνει ήδη, ξεκινήστε με το PushEngage σήμερα.


