
Γεια σας, Engagelings.
Exciting news: We just added Attributes and Subscriber Fields to the PushEngage dashboard.
Attributes and Subscriber Fields have always been part of the PushEngage API. But with this new update, you can create and manage both right from the dashboard.
In simple terms, we made it so that your developer can set up Attributes and Subscriber Fields to collect and tag data as a one-time exercise. After that, your marketing team can create compelling push notifications from the dashboard without needing any help from the developers!
Ας ξεκινήσουμε.
Why Should You Care About Attributes and Subscriber Fields?
Before we dive into why you need to know about Attributes and Subscriber Fields, let’s take a quick look at what they are and why they matter in the first place.
PushEngage only captures 3 pieces of data from your subscribers:
- Την τοποθεσία τους
- The browser
- The device type
And this is what makes PushEngage GDPR compliant. The software doesn’t capture any identifying data.
But of course, the PushEngage API is super flexible and you can store identifying data for your subscribers using custom code. You can hook the PushEngage API to your CRM or a contact form and keep track of what notifications you’re sending to exactly which subscriber.
That’s exactly why you should care about Attributes and Subscriber Fields.
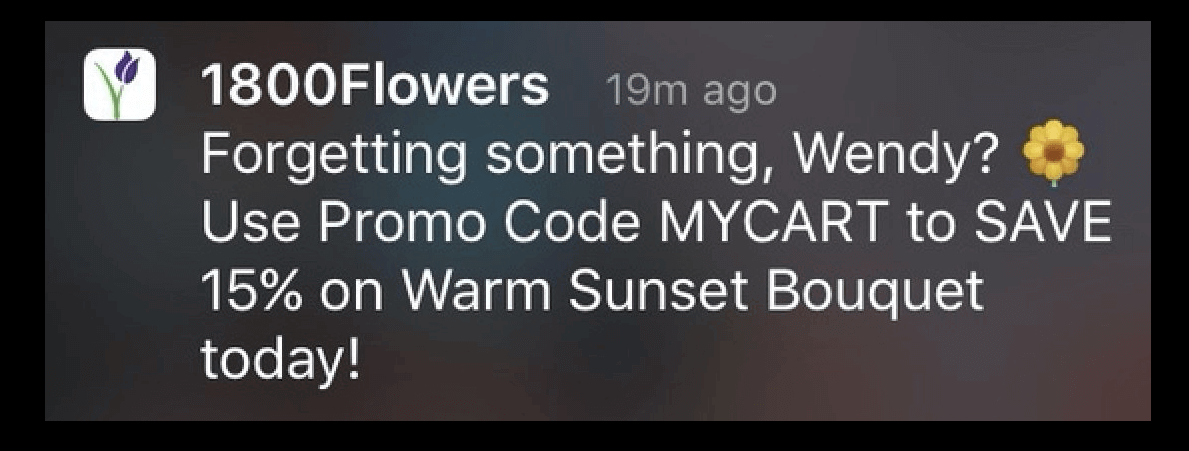
Subscriber Fields are the default fields available for every subscriber. Subscriber Fields help store additional information about subscribers, such as email, first name, and more. You can design personalized campaigns for your subscribers using the basic personal information of that subscriber.
For example, this push notification uses the subscriber’s name (Wendy) to send a personalized notification:
And you can add data to Subscriber Fields using the PushEngage Identifying Subscribers API to use in your campaigns.
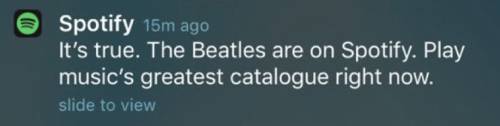
Attributes are used to store additional information about your subscribers. Any data you can use to create behavioral, cultural, occasional, and psychographic segments can be stored as subscriber attributes.
For example, you can create an attribute called ‘payment_expiry_date‘ to store the payment expiry date of your subscribers, and send a reminder campaign before the expiry date.
Or, if you’re tracking content preferences in your subscribers, you can send personalized content recommendations like Spotify does:
And again, you can set this up using the PushEngage Attributes API.
Using Attributes and Subscriber Fields will get you higher click rates and more conversions at a scale you simply can’t achieve with one-on-one messaging or even a general push notification broadcast.
But all these options have existed for a long time. So, exactly what did we change?
What Exactly is the Change?
Previously, you had to do all this from the API exclusively, which meant that only your developer or development team could manage Subscriber Fields and Attributes. Now, if you head over to your PushEngage account and go to Audience » Attributes, you can manage both data types right from the PushEngage dashboard:
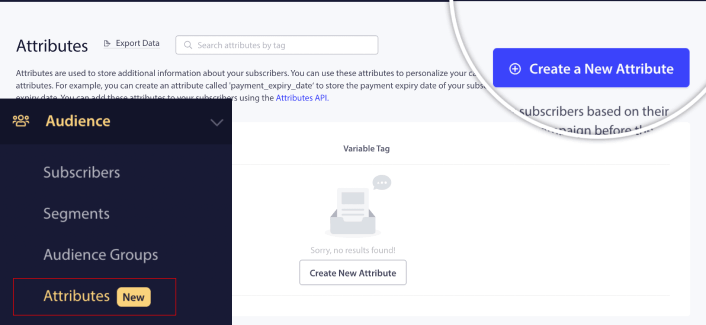
Here, you can add a new Attribute fairly quickly.
IMPORTANT: You will still have to use the APIs to add data to your Attributes and Subscriber Fields. The dashboard only allows you to add and manage Attributes visually.
Once you create an Attribute, you can use it in your push notifications to send dynamic, personalized notifications. For example, I just created an Attribute that maps our preferred social media channels for each subscriber.

Now, I can use this attribute in any push notification I send. Let’s say that we do a live-streaming event across multiple social media channels. To get the most viewership, I can ask our subscribers to sign up for the event on their favorite social media channel:
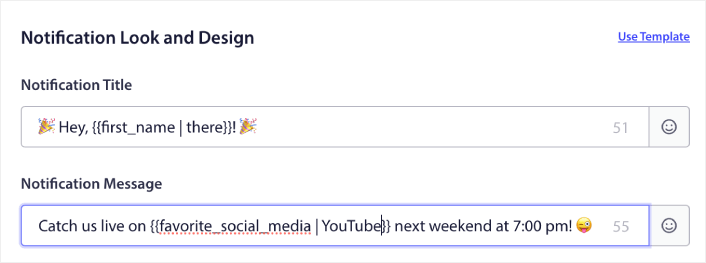
That notification dynamically swaps out the variable for the first name with the actual first name and the favorite social media with the actual channel name. And if that data isn’t available for that subscriber, the fallback option will create a notification that says “Hey, there!” instead of using the first name and “YouTube” instead of using the favorite social media channel.
But that’s not all!
You can even create a Custom Audience using these Attributes. So, if I wanted to send a different signup link or event link for different social media channels, I could do that by creating multiple versions of the same notification and changing the Notification URL.
Simply go to the Audience tab of the notification and select the right attribute.
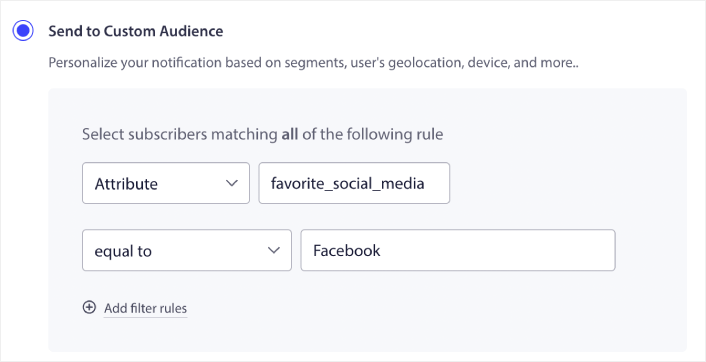
And then you can simply duplicate the notification and change the URL and value for the attribute to target specific users.
Τι άλλο;
Γνωρίζουμε ότι η ανάπτυξη μιας επιχείρησης είναι σκληρή δουλειά. Στην PushEngage, αναζητούμε πάντα να βελτιώνουμε το προϊόν μας και την εμπειρία σας. Λανσάραμε αυτήν τη νέα λειτουργία για να σας βοηθήσουμε να αντλήσετε ακόμη μεγαλύτερη αξία από τη συνδρομή σας στην PushEngage.
Now, you can have your developers set up Attributes and Subscriber Fields once to collect and tag the data, and then have your marketing team send powerful push notifications without needing the developers every time a new campaign needs to go out.
Σας ευχαριστούμε πολύ που διαβάσατε αυτήν την ανακοίνωση.
Εάν έχετε οποιεσδήποτε ερωτήσεις, η ομάδα Εξυπηρέτησης Πελατών μας είναι εδώ για να βοηθήσει. Απλώς ξεκινήστε μια συνομιλία στο Live Chat ή ελέγξτε τη σελίδα επικοινωνίας μας.
Και σας ευχαριστούμε που χρησιμοποιείτε την PushEngage. Είτε χρησιμοποιείτε τη δωρεάν έκδοση είτε την έκδοση Enterprise, είστε εξίσου σημαντικοί για εμάς. Τα νέα πρότυπα έχουν σχεδιαστεί για να σας βοηθήσουν να πετύχετε και σας ευχόμαστε τα καλύτερα.
Ενημερώστε μας για τις σκέψεις σας στα παρακάτω σχόλια και αν δεν το έχετε κάνει ήδη, ξεκινήστε με την PushEngage σήμερα!


