Looking for ways to automatically segment push subscribers?
Targeted push notifications lead to higher click-through rates and lower unsubscribe rates. Segmentation allows you to offer a custom experience to your web push subscribers. With most push notification services and tools, you need custom code to create segments.
But what if you don’t have a development team that can take on custom code for your web push campaigns? The good news is that there is push notification software that doesn’t require you to code at all. And you can create powerful segments very easily.
In this article, we will show you the different ways to automatically segment subscribers in web push notifications. And we’ll create each segment in 5 minutes or less!
Sounds good? Let’s dive in.
Different Ways to Segment Push Subscribers
Segments are a really great way to send targeted push campaigns. And it should be a big part of your push notification marketing strategy. But how do you get started? What kinds of segments should you be creating?
For starters, you shouldn’t be focused on creating only one type of segment. We’re going to walk you through the different types of segmentation that we’ve found to be the most impactful.
But before you start, you need to pick a push notification service. A push notification software allows you to create and send push campiagns without any coding.
We recommend using PushEngage.

PushEngage helps you grow your website traffic and engagement on autopilot. And if you’re running an online store, PushEngage also helps you grow your sales by helping you create automated eCommerce push notifications.
You can get started for free, but if you’re serious about growing your business, you should buy a paid plan.
Here’s what you can get from a paid plan:
- High-converting campaigns including Drip Autoresponders, Cart Abandonment Campaigns, Price Drop Alerts, and Inventory Alerts
- Higher subscriber limits so that you can keep growing your push notification subscriber lists seamlessly
- Higher sending limits so that you can send more push notifications across different campaigns as your business grows
- More ways to target campaigns, including Customer Timezone Sending, Custom Triggered Campaigns, and Personalized Smart Tags
- Goal tracking and advanced analytics to always keep improving the ROI on your push notifications
- Split testing which allows you to test your copy, images, or display rules to see which converts the best
- A Dedicated Success Manager to help you with Success Scripts, Behavior Automation, and Follow Up Campaigns
And these features are built to help small businesses grow. Take a look at the case studies and you’ll know how all kinds of businesses have enjoyed a lot of success from PushEngage’s push notifications.
You’ll see that PushEngage is hands down the best bet if you want to build traffic, engagement, and sales for your business. And if you’re on a budget, you can always get a little bit creative with your push notifications.
Check out our full review of PushEngage or dive right into creating segments.
#1. Geographic Segmentation
Geographic segmentation is the act of using your subscribers’ location to send personalized campaigns. PushEngage stores the geographic location of your push subscribers. You can segment push notification subscribers based on their Country, State, and City.
In the PushEngage dashboard, you can see the countries where your subscribers are located under Demographic Overview.
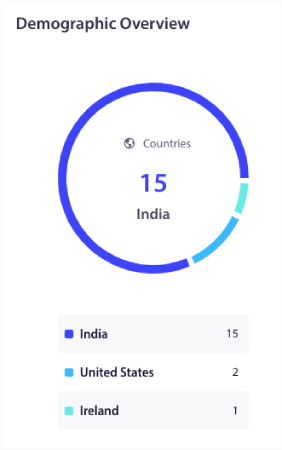
You can use this list of countries to create geographic segments. Geographic segmentation allows you to:
- Send push campaigns in your subscribers’ timezones for better engagement
- Run local offers that are only relevant to that customer segment for higher conversion rates
- Create campaigns in local languages for higher click rates
The best part is that you don’t even have to create a segment in PushEngage. Whenever you create a new campaign, go to Audience tab and select the countries you want to target under Send to Custom Audience.
Let’s say you want to send a push broadcast. Go to the PushEngage dashboard and head over to Campaign » Push Broadcasts and click on the Create New Push Broadcast button:

Then, create your push notification:

Go to the Audience tab and scroll down to Send to Custom Audience. Finally, set the targeting rule to Country and select the countries that you want to target:
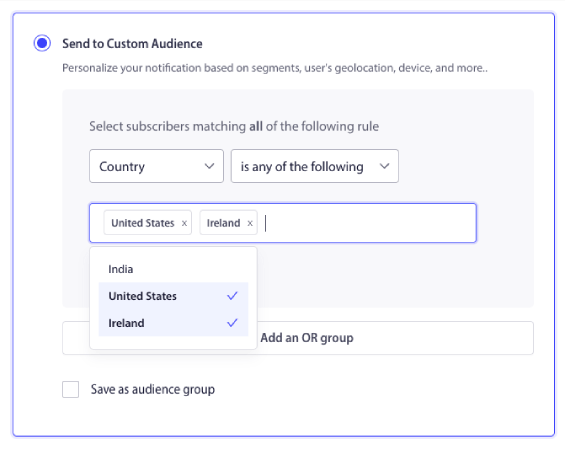
PushEngage only lists out countries where you have subscribers. So, it’s super simple to retarget your subscribers by geolocation.
#2. Demographic Segmentation
Demographic segmentation is the idea of segmenting your subscribers by data points that create an identity for your subscribers. This includes various data including age, location, socioeconomic background, and race.
Of course, you can’t store such data for web push by default. PushEngage is built to be GDPR compliant. So, you can’t store most demographic data without using a Customer Relationship Management (CRM) software.
But you can store the browser and device for all your web push subscribers.
Again, you can head into your PushEngage dashboard and check the demographic data on your subscribers.

You can use this data to create demographic segments based on the browser and device that your subscribers are using. Whenever you send a push broadcast or a campaign, simply scroll down to Send to Custom Audience and add the targeting rules.
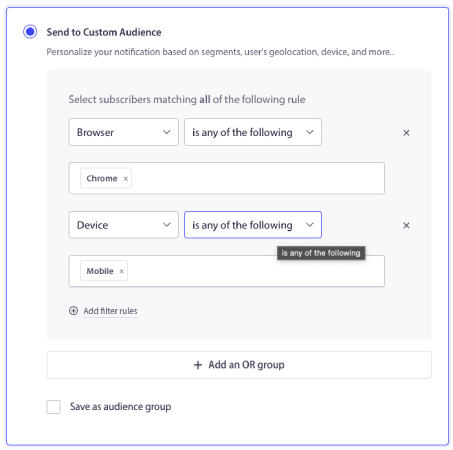
As with geographic segmentation, you don’t need to create a new segment to target audience demographics. These are all default segments.
#3. Behavioral Segmentation
Behavioral segmentation is the act of creating subscriber segments based on the actions they take. For web push, segmenting your subscribers by behavior is super easy. Head over to Audience » Segments and click on Create a New Segment:
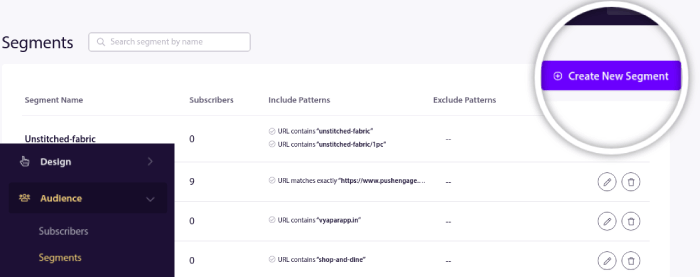
And create a rule that segments your subscribers automatically based on the URLs they’re browsing:
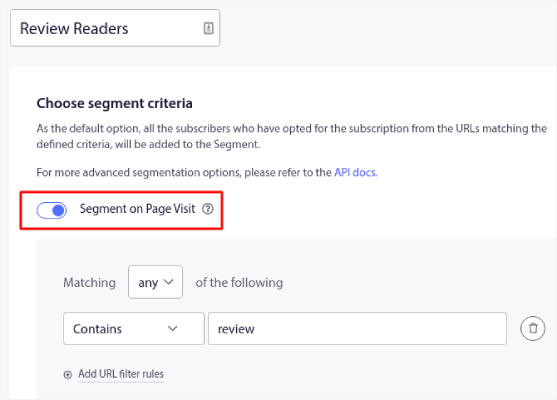
In the example, we created a segment called “Sample Segment” that segments subscribers automatically when they visit URLs on your site with the word “examples” in it. You can pretty much use any keyword you like here.
When you’re happy with the rule, click on Create.
You can also segment web push subscribers using an API call. This segmentation method is the most flexible and allows you to add segments based on any actions on your site. Check out the PushEngage API to create custom segments.
#4. Psychographic Segmentation
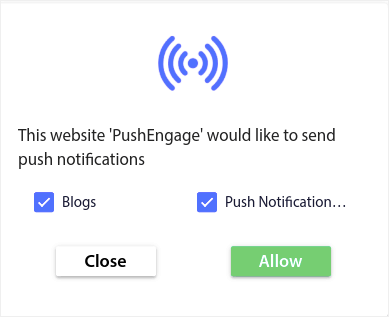
You can also segment your subscribers when they subscribe for push notifications by customizing your push notification opt-in.
This is a type of user preference-based segmentation that you can do using PushEngage. You can also call this a User-Driven Segmentation. Here, the subscriber gets to choose one of the two choices they are provided:
Here’s how it works:
- When any user subscribes PushEngage gets the subscription device ID, Geolocation, and device type
- In this case, PushEngage also collects the user’s preference at the time of subscription, and stores it in a Custom Segment
Let’s get this up and running, now.
The first part is the same as the previous method. You head over to Segmentation and click on Create a New Segment.
NOTE: Don’t click on Segment on Page Visit for this type of segmentation.
After creating the segments go to Design » Popup Modals and create a new Large Safari Style with Segment optin:
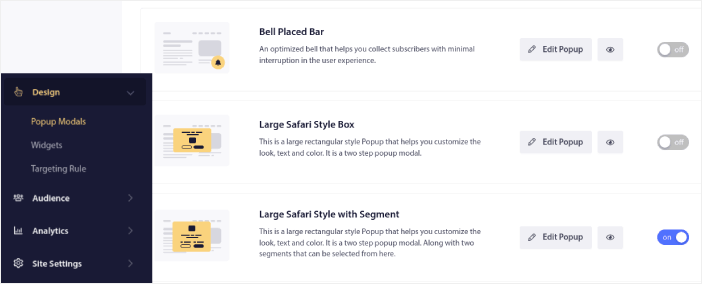
Click on Edit Popup and under the Popup Design tab, design your optin:
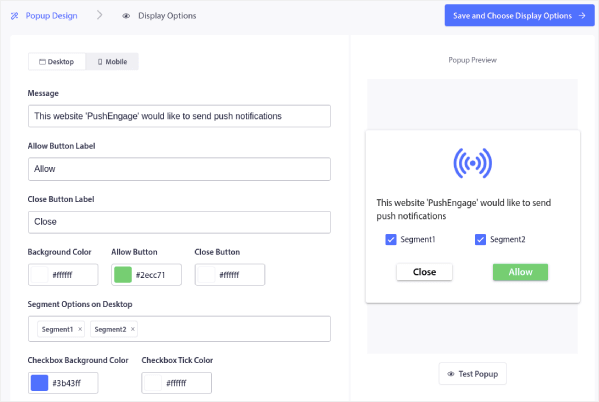
You can customize pretty much everything about your optin here starting from the copy to having your brand colors on the optin. In the Segment Options on Desktop field, you can select the segments you want your visitors to subscribe to.
The beauty of this optin is that the same subscriber can choose to subscribe to multiple segments right from the popup.
Scroll down to Enable Opt-in Subscription Rules and you can configure when you want your push notification optin to show up.

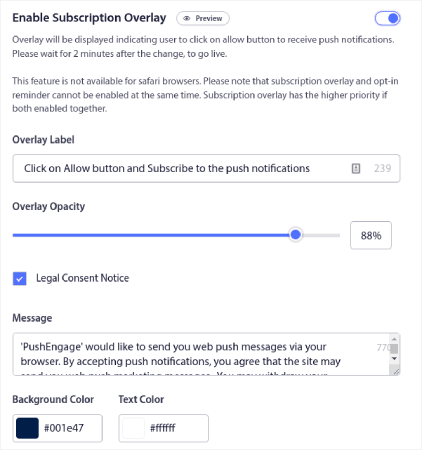
You can also create a Subscription Overlay with a Legal Consent Notice:
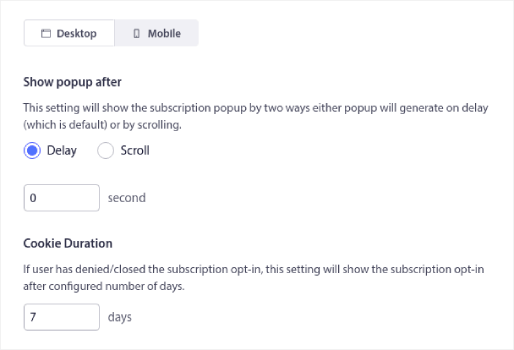
When you’re done, click the Save and Choose Display Options button. There, you can set up when the optin shows up by creating a delay after a visitor lands on a targeted page.
When you’re done just hit the Save and Enable Popup:

#5. Cultural Segmentation
Cultural segmentation segments users on the basis of mindset and shared values. Cultural segmentation flows directly from your overall marketing strategy. A simple way to look at it is a list of interests that would be genuinely helpful to your audience.
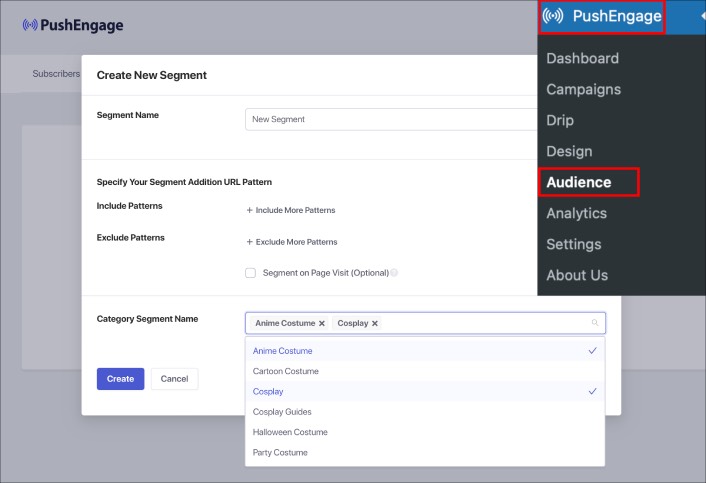
If you’re running a WordPress site, you can use the PushEngage WordPress plugin to create cultural segments based on the content categories on your site.
Go to PushEngage » Audience » Segments and click the Create New Segment button. Then, go to Category Segment Name and select the content categories you want to club into a single segment.
By clubbing interests, you can segment your subscribers according to their mindsets. The difference between psychographic segmentation and cultural segmentation is that psychographic data comes directly from the choices that your subscribers make. A cultural segment comes from what YOU believe would also be interesting to your audience.
Mostly, psychographic and cultural segments are quite related and complement each other really well.
#6. Occasional Segmentation
An occasional segment is a segment of seasonal customers. For instance, let’s say someone subscribed to your push campaigns during Black Friday. You can retarget these subscribers by creating an occasional segment. It’s pretty easy to set up as well.
Once you’re done creating your broadcast or campaign, go to the Audience tab and scroll down to Send to Custom Audience. Select the Subscription Date filter to target your subscribers based on when they subscribed.
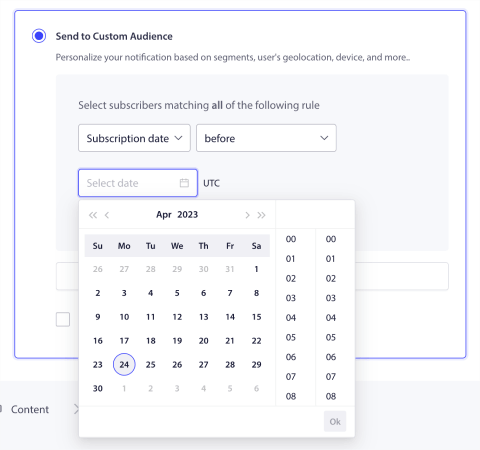
An occasional segment is a cool way to upsell or cross-sell to existing customers. You can also use it to retarget new subscribers and get them to buy something while they are super engaged.
Remember that you can actually save this custom audience if you’re going to send notifications to this audience group frequently.

The next time you need to send campaigns to this audience, you can select it from a list of your saved Audience Groups.
Bonus Tip: Use Audience Groups to Combine Multiple Segments
You might end up wanting to target specific attributes across multiple segments. That’s where an Audience Group comes in. An Audience Group is a group of subscribers that fit specific conditions across multiple segments.
Segments in your push notification subscriber lists are based primarily on your subscriber’s interests and browsing behavior. However, with Audience Groups, you can take that several steps further.
With Audience Groups, you can filter your subscribers by:
- Interests and Behavior
- Browsers and Devices
- Geolocation
- Engagement Metrics
- Identifiers
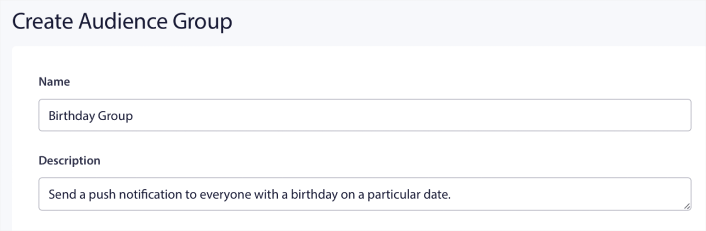
To get started, head over to your PushEngage dashboard and go to Audience » Audience Groups and click the Create New Audience Group button:

Before you can use your Audience Groups to send targeted push broadcasts, you’ll need to create an Audience Group with rules to create that group. You can start with a name and description for your Audience Group.
Next, create a selection criteria to filter and target the right audience:
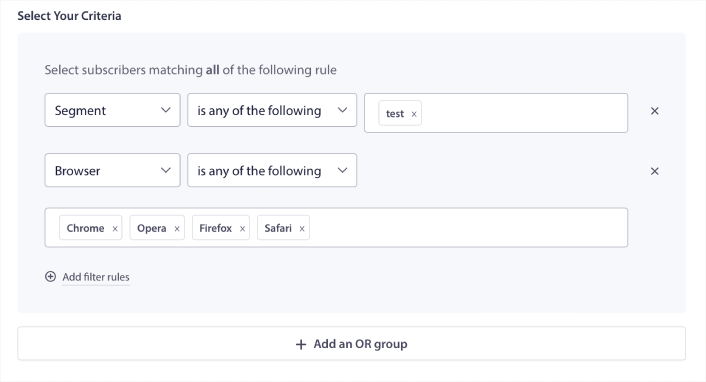
You can click Add filter rules to select subscribers who match ALL the filter rules or, you can click Add an OR group to create a filter where the subscribers meet at least one of the selection criteria.
You should check out the filtering options for Audience Groups to send even more targeted campaigns.
What to Do After You Create Segments for Your Site
Now that you know how to create different types of segments for your push campaigns, it’s time to get started with creating campaigns.
We also suggest that you take some time to read our articles and learn how to supercharge your automated push notifications. Start with our article on push notification best practices.
If you’re new to push notifications, you should follow a full-blown push notification testing process before you go live. It’ll help you troubleshoot common issues before your visitors see them and start complaining about a broken user experience.
And most definitely you should set up Google Analytics to track push notifications.
Retargeting push notifications to target the subscribers who clicked on them or didn’t. Let us know how that works for you. In the meantime, check out these resources:
- How to Boost Clicks on Your Push Notifications With Curiosity
- How to Personalize Each Push Notification
- How to Stand Out With Rich Media in Your Push Notifications
- How to Reactivate Dormant Push Subscribers
- How to Use Push Notifications to Keep Customers Informed
- How to Use Emojis in Your Push Notifications for Higher Click Rates
- How to Increase Conversions by Creating a Sense of Urgency
And if you haven’t already, get started with PushEngage.


This is interesting.
can I connect with our API and get users information while we sending mails?
If we mail to 100 users, the same users should get the notification.
Sure, if you use the addProfile API you can enrich the profile information for each subscriber with a email id. Later while sending using API you can send to those email ids with REST API call.
Thanks. How to segment on a site like Wordprss
Use Auto Url segmentation.
It works for me
Wow this is really great… Nice write up?.
Commenting from
On a website we have several doctors as subscribers with login to manage their booking calendars. And of course there is the general public (existing + potential patients). For the doctors we would like to send them a push message whenever someone books an appointment on their specific calendar. Can this be done? (We would like the doctors to be able to quickly see an appointment request and quickly confirm/reject the appointment.)
Hi, Tomas. That’s a really interesting question. I think our Customer Success team can help you find a more qualified answer. I’d recommend getting in touch with them instead.